Search
Ctrl+K
Tenants


On this page
Documentation for the Admin view of Shuffle. Best used by administrators. Previously called Organizations, now standardised to Tenants.
Introduction
Tenants are Shuffle's way of organizing data, and can be thought of as tenants. Data from Apps, Workflows, Notifications, Files etc. are all related to an tenant from which users gain access based on their access rights. This document is made to explain what the different options for tenants are.
Tenant overview
The tenant overview gives access to these things:
- Name Change
- Description Change
- Image change
- Cloud synchronization
- App runs management for sub-tenants
- Hybrid Feature overview
- Single Signon options
- Notification Workflows
- Priorities & Notifications
- Licensing
- Statistics
- Branding
This view outlines the basic details of your tenants, which any Admin can change at any time. It can tell you about new updates, features and more that we have in store. The view is slightly different from the cloud version to the on-premises version. Here's how:
- The cloud version shows you an API-key. This can be used in the open source version.
- The open source version gives you an API-key field. This can be used in the cloud version.
App Runs Management for Sub-tenants (Enterprise)
Starting from version 2.0.2, enterprise users can manage sub-tenant app run limits from the parent tenant. The maximum limit that can be assigned to a sub-tenant is equal to the app run limit of the parent tenant. For example, if the parent tenant has an app run limit of 300k, the maximum limit that can be assigned to each sub-tenant is also 300k.
Steps to assign app run limits to a sub-tenant from the parent tenant:
-
Log in to your Shuffle account and visit the Billing tab on the admin page.
-
Scroll down to the Utilization and Stats section. There, you’ll find the Child Tenant tab, where you can manage sub-tenant app run limits.
-
Click Edit next to the App Execution Limit. A pop-up will appear where you can assign the app execution run limit for each sub-tenant. You can follow the same process to assign workflow run execution limits.
Hybrid Features
There are many features that make Shuffle more usable. These are mainly related to accessibility, scalability and collaboration - in that order. For the initial release (v0.8) of Shuffle, we've decided to focus entirely on accessibility. Every feature comes with some of the same basic features, so that you know what you're getting into.
These basic features are
- Activation (true or false)
- Limits (none or 0-infinite)
- Privacy & Data sharing (none, minimal, high)
- Type (general, actions, triggers, editor, )
- Description
These are the categories they fit into
- Accessibility - Makes Shuffle easier to use. We make every open source function open source, but some are hard or impossible to make easy for a user to have.
- Collaboration - Gives access to shared workflows, apps and general searching. This is to make it possible to learn from each other.
- Scalability - Gives access to use our hardware and servers, e.g. through cloud executions.
You can see most of our currently planned features on https://shuffler.io/pricing.
Activation
Activation tells you whether the feature is active. It's indicated by the red or green mark next to the feature on the admin page.
Limits
Some features have limits. These are features such as SMS and email sending, schedule creation, cloud executions and more. Click each item to learn more.
Description
The description exists to specify what exactly an action does. This will become more granular over time. Access it by clicking each feature.
Data collection
There are three types of data sharing, where the initial launch of Shuffle uses none. You can see the usage as per the image in limits
The three levels we'll keep to are:
- None - Shuffle doesn't collect any information about your on-premises tenant. This is most features.
- Minimal - Shuffle collects a minimal amount of information necessary to execute the action. An example is a Workflow execution, where we'll need to gather information about the next steps in a workflow to properly execute it.
- High - Shuffle collects the necessary information to handle information. This is used for when full synchronization, meaning information used on-premises will also be used in the cloud. An example is having access to edit workflows in the cloud, that will execute on-premises. This requires access to all the same apps, workflows, credentials, triggers, organizational users and more. PS: This will not happen for a while, and will be 100% OPTIONAL
User management
User management is all about adding, listing, deleting and controlling users in general. Users are a part of a specific tenant, and are created by tenant admins. To add users you need the "admin" role.
Existing roles:
- Admin - Gives access to control an tenant, and see what everyone in the tenant are doing.
- User - Gives access to use the tenants resources, but NOT see everyone elses Workflows. This role is meant for engineers who are to build their own workflows, without potentially breaking others'
- Reader - Gives access to READ all data for an tenant (like an admin), but not make any changes.
To come:
- Creating API-only users (no login)
- Granular access (RBAC)
Adding a user
Click the "ADD USER" button, and you'll get a popup. Type in their username (open source) or email (cloud), and you'll create an invite for them. Cloud will not allow an admin to set a password to share, but rather send them an email. This will also be a part of the hybrid offering later.
Change a users' role
Click the "Role" dropdown and choose one. Defaults are Admin and User, but we'll add granular access for this now. To repeat, here's the current roles:
- Admin - Gives you access to control a tenant, and see what everyone in the tenant are doing.
- User - Gives you access to YOUR resources within an tenant. This is to prevent you from seeing what everyone else are doing.
Deleting a user
A user in Shuffle can't be deleted, but deactivated. This is to keep all references available for when audits eventually require them. Click "Edit user", then "Deactivate". This prevents the user from being used. A deactivated user can be reactivated.
App Authentication
App authentication is a way for Shuffle to keep track of what credentials you have for an app in a specific tenant. It shows you information the most important information, and gives you access to modify or easily delete them. Authentication is specified at the app level, and applies to ALL functions of the app, unless specified otherwise. Authentication is created during workflow editing.
These are NOT editable outside of deletion as of november 2020, but we may add the possibility of changing without showing the previous value.
Distributing auth to sub-tenants
From a parent tenant, you can share an app authentication with your sub-tenants. In the App Authentication tab, tick the distribution checkbox on an auth and pick the sub-tenants to share it with, or share it with all of them at once. Sub-tenants see it marked as "Parent" and can use it in their workflows, but can't modify it. To stop sharing, clear the selection.
KMS
Shuffle supports the use of a KMS. Please see the extension documentation for more.
App Authentication Groups
Groups was taken out of beta and was removed for the 2.0.0 release
Authentication Field overview
The fields of authentication:
- Label - The name of the authentication scheme. Make it helpful, e.g. "QRadar Datacenter Amsterdam" or similar.
- App Name - The name of the app it belongs to
- Workflows - The amount of workflows it's being used in
- Action Amount - The amount of actions that use the authentication
- Fields - The fields specified by the app creator. It's usually a URL, an API key or username & password.
- Actions - What you can do to edit the app. As of 20.11.2020, only deletion is accessible. By deleting it, you'll also make the workflow invalid.
Authentication in workflows
Authentication is and should be defined the first time you use an app. We'll use the example of TheHive, which takes the fields "apikey" and "url". Start by creating a workflow, before dragging in the app "TheHive".
Once it's in, click the node, and you'll see a view like this. We've outlined three places that indicate this app requires authentication. All of these are also clickable.
By clicking either of these, a popup window will show. In this one, type in a DESCRIPTIVE name (to remember), before passing credentials. PS: Never use localhost in an URL. Everything runs in a container, which has its own IP. Always use the system's IP/domain within the URL.
By clicking "submit", the authentication is now saved for your tenant. This removes clutter in the UI, by having less required fields, and is also reusable. You can now make multiple nodes that use the same authentication.
Last, but not least, this can now be controlled on a tenant level.
App creation with authentication
The fields are specified by the app creator. This short section outlines how to create authentication as a creator. More on this in the apps section. An example is TheHive, which takes a URL and an API-key. These fields have to be specified as seen below.
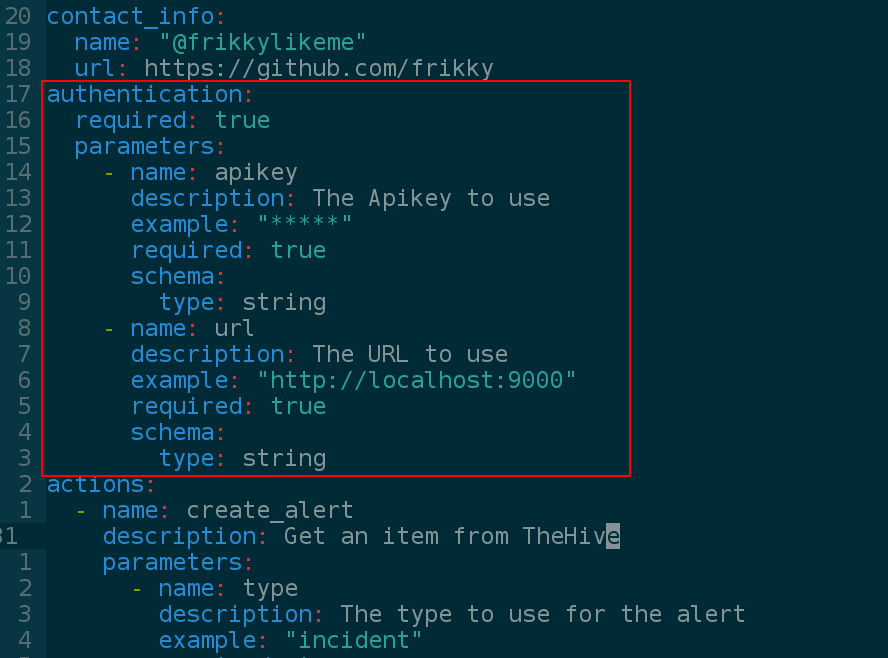
Outer level: authentication Inner level: parameters
These parameters are specified exactly as a parameter within an action. The function's code needs to reflect it as well, as can be seen with this python function, taking an apikey and URL.

Locations
Locations, previously Environments, are a core part of Shuffle's open source build. Cloud does not require any configuration for this, unless you are connecting to your on-premises datacenter/cloud VPC. Think of a location as the place where Shuffle is allowed to run work: a server, Docker host, Docker Swarm cluster, Kubernetes cluster, datacenter, cloud VPC, or sensor group.
Each location is matched by name. The name you configure in Shuffle must be the same value Orborus starts with in ENVIRONMENT_NAME. When an action or workflow is configured for that location, the backend queues the execution for that exact location name. Orborus polls that queue and starts workers only for matching executions.
The default location is called "Shuffle" in your on-premises installation, and "Cloud" in the Shuffle SaaS. You can add as many as you want, and will get access to the additional "cloud" location through cloud synchronization onprem.
Location fields
- Name - The name to use. This is the identifier used by Orborus through
ENVIRONMENT_NAME. - Orborus running - Shows whether Orborus is running or not.
- Type - Whether it's a cloud location or not. Orborus can't attach to "cloud" locations.
- Default - Whether it's the default location to use for new actions. You should set this to the location you use the most.
- Actions - Possible changes to a location. You can't re-open an archived location, and can't archive the default location.
- Archived - Tells you whether it's archived. There's a toggle at the top to edit it.
Runtime location flow
A workflow execution moves through these components:
- The frontend starts a workflow execution.
- The backend validates the workflow and stores the execution.
- For every non-cloud location used by the workflow, the backend writes an execution request to that location's queue.
- Orborus polls
BASE_URL/api/v1/workflows/queuewithOrg-Id: <location name>. IfORGis set, it is sent as the tenant ID. IfAUTHis set, it is sent as the location authorization value. - The backend returns queued executions for that location.
- Orborus starts a worker for each accepted execution. The worker receives
EXECUTIONID,AUTHORIZATION,ENVIRONMENT_NAME,BASE_URL, and the relevant Docker/Kubernetes/scaling environment variables. - The worker reads the workflow execution from the backend, starts app containers or app deployments, streams results back to the backend, and exits when the execution is done.
- After Orborus has successfully started or dispatched the worker, it calls
BASE_URL/api/v1/workflows/queue/confirmto remove that execution request from the location queue.
This means the location name is not only a UI label. It is the queue key used by the backend and Orborus. If an action says it should run in Production VPC, the Orborus instance for that runtime must use ENVIRONMENT_NAME="Production VPC" or a normalized equivalent of the same name.
Orborus configuration
If you would like to run Orborus towards a different location, you will have to specify the environment variables ENVIRONMENT_NAME, ORG, AUTH and BASE_URL. AUTH and ORG may not be required for every on-premises setup. You can click the location to get a finished command.
The important variables are:
ENVIRONMENT_NAME- The runtime location name. This must match the location selected in Shuffle.BASE_URL- The Shuffle backend URL Orborus and workers can reach. In Docker Compose this is oftenhttp://shuffle-backend:5001; for hybrid/cloud setups it is usually your Shuffle URL.ORG- The tenant ID. This is sent to the backend as theOrgheader.AUTH- Runtime location authorization. This is sent as theAuthorizationheader when Orborus polls the queue.SHUFFLE_SWARM_CONFIG- Set torunwhen Orborus should run workers in Swarm/service mode.SHUFFLE_WORKER_IMAGEorSHUFFLE_WORKER_VERSION- Optional worker image/version override.SHUFFLE_MEMCACHED- Optional shared cache endpoint. See Adding Memcached to runtime locations.
Below is an example, where the location's name is "Another env" and it is using https://shuffler.io as its backend. This works on-premises as well if you change out the BASE_URL.
docker run -d \
        --restart=always \
        --name="shuffle-orborus" \
        --pull=always \
        --volume "/var/run/docker.sock:/var/run/docker.sock" \
        -e AUTH="AUTH_KEY" \
        -e ENVIRONMENT_NAME="swarm testing" \
        -e ORG="YOUR_ORG_ID" \
        -e SHUFFLE_SWARM_CONFIG=run \
        -e BASE_URL="https://uk.shuffler.io" \
        -v /tmp:/tmp \
        ghcr.io/shuffle/shuffle-orborus:latest
Adding Memcached to runtime locations
Shuffle can run without Memcached. When SHUFFLE_MEMCACHED is not set, each backend, Orborus, and worker process uses its own local in-memory cache. That is fine for small single-node deployments, but it becomes limiting when you scale backend replicas, run workers as services, or run workflows across multiple runtime hosts.
Memcached adds a shared cache that the backend, Orborus, and workers can all read and write. In the current implementation this is enabled only by setting SHUFFLE_MEMCACHED; Orborus passes that same value into workers it starts. Orborus does not automatically create a Memcached service, so you should deploy Memcached yourself and make sure every relevant Shuffle container can reach it.
Common uses include short-lived workflow execution data, action result cache entries, validation data, health/stat counters, and worker coordination data. The database is still the source of truth. Memcached is an acceleration and coordination layer, not durable storage.
Start a single Memcached instance:
docker run --name shuffle-cache -p 11211:11211 -d memcached:1.6-alpine -m 1024
For Docker Compose on one host, put backend, Orborus, and Memcached on the same Docker network and use the service name:
services:
  shuffle-cache:
    image: memcached:1.6-alpine
    command: ["-m", "1024", "-c", "2048"]
    restart: unless-stopped

  shuffle-backend:
    environment:
      - SHUFFLE_MEMCACHED=shuffle-cache:11211

  shuffle-orborus:
    environment:
      - SHUFFLE_MEMCACHED=shuffle-cache:11211
For Docker Swarm, use a service DNS name reachable from backend, Orborus, and workers:
- SHUFFLE_MEMCACHED=tasks.shuffle-cache:11211
In Swarm mode, the network is the important part. Workers run on the execution overlay network configured with SHUFFLE_SWARM_NETWORK_NAME (commonly shuffle_swarm_executions or swarm_executions). Memcached must be attached to that same overlay network, otherwise workers cannot resolve or connect to it.
If you do not want to expose Memcached on the host machine, do not publish port 11211 with -p, --publish, or a Compose ports: entry. In Swarm, backend, Orborus, and workers can use the internal service DNS name over the overlay network, so Memcached can stay private to Docker.
If the backend reaches Memcached through a different application network, attach the Memcached service to both networks:
docker network create --driver=overlay --attachable shuffle
docker network create --driver=overlay --attachable shuffle_swarm_executions

docker service create \
  --name shuffle-cache \
  --network shuffle \
  --network shuffle_swarm_executions \
  --replicas 1 \
  --endpoint-mode dnsrr \
  memcached:1.6-alpine \
  -m 1024 -c 2048
Then configure backend and Orborus with:
- SHUFFLE_MEMCACHED=tasks.shuffle-cache:11211
Orborus will pass this value to the Swarm worker service. The worker service must also be on shuffle_swarm_executions so it can reach tasks.shuffle-cache.
For Kubernetes, create a Memcached Service and set the service DNS name in the backend and Orborus environment:
- SHUFFLE_MEMCACHED=shuffle-memcached:11211
When Orborus has SHUFFLE_MEMCACHED set, it forwards the variable to:
- single execution workers it creates,
- the
shuffle-workersservice in Swarm mode, - Kubernetes worker deployments.
Workers then use the same shared cache while they deploy app containers and report execution progress. If workers cannot reach Memcached, cache reads and writes will fail in worker logs and execution state may fall back to slower backend/database paths or fail for cache-dependent coordination.
Operational guidance:
- Use one Memcached endpoint first. Multiple endpoints can be provided as a comma-separated list, but inconsistent routing can make cache keys appear missing.
- Do not expose port
11211publicly. Keep it on an internal Docker, Swarm, Kubernetes, or private network. - In Docker Swarm, attach Memcached to the same overlay network as workers. If backend is on a separate network, attach Memcached to both.
- Restart backend and Orborus after changing
SHUFFLE_MEMCACHED. Newly started workers inherit the value from Orborus. - If you are debugging cache-related execution issues, temporarily remove
SHUFFLE_MEMCACHEDfrom backend and Orborus and redeploy to confirm whether routing to Memcached is the cause.
Scaling Orborus
By clicking the "Scale" or "K8s" tab, you will get relevant info related to scaling Shuffle the way you want. This IS available from cloud to onprem (hybrid).
Using Multiple Environments
It's possible to create and use multiple environments for your Workflows.
- First, let's create a new Environment, by clicking on the "Add Environment" button.
Once you add an environment, it will be displayed on the list.
-
If you create an Environment it will be set up as the Default for all workflows, but if you want to set a specific environment as the default click the "Default" button.
-
Alternatively, you can select a different environment for a particular workflow in the workflow settings by selecting it from the displayed list after clicking on "Environments".
- To run the respective environment, you need to copy the Orborus command and modify the necessary fields such as
ENVIRONMENT_NAME,AUTHandORG, and ensure they are correctly filled in.
To check if the Orborus command is set up correctly, look for a change in status from "not running" to "running".
- If you want to change Orborus from "nightly" to a different image tag, in this example "test", change the image tag after
shuffle-orborus:fromnightlytotest.
docker run -d \
        --restart=always \
        --name="shuffle-orborus" \
        --pull=always \
        --volume "/var/run/docker.sock:/var/run/docker.sock" \
        -e AUTH="AUTH_KEY" \
        -e ENVIRONMENT_NAME="swarm testing" \
        -e ORG="YOUR_ORG_ID" \
        -e SHUFFLE_SWARM_CONFIG=run \
        -e BASE_URL="https://uk.shuffler.io" \
        -v /tmp:/tmp \
        ghcr.io/shuffle/shuffle-orborus:test
- Further documentation on running Orborus in production at scale, whether onprem or with hybrid environments: https://shuffler.io/docs/configuration#scaling-shuffle
Health
Shuffle has a health check API that can be used to check the health of your Shuffle instance. It's related endpoints are available at:
/api/v1/health: This gives you the result of the cached execution (doesn't require an API key)/api/v1/stats: This gives you historical data about the health of your instance (doesn't require an API key)
You can also force a run by making an API call at:
/api/v1/health?force=true(calling this requires the API key of an admin user)
For the time being, this health check automatically runs every 15 minutes by default and can be disabled with the SHUFFLE_HEALTHCHECK_DISABLED=true environment variable.
Notifications
Notifications are a way for Shuffle to inform you of a potential error in your workflows. We recommend you investigate them to see if the issue is an actual issue or not. They are tenant-wide, meaning if you dismiss them, they get dismissed for everyone. A dismissed notification will show back up if it happens again.
Notification sources:
- Failed workflows (Status: ABORTED)
- Workflows that take more than 10 minutes (without delays)
- Actions where the result JSON contains
"success": false - Actions where the result JSON has a
"status"outside the 200-299 range — but only when"success"is also present and isn't explicitlyfalse. This guard exists so an unrelated"status"field in your payload (one that isn't actually an HTTP status) doesn't falsely trigger this. - Failed Liquid formatting
- When a returned app parameter starts with "shuffle" and contains "error". Example: "shuffle variable error" for when a variable is not found.
- We may add more without warning in the future. They are only added for things that represent typical things you want to see
Accessing Notifications:
- Through the UI: The notifications badge with a count number is displayed in the top right bar when you are logged in. This indicates the number of notifications you have. Clicking it opens your notification panel.
- Selecting a Notification Workflow: If you go to
/admin?admin_tab=organization, you can see a section called "Notification Workflow". Click on it to select an appropriate workflow. This workflow will be ran whenever a notification is created, except when bucketed. This can be used to automate opening tickets, sending emails, or whatever you want to do when there is an error in your notification.We use some sort of "bucketing" of notifications, to prevent you from getting spammed. This means, every time a notification is created 2 times under 2 minutes, we'll only send you one notification. This is to prevent you from getting spammed.
If you are on the open-source side, you can change the bucketing timeout by changing the SHUFFLE_NOTIFICATION_BUCKETING_MINUTES environment variable. This is set to 2 minutes by default.
Creating Custom Notifications: You can create notifications yourself with the Notification Creation API from Shuffle. These will act the same as any other notification by both being added to the UI, as well as being sent to your notification Workflow.
Disabling a Notification: You can ignore/disable a notification by clicking the "Disable" button next to any of them.
Billing
Onprem Licensing
Shuffle’s licensing system enables tenants to unlock advanced capabilities designed for production deployments and enterprise grade scalability.
While the open-source version of Shuffle includes all core workflow automation functionality, running Shuffle in production environments or at scale (including multi-tenant or multi-environment setups) requires a valid on-premise license.
Licensing ensures access to premium features such as high-performance scaling, multi-tenant management, multi-environment configurations, and full platform branding empowering tenants to customize, optimize, and securely manage their automation infrastructure.
Default Limits
By default, Shuffle onprem instance includes the following limits:
- App Runs Executions: 25,000 per month
- Sub-Tenants: Up to 3
- Environments: 1
- Branding not Enabled
To run Shuffle in production or to scale beyond default limits, a valid onPrem Shuffle license is required. Licensing ensures access to advanced scaling, customization, and management features designed for enterprise and high-availability deployments.
For more information or to obtain an on-premise license, please contact support@shuffler.io
Cloud Synchronization
Cloud synchronization is a feature used to get more capabilities on-premises, that otherwise wouldn't be possible. These range from scalability to collaboration, support, public workflow generation, accessibility and more. The goal is to give access to features that otherwise are impossible to build in a location solution. See Hybrid Features for more info.
Setup
Setting up cloud synchronization requires two things:
-
A user on https://shuffler.io. Get the API-key.
-
An open source version of Shuffle. Here's how to set it up
-
Start by going to https://shuffler.io/register and create an account.
- With an account made, go to https://shuffler.io/admin. Here you'll find your API-key. Copy it.
- Go to your local instance at /admin and paste the API-key.
- See the features you get access to.
A valid Shuffle license is required to unlock advanced enterprise capabilities on your on-premise instance.
With a valid license, connecting your instance to the cloud allows you to access features such as multi-tenant management, multi-environment setups, workflow executions, and branding customization.
Note:
- A single cloud tenant can sync with only one on-prem tenant at a time.
- Cloud Sync is disabled for child tenants on both the cloud and on-prem sides. As a result, only the parent cloud tenant can sync with the parent on-prem tenant.
License Key
For air-gapped or offline environments where Cloud Synchronization cannot be used, Shuffle supports activating enterprise features through an on-premise license key.
The license key allows tenants to unlock capabilities for scaling, multi-tenancy, multi-environment setups, and branding enabling full production use of Shuffle on-premises.
Applying a License Key
To activate your license, set the SHUFFLE_LICENSE environment variable in your on-prem deployment:
export SHUFFLE_LICENSE=<your_license_key>
Once applied, Shuffle will automatically recognize and unlock the licensed capabilities no internet connection is required.
Features Unlocked by License
A valid Shuffle license unlocks a range of enterprise capabilities.
The availability of these features depends on the type and level of your license.
| Feature | Description |
|---|---|
| Workflow Scaling | Increase monthly workflow execution limits to support larger workloads. |
| Multi-Tenant Management | Add and manage more sub-tenants within a single deployment. |
| Multi-Environment Support | Create and operate multiple isolated environments. |
| Branding Customization | Enable full white-label branding, including logo, colors, and support links. |
Note: The exact features and limits available to your tenant depend on your Shuffle license tier.
For more information or to upgrade your license, contact support@shuffler.io.
You can securely store your license key in the Datastore tab (/admin/datastore in Shuffle Security, or /admin?tab=datastore in Shuffle Core) or save it in a text file and upload it via the Files tab (/admin?tab=files) in the Admin panel.
Alternatively, you may store the key outside of Shuffle (e.g., in a secure local or cloud storage) to ensure it can be recovered if the key is lost.
Production Readiness (Onprem)
The Production Readiness section helps administrators verify whether their Shuffle on-premise instance is properly licensed, synchronized, and configured for stable production use.
Running Shuffle in production requires both a valid on-prem license and a verified production configuration, ensuring your deployment can support enterprise workloads with high availability, scalability, and reliability.
To unlock default limits (see details here) for your on-prem instance, you must activate a valid license using either Cloud Synchronization or a License Key.
Once your license is applied, navigate to the /admin?admin_tab=billingstats tab in the Admin panel and verify that:
- Production Status is set to “On”
- The following indicators show a green checkmark:
License, Multi-Tenant, High Availability, and Robust Infrastructure
Checking Subscription Details
Based on your license type, you can view detailed subscription information in the Billing Stats section of the Admin panel (/admin?admin_tab=billingstats), as shown below:
Viewing Enabled Features and Limits
To review which features are unlocked and their respective limits:
- Go to the
/admin?admin_tab=org_configpage in the Admin panel. - Scroll to the Hybrid Features section.
- Check the list to see which features are currently enabled or disabled.
Upgrading or Increasing Limits
If you need to:
- Increase existing feature limits
- Enable additional enterprise capabilities
- Upgrade to a higher-tier or Enterprise license
Please contact support@shuffler.io for more information and assistance.