Search
Ctrl+K
Workflows


On this page
Documentation for workflows.
Introduction
Workflows are the backbone of Shuffle. A workflow is a structured, event-driven automation pipeline that connects apps, data, and logic to execute tasks automatically. Instead of writing code to connect your tools, you build workflows visually using four building blocks: apps, triggers, conditions, and variables.
Why workflows matter
- They eliminate manual work. No more copy-pasting data between tools or running the same checks by hand every time an alert comes in.
- They ensure consistency. Every piece of data gets handled the same way, every time. No forgotten steps, no typos.
- They facilitate tool synergy. Different tools that don't natively talk to each other — your SIEM, ticketing system, chat app, firewall — all connected through a single workflow.
- They scale without scaling people. A person can handle a handful of alerts. A workflow handles hundreds, at any hour, without slowing down.
How it works
Every workflow follows a simple pattern: Input → Action → Output.
You need three parts:
- The Trigger — Tells the workflow when to run. This can be a webhook receiving data, a schedule that runs on an interval, or a manual click.
- The Nodes (Apps) — The steps in your process. Each node is an app performing a specific action. For example, one node scans a file with VirusTotal, the next sends the results to Slack.
- The Lines — Connect your nodes. They define execution order and pass data between steps.
Ways to create your first workflow
1. Use Cases
Use Cases contains pre-made templates. Click "enable" on any use case and Shuffle spins up a ready-made workflow for you. This is the fastest way to get started.
2. AI generation
If you know what you want but aren't sure which nodes to use, type a plain English prompt. For example: "When a new ticket arrives, scan the IP address with VirusTotal." Shuffle generates the nodes and connections automatically. This feature is currently in Beta.
Read more about AI generation →
3. Manual setup
Build from scratch when you need custom logic. Go to workflows, click "Create workflow," give it a name, and start dragging apps onto the canvas.
Go to workflows to get started →
What you need to know
We recommend going through the Workflow Development Exercises before building. It covers the fundamentals so you can build anything, not just follow tutorials.
The checklist:
- Variables & nodes
- JSON autocompletion
- Loops
- Nested loops
- Start nodes
- Triggers: Webhooks & Schedules
- Subflows & User Input
- App Authentication
- Loop filtering
- Shuffle File storage
- Shuffle Datastore (Cache)
- Deduplication
- Liquid formatting
- HTTP & REST APIs
Finding relevant workflows
Before building from scratch, search public workflows. Someone may have already built something close to what you need. Use it as a starting point and modify it to fit your use case.
Workflow Basics
Below is a video walkthrough demonstrating the workflow creation process — from creating a new workflow to editing, saving, and executing it:
Create
Go to the workflows dashboard and click "Create workflow." Give it a name and a short description. Both can be changed later.
All of your workflows live at /workflows, so you can always find them again.
Edit
After creating a workflow, the editor opens. The left panel lists four building blocks: apps, triggers, variables, and conditions. Apps and triggers can be dragged onto the canvas.
A new workflow starts with a default "change_me" node. You can edit it or delete it. Drag an app onto the canvas, click it, and select an action from the dropdown. The default action — "repeat back to me" from the Shuffle Tools app — simply returns its input. Swap it for whatever action you actually need.
The play button starts an execution at your starting node. A side panel shows the output for each node as it runs.
Save
Click the save button next to the play button, or press Ctrl+S. A notification appears at the bottom of the screen when saving is in progress. You need to save before executing — saving makes your latest edits available to the execution engine.
Execute
With a saved workflow, click the Orange play button. Execution begins at your starting node, and a side panel opens showing results for each node as it completes.
To review past executions, go to /workflows, click the name of your workflow, and click Executions. It shows the status and output of every previous run.
Duplicate
Click the kebab menu (vertical three dots) on the workflow and select "Duplicate Workflow." A copy appears with a _copy suffix in the name. Use this to experiment without risking your original.
Delete
Click the kebab menu (vertical three dots) and select "Delete Workflow." Confirm the deletion when prompted.
Note: Workflows that reference this one as a subflow will break after deletion.
Export and Import
Export: Click the kebab menu (vertical three dots) on a workflow and select "Export Workflow." A JSON file downloads containing the full workflow definition — nodes, connections, variables, and authentication references. Use this to back up a workflow locally or move it between tenants.
Import: Go to /workflows and drag the exported JSON file onto the page, or use the import option in the workflow list. The workflow appears with its original name. You may need to reconfigure authentication for apps that require credentials in the new tenant.
You can also download workflows directly from Git repositories. See Workflow Backup for GitHub and Azure DevOps integration.
Create Your First Workflow
This section walks through building a simple workflow from scratch: two nodes, connected, with data passing between them.
Goal: Send a message via the HTTP app and print the response.
Step 1 — Create the workflow
- Go to workflows.
- Click "Create workflow."
- Name it "My First Workflow" and click the checkmark.
Step 2 — Add a starting node
- The canvas opens with a default "change_me" node. Click it.
- In the right panel, select an app and action. For this example, choose the Testing app and the Repeat back to me action.
- In the input field, type a test message:
{"hello": "world"}. - This is your starting node (marked with a turquoise border).
Step 3 — Add a second node
- Drag the Shuffle Tools app from the left panel onto the canvas.
- Place it to the right of the starting node.
- An arrow automatically connects them. If not, drag a line from the output of the first node to the input of the second.
- Click the Shuffle Tools node and select the Repeat back to me action.
- For the input, click the field and select the output of the previous node from the dropdown (or type
$change_me).
Step 4 — Execute
- Click the Save button.
- Click the green play button.
- A side panel opens showing the execution progress. Each node turns green as it completes.
- Click the second node in the panel to see its output — it should match the input from the first node.
You have built a working workflow. From here, you can swap the Testing app for a real service (like sending an email or querying an API), add conditions to branch the logic, or chain more nodes for additional steps.
Building further
Once you are comfortable with a two-node workflow:
- Add a third node that sends the result to Slack or email
- Add a condition on the branch between nodes so the second node only runs if the first succeeds
- Replace the static input with a webhook trigger so the workflow runs on incoming data
- Use a subflow to pass list items to a separate workflow for parallel processing
Nodes
Apps become nodes when you drag them onto the workflow canvas. Each node represents an app action — a specific call to an external tool or service.
To add a node, drag an app from the left panel onto the canvas. Click a node to configure it on the right side.
Anatomy of a workflow
A well-structured workflow follows a clear pattern:
- Trigger — receives the initial input (webhook, schedule, etc.)
- Starting node — the first app action that processes the trigger data
- Processing nodes — apps that transform, enrich, or act on the data
- End node — the final action, such as sending a notification or closing a ticket
Below is a video showing the full structure of a complex workflow, including how to organize and read it:
Building efficiently
The fewer nodes a workflow uses, the faster it runs and the easier it is to maintain. Before adding a new node, check whether an existing app action can handle the same step.
Starting node
The starting node is the first action that runs when a workflow executes. It is marked with a turquoise circular border. It is not a trigger — it is the first app action that receives data from a trigger.
To change the starting node, hover over a different node until you see the flag control in the top-right corner and click it. The shape of the node changes from a square to a circle.
Apps and actions
An app bundles one or more actions that connect to a specific service. Apps must be activated within your tenant before they can appear in the left panel.
Each app action requires authentication. Click the app on your workflow, go to Setup, and press the "+" button to add your credentials. Authenticated apps in one workflow are available across your tenant and can be distributed across your sub-tenants.
HTTP App and REST API
Shuffle includes a built-in HTTP app for making REST API calls to any endpoint. Use it when no dedicated app exists for a service, or when you need more control over the request than a dedicated app provides.
The HTTP app supports:
- All HTTP methods (GET, POST, PUT, PATCH, DELETE)
- Custom headers
- Query parameters
- Request body (JSON, form data, raw text)
- Basic and Bearer token authentication
This is the same app you would use to call the Shuffle API itself from within a workflow. For example, you can use the HTTP app to trigger another workflow via its webhook URL, or to fetch data from an internal service that does not have a dedicated Shuffle app.
Compare this to dedicated apps (like the GitHub app or Outlook app), which wrap the same HTTP calls into pre-configured actions with built-in authentication. A dedicated app is easier to use; the HTTP app is more flexible.
Other built-in apps: Shuffle also includes several other pre-installed apps:
- Shuffle Tools — utility actions: set variables, filter lists, merge lists, parse lists, execute Python code
- AI Agent — run AI agent tasks within a workflow using MCP
- Subflow — trigger another workflow from within the current one
- Testing — create test files and mock data directly in a workflow
All other apps must be activated before they appear in the left panel. Once activated, they are available across your tenant.
Variables and Arguments
Execution Argument
The execution argument is the input that starts a workflow run. Every trigger provides one. You can also supply one manually when running a workflow by hand.
It can be anything: JSON, a string, a number, a list. It acts like a node — you can reference its value anywhere using:
$exec$trigger$webhook$schedule$userinput$email_trigger
All of these refer to the same value: the data that triggered the execution. Use $exec as the default.
Workflow Variables
Workflow variables are static values set before execution. They persist across runs and are shared with everyone who has access to the workflow. Common uses: API keys, base URLs, usernames.
Characteristics:
- Set before execution
- Unencrypted
- Shared with all workflow users
- Accessible only within the workflow where they are defined
How to create a workflow variable:
- Click "Variables" in the bottom-left corner.
- Click "new workflow variable."
- Enter a name, description, and value.
- Reference it with
$variable_namein any node or condition.
Execution Variables
Execution variables are temporary values set during a run. They exist only for that execution and are not saved. Use them to capture the result of an action for use later in the same run.
How to set a runtime variable:
- Click "Variables" in the bottom-left corner.
- Click "New runtime variable."
- Give it a name.
- On the action you want to capture, select the variable. The result of that action is stored in the variable.
- Reference it with
$variable_namein any subsequent node.
JSON Autocompletion
When you click into a field that accepts references, Shuffle shows an autocomplete dropdown listing all available nodes and variables. Click the plus button next to a field to open it.
The dropdown shows each node's output structure. You can navigate through JSON keys and select the exact value you need — without typing the $ syntax by hand. This is especially useful when working with deeply nested responses or when you are unsure of the exact key names.
If the output structure is not yet available (for example, the referenced node has not been executed), you can type the path manually. Use the $node.key and $node.key.subkey syntax described in Parsing JSON.
Passing Values
Passing data from one node to the next is the core of how workflows work. There are three ways:
- "Data from previous actions" — select the output of any earlier connected node from the dropdown.
- "Static data" — type the value yourself, using
$node_nameor$variablesyntax to reference data. - "Copy the JSON path" — click on the value you want to copy if it is in the result of another node.
You can reference:
$testing_1— output from a node or variable called "testing_1"$exec— the execution argument
This only works with nodes that precede the current one, connected via the directional arrows.
Parsing JSON
Shuffle uses $ to reference nodes and . to traverse JSON keys.
| Expression | Meaning |
|---|---|
$node_1 | Output of node called "node_1" |
$exec | The execution argument |
$exec.name | The name key inside the execution argument |
Given this execution argument:
{
  "name": "this is some data",
  "description": "Cool description",
  "extra": {
    "writer": "Fredrik"
  }
}
- Get
name→$exec.name - Get the nested
writer→$exec.extra.writer
If a node doesn't exist or the key is missing, Shuffle writes the expression as-is.
Passing Lists
Lists are identified with #. This is separate from $ (which references nodes).
| Syntax | Meaning |
|---|---|
| No loop — returns the raw value |
.# | Loop over the entire list |
.#0 | Only the first element |
.#1 | Only the second element |
.#0-1 | First and second elements |
.#.data | Loop over list, get data from each item |
.#0.data | First element, get data |
.#max.data | Last element, get data |
Example: Suppose you have a node called get_users that returns this data:
{
  "users": [
    {"name": "fredrik", "username": "@frikky", "id": "12345"},
    {"name": "moomo", "username": "shuffle user 2", "id": "23456"}
  ]
}
To extract all IDs:
$get_users.users.#.id
Result: ["12345", "23456"]
To get only the first user's name:
$get_users.users.#0.name
Result: "fredrik"
To get the last user's name:
$get_users.users.#max.name
Result: "moomo"
You can use this pattern to reconstruct data in a subsequent node. Given a node called repeat_list with the same data:
{
  "ids": "$repeat_list.users.#.id",
  "names": "$repeat_list.users.#.name",
  "usernames": "$repeat_list.users.#.username"
}
This produces:
{
  "ids": ["12345", "23456"],
  "names": ["fredrik", "moomo"],
  "usernames": ["@frikky", "shuffle user 2"]
}
Important: For nested loops, pass each item to a subflow using the Shuffle Workflow trigger.
Casting Values
Since v0.9.25, Shuffle supports Liquid formatting for data transformation in action parameters. All action parameters are supported.
Example — strip whitespace:
{{ " So much room for activities " | strip }}!
More filters and syntax: Liquid Formatting Guide and the Shopify Liquid documentation.
Conditions
Conditions control which nodes run and which are skipped. They sit on the lines (branches) between nodes, acting as gatekeepers: the next node only fires when the condition evaluates to true.
A condition requires at least two nodes connected by a line. By default, every branch is implicitly true — the next node always runs. You can override this by adding a condition to the branch.
IF Conditions
To add a condition:
- Click the line between two nodes.
- Click "New condition" in the right panel.
- Configure the condition. Set a left-side value, choose an operator (EQUALS, DOES NOT EQUAL, CONTAINS, and so on), and set a right-side value.
Both sides of the condition can reference anything a normal node can: previous node outputs, the execution argument ($exec), workflow variables — any value available in your workflow.
The condition uses the operator to compare the two sides. If the comparison is true, the next node runs. If false, it is skipped.
A node can have multiple outgoing branches, each with its own condition. These conditions are evaluated independently. When multiple branches from the same node are all true, those paths run in parallel.
Multiple conditions on a single branch are joined with implied AND logic. To create OR logic, use separate branches from the same node.
Note: Conditions cannot handle list loops ($variable.#). To filter a list by a condition, use the "Filter List" action described below.
Condition Loops
Standard conditions work on individual values. To filter a list — keeping some items and discarding others — use the Filter List action in the Shuffle Tools app.
The Filter List action takes a list and returns two sub-lists: items that matched your criteria and items that did not.
When to use Filter List vs. subflows: If performance is not a concern, the preferred approach is to pass each list item to a subflow using the Shuffle Workflow trigger. Filter List is simpler but runs in-place, which can consume more memory on large datasets.
Example data:
[
  {"ip": "1.2.3.4", "malicious": true},
  {"ip": "4.3.2.1", "malicious": false},
  {"ip": "1.2.3.5", "malicious": true}
]
The goal: extract only the items where malicious is true.
Steps:
- Create a node that produces or receives the list.
- In the next node, select the Shuffle Tools app and choose the Filter List action.
- Configure the fields:
- input_list — the entire list, passed as
$node_name(no#— pass the whole list, not individual items). - field — the key to evaluate. In this case:
malicious. - check — the comparison operator. Options: EQUALS, DOES NOT EQUAL, Larger than, Less than, Is Empty, Contains, Starts With, Ends With, Files by extension.
- value — the value to match against. In this case:
true. - opposite — toggle to invert the result. EQUALS becomes DOES NOT EQUAL, and so on.
- input_list — the entire list, passed as
- The output has this structure:
{
  "success": true,
  "valid": [
    {"ip": "1.2.3.4", "malicious": true},
    {"ip": "1.2.3.5", "malicious": true}
  ],
  "invalid": [
    {"ip": "4.3.2.1", "malicious": false}
  ]
}
valid contains items that met the criteria. invalid contains everything else. Reference them as $filter_node_name.valid or $filter_node_name.invalid in subsequent nodes.
Authentication
App Authentication
Most apps require authentication before you can use them — usually an API key, endpoint URL, or OAuth token.
When you select an app action that needs authentication, the Setup tab shows an Authentication section with a dropdown set to No selection and an orange + button. Until you add credentials, an orange warning box tells you "Authentication needed" and prompts you to click Add Authentication. The step will not work until authentication is configured.
Authentication follows a consistent pattern for apps built with the App Creator (using OpenAPI specs). Custom apps may vary depending on how the creator defined them.
Once you add authentication for an app, it becomes available across your tenant. You can also distribute authenticated apps to sub-tenants.
Tip: Use a workflow variable for credentials so they can be updated in one place.
Below is a screenshot showing the authentication prompt on a Wazuh node. The orange warning indicates that credentials are required before the node can execute.
Workflow Authentication
Every execution generates a random authorization key. Execution data can only be accessed by the worker running it or a tenant admin. No action required on your part.
Triggers
Triggers are the operators used to execute a workflow automatically. They connect to actions within workflows — often the starting node. Triggers take an execution argument that will be used to initialize the workflow run.
About Triggers
Triggers, alongside apps and variables, can be found on the left-hand panel under the "Triggers" tab.

Triggers are developed by Shuffle specifically to give users multiple ways to run a workflow. The triggers that are not available on-premises are due to access requirements — not hiding of features.
- Webhook — Handle real-time HTTP requests from anywhere.
- Schedule — Runs your workflow on a recurring schedule (cron expression or seconds).
- User Input — Temporarily pauses execution awaiting human approval/denial before continuing.
- Subflow — Allows running of another workflow from the current workflow, enabling modularity and nested loops.
- Pipelines — Ingest logs and event streams (Syslog, Sigma rules, Kafka) into workflows.
- Email — Handled via email schedules (Gmail/Outlook) to trigger workflows upon new emails.
- REST API — Direct HTTP execution triggers from third-party systems or external scripts.
Execution options across environments:
- Cloud & Hybrid (paid): Webhook, Subflow, User Input, Schedule, Outlook, Gmail, REST API, Pipelines.
- Onprem: Webhook, Subflow, User Input, Schedule, REST API, Pipelines.
Hybrid & Cloud Synchronization
ALL triggers are available everywhere if you have a Shuffle subscription. This allows routing executions through the cloud (without saving any data) to your open source / on-prem instance, eliminating the need to open inbound ports in your firewall.
Example: Say you want to get messages from a service like a SIEM, but it's in a different network or data center. How do you get that request all the way to your instance? This can be done by setting up cloud synchronization:
- Remote SIEM -> Sends Webhook to
https://shuffler.ioas a secure proxy. - Your local instance looks for jobs from a tenant you own on
https://shuffler.io. - When a webhook job is found on
https://shuffler.io— it will execute locally inside your on-prem instance.
Read more about cloud synchronization in the tenant documentation.
Finding Trigger Executions
When a trigger fires, you will not be notified by default — it runs behind the scenes. You can discover trigger executions and their data by opening the workflow and clicking the Executions button ("See all executions") at the bottom of the canvas, or by using the Workflow Run Debugger.
Webhook
Webhooks are the real-time handler for Shuffle data. Webhooks were initially implemented to handle data from Office365 connectors and TheHive, but have turned into a generic trigger, taking any kind of HTTP data, as we saw the need for it.
HTTP Method(s):
- GET
- POST
PS: Data in the POST request will be the execution argument ($exec). If HTTP queries are present in the GET request, these will be converted to structured JSON.
Webhook Authentication
You can secure your webhook by specifying required HTTP headers in the trigger configuration. Each header must be placed on its own line in the format:
Header-Name: Expected-Value
Any incoming request missing these headers or values will be rejected.
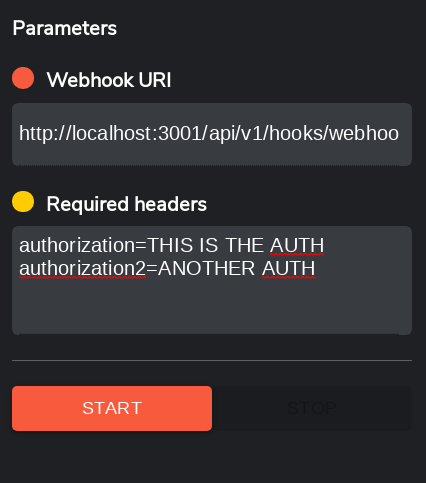
Webhook Setup Example
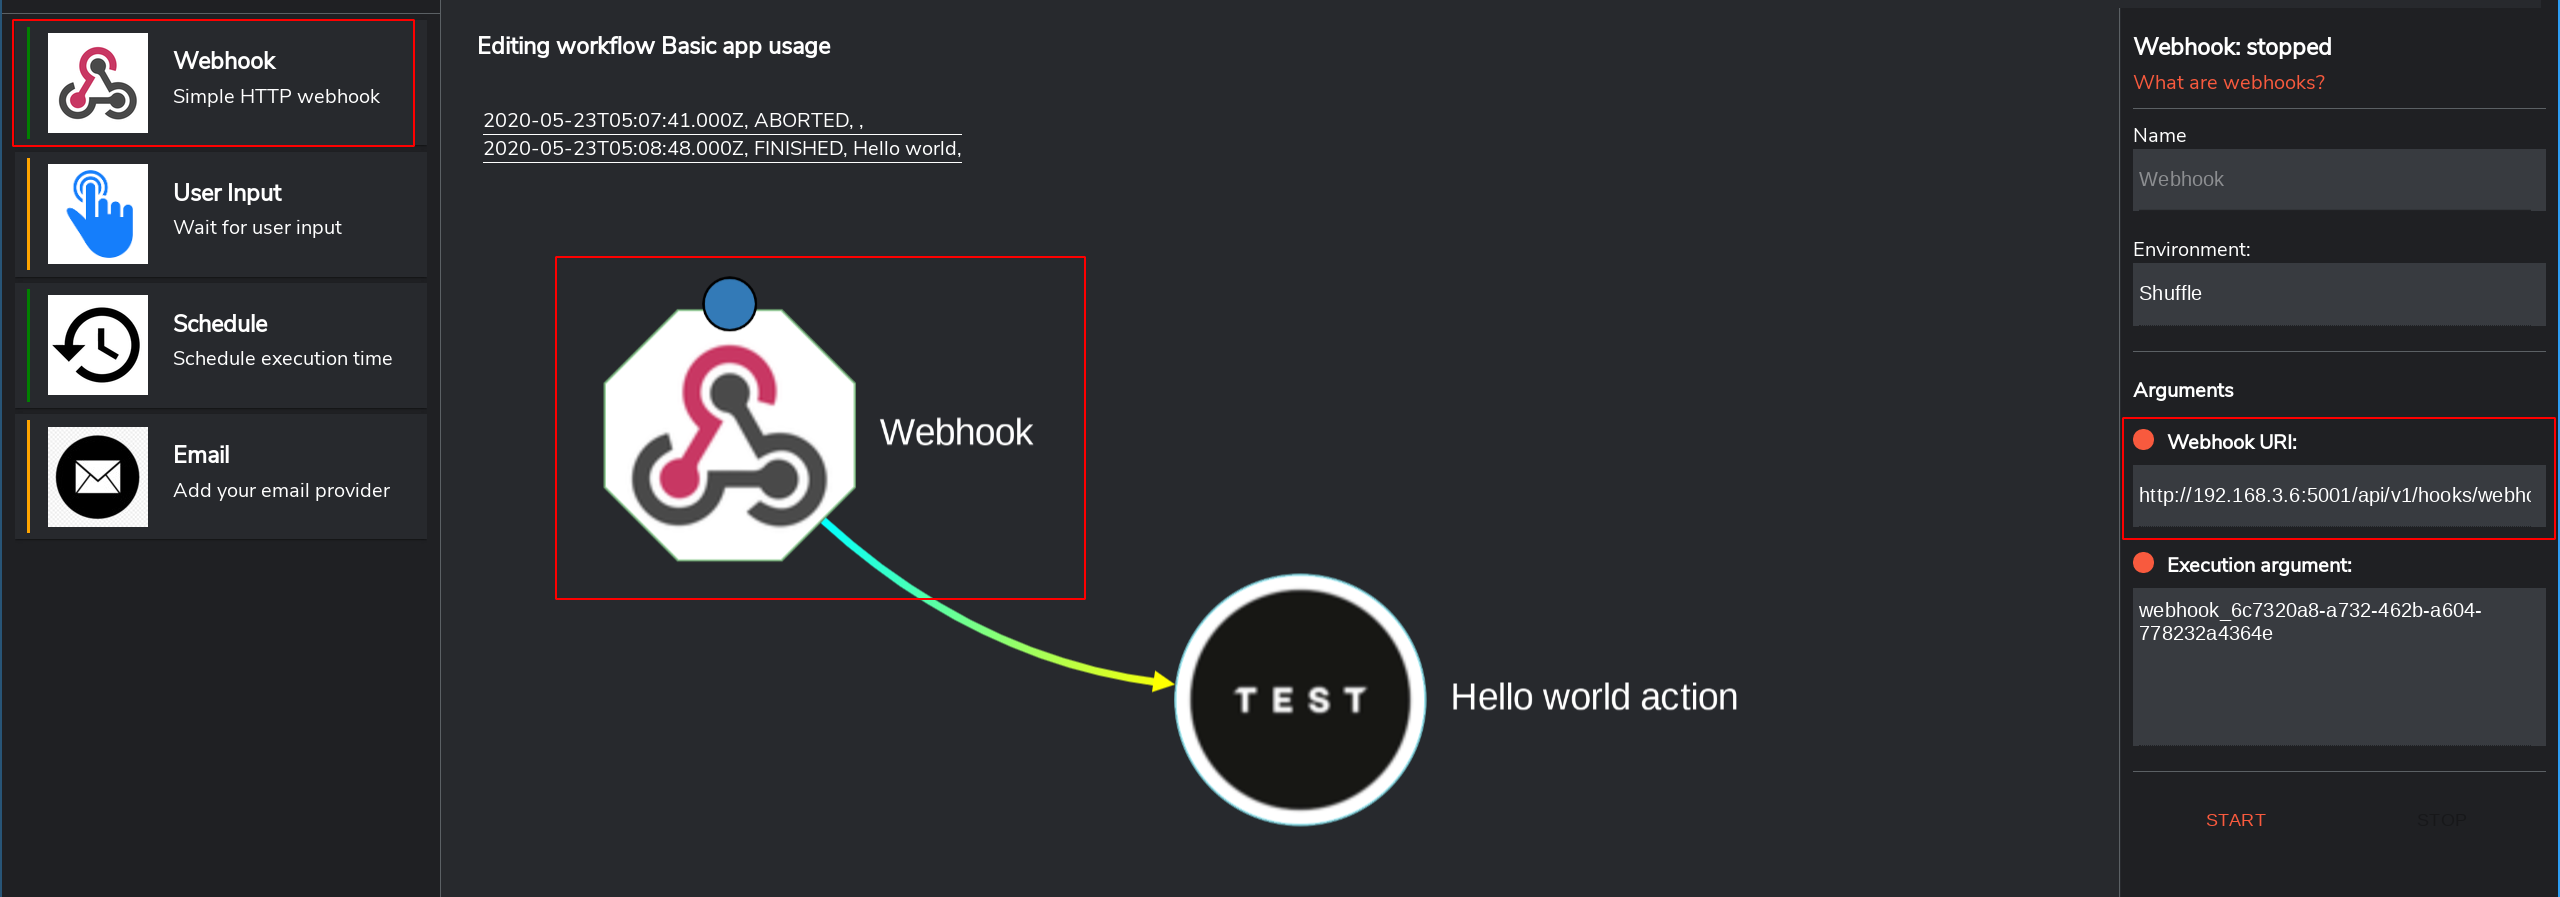
- Drag the "Webhook" trigger from the left-hand panel onto the canvas. It will automatically connect to your starting node.
- Click "Start" to deploy the webhook. A webhook URL is generated:
https://shuffler.io/api/v1/webhooks/webhook_<uuid> - Copy the URL into your external service (e.g., SIEM, ticketing system, or EDR).
Test from the command line:
API Call
curl -X POST 'https://uk.shuffle.security/api/v1/webhooks/webhook_336a7aa2-e785-47cc-85f4-31a4ab5b28b8' \
  -d '{
  "test": "testing"
}'
Response
No response received.
Schedule
Schedules run workflows on a recurring basis. Shuffle provides two scheduling engines depending on your deployment:
- On-prem Schedules: Run directly on the Shuffle backend webserver. The schedule is specified in seconds (down to every 1 second) and persists in the database across restarts and updates.
- Cloud Schedules: Powered by Google Cloud Scheduler using standard 5-part cron syntax. Takes the cron expression and the execution argument to pass to the workflow.
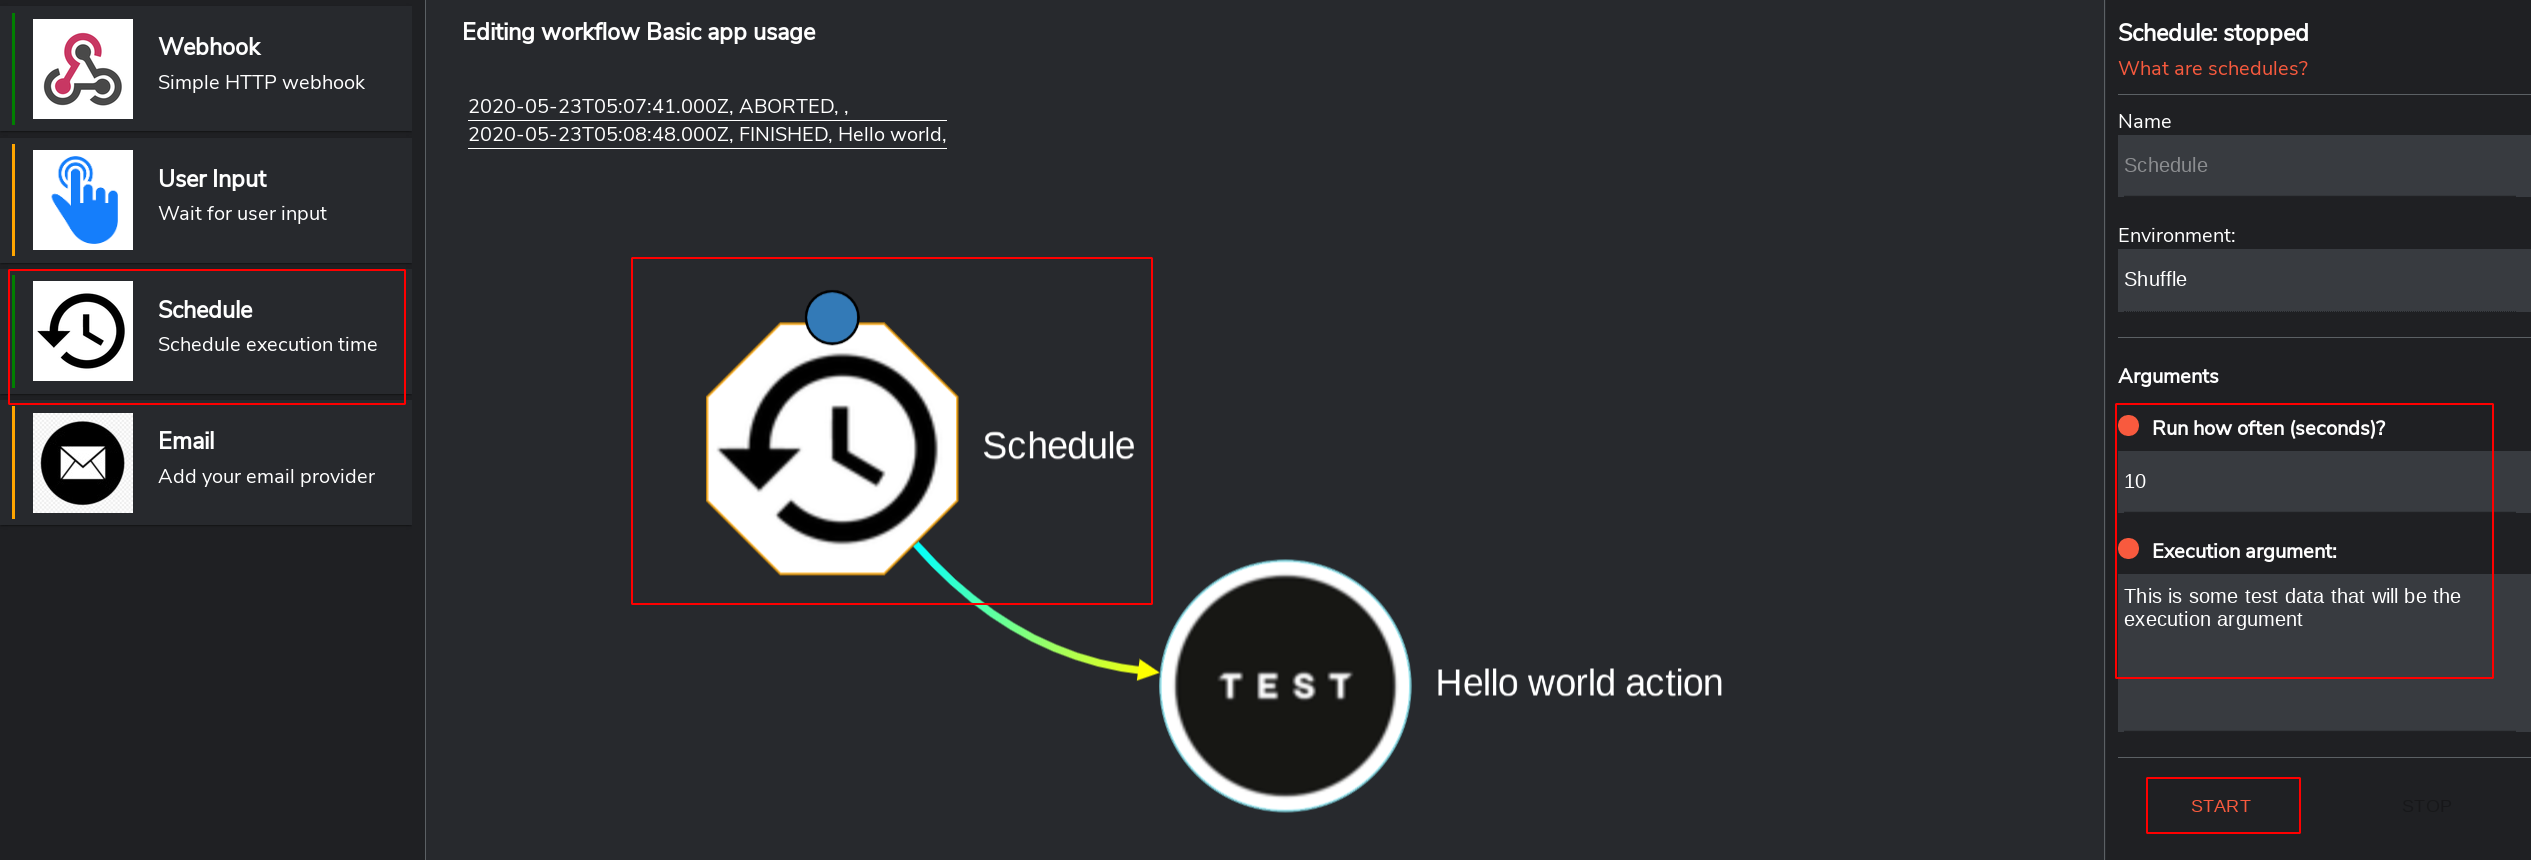
Schedule Setup Example
- Drag the "Schedule" trigger from the left-hand panel onto the canvas.
- Click the schedule node to configure it.
- For on-prem: Enter the interval in seconds. For cloud: Enter the cron expression.
- Provide the execution argument (data passed to the start node).
- Click "Start".
Subflow
Subflow triggers allow you to execute another workflow from within your current workflow, establishing a parent/child execution relationship.
Key Use Cases:
- Reusable standard logic: Centralize common operations (e.g. standard IoC enrichment, ticket creation) into dedicated workflows.
- Nested Loops: Avoid deep nested loops within a single canvas by delegating each item in a list to a subflow execution.
Subflow UI Indicators
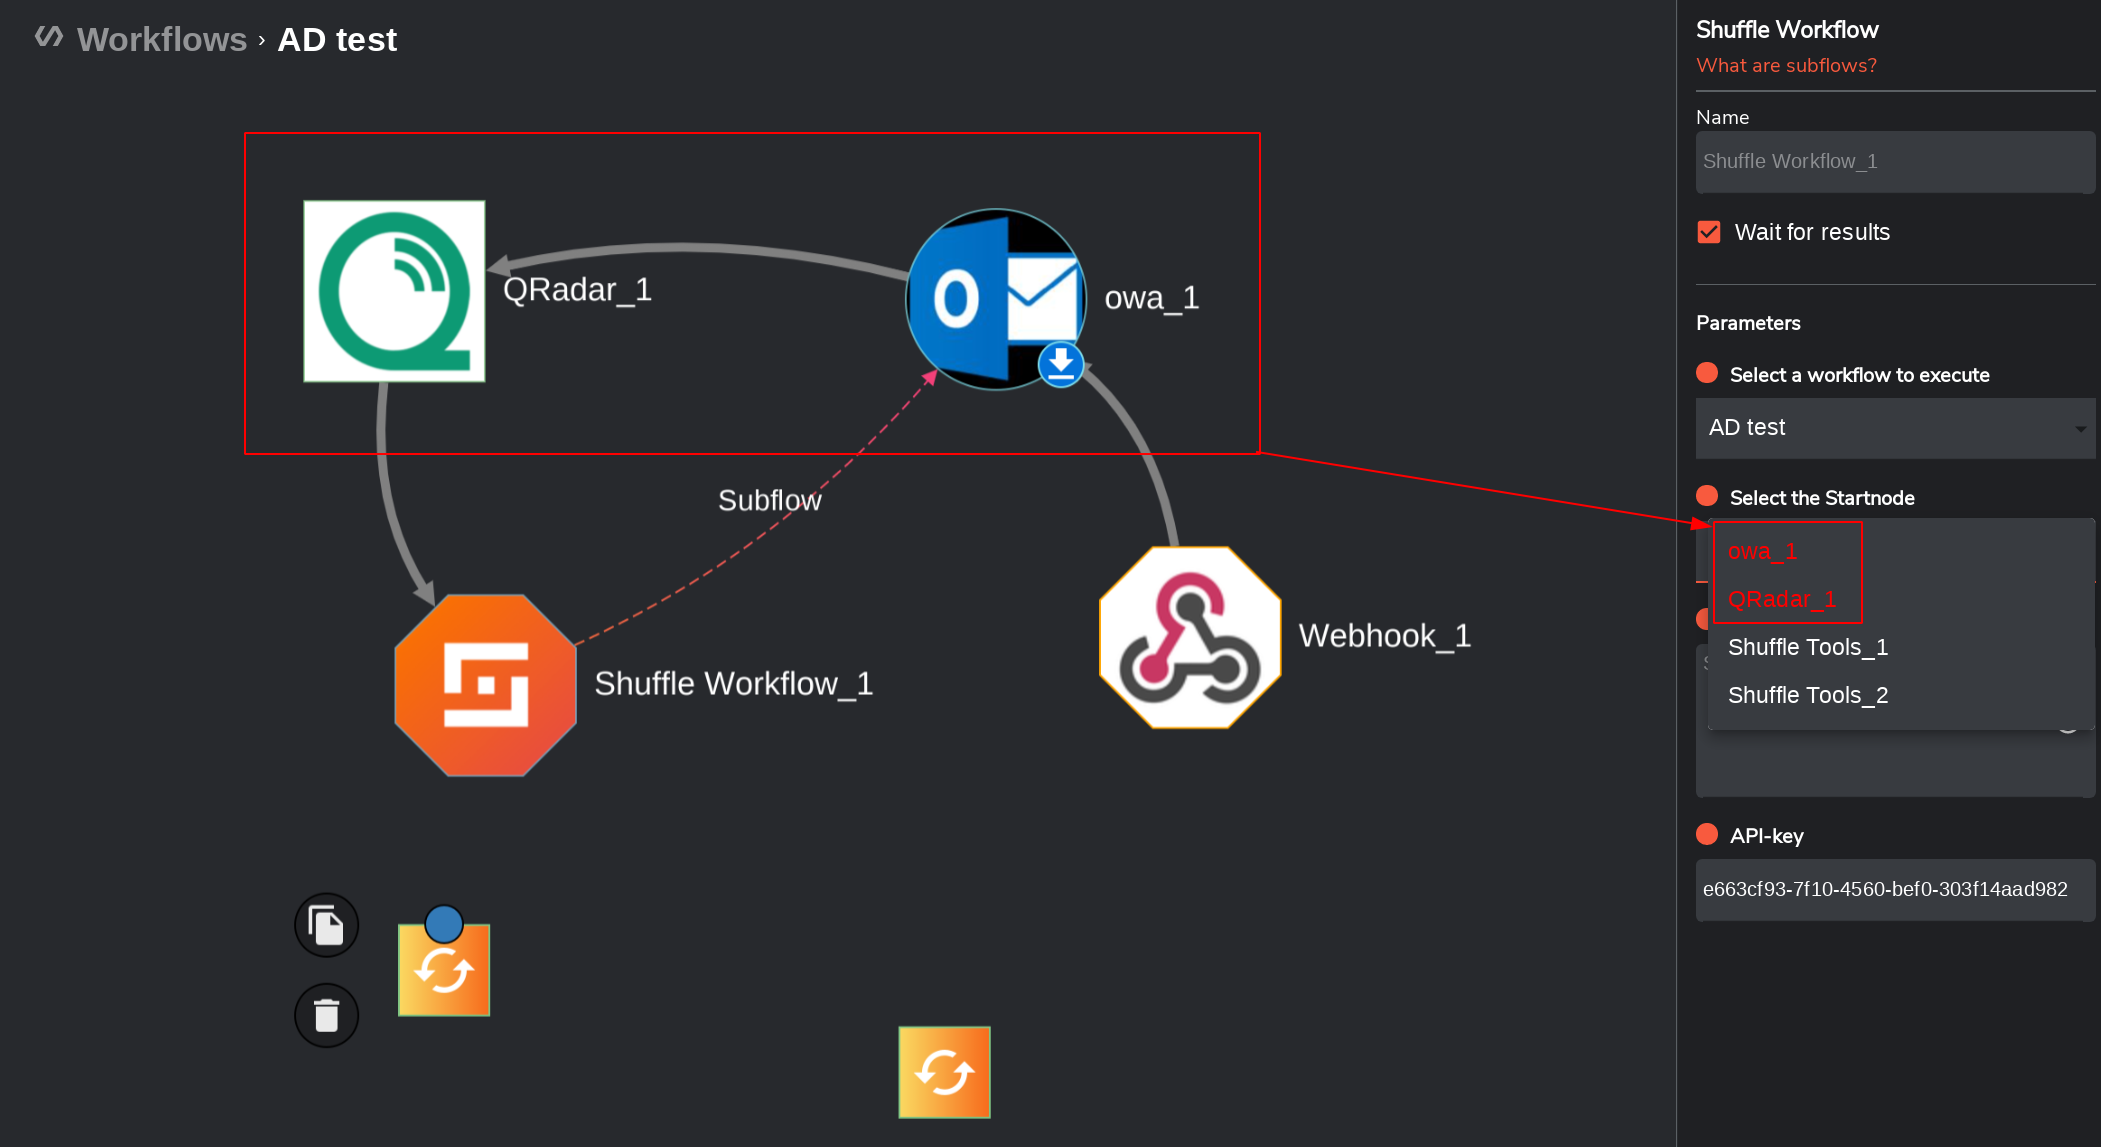
- Subflows within the same workflow: When selecting a subflow, selecting the same workflow will display in red.
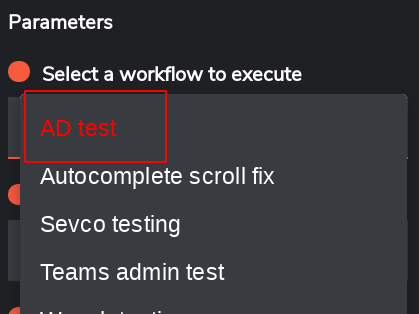
- Parent node warning: Parent nodes calling a subflow trigger show up in red. Ensure termination criteria are in place to prevent infinite recursion.
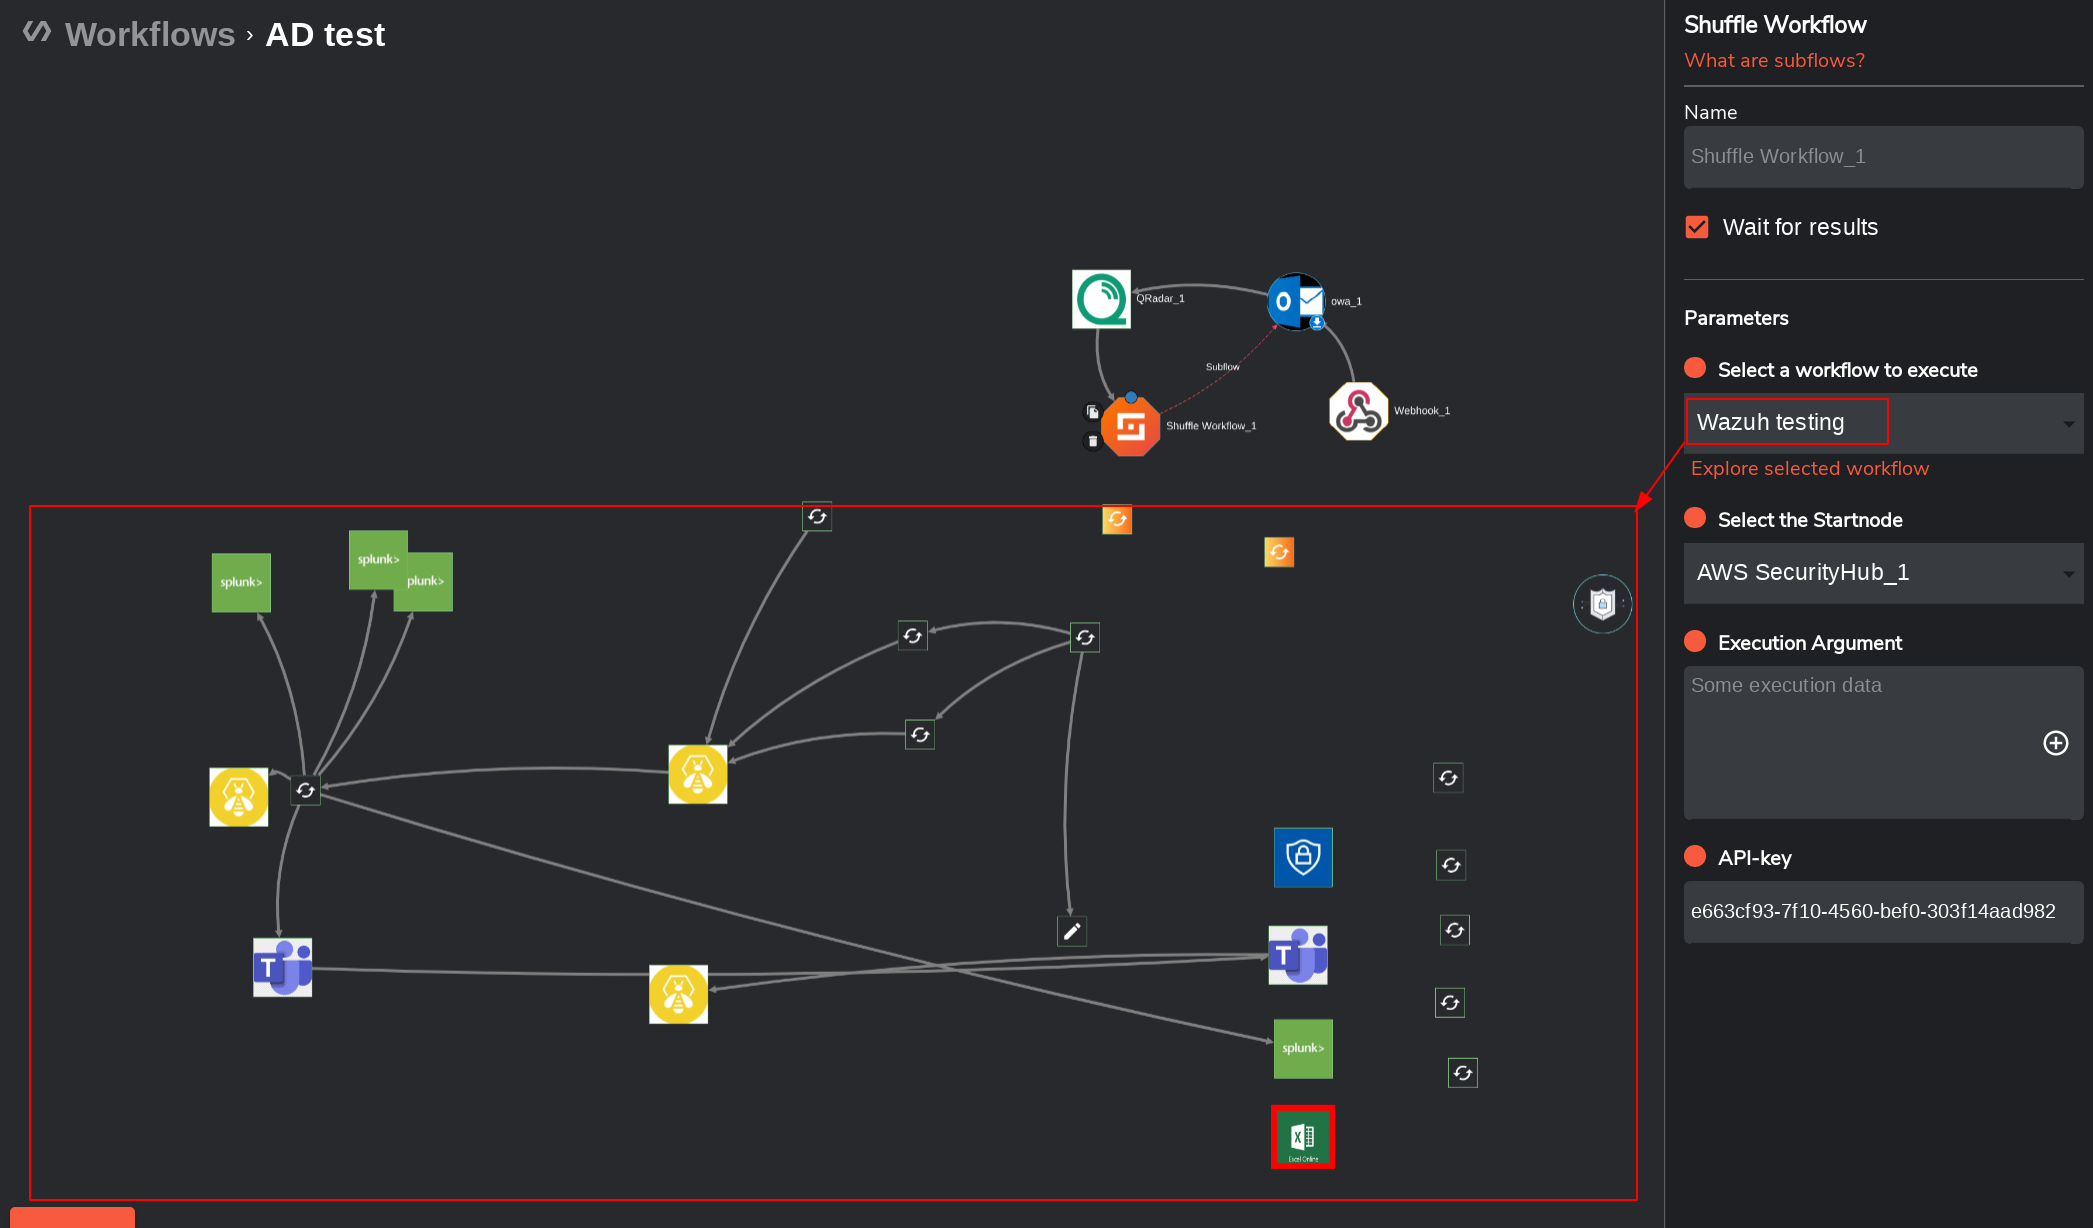
- Importing Subflow: Right-clicking a configured subflow node in the UI allows you to visually inspect its layout.
Subflow Step-by-Step Example
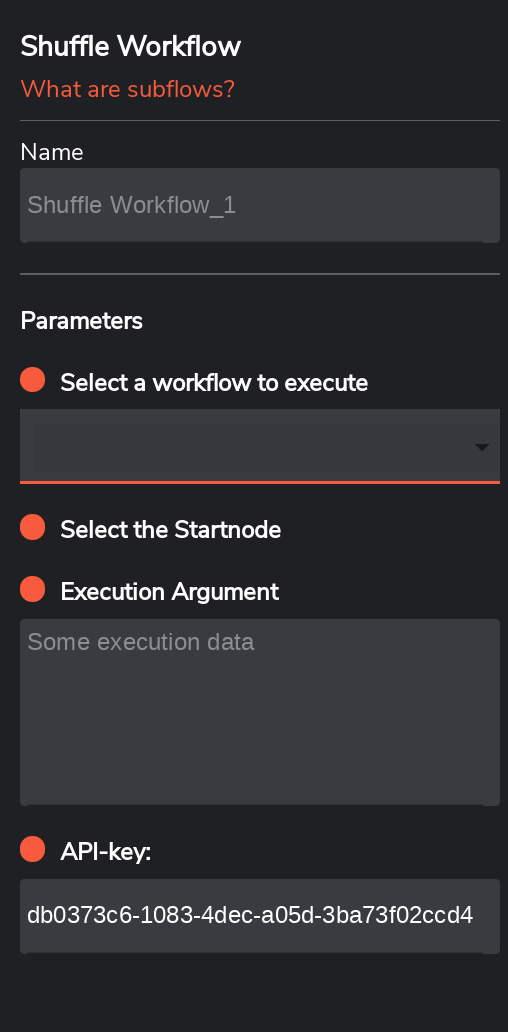
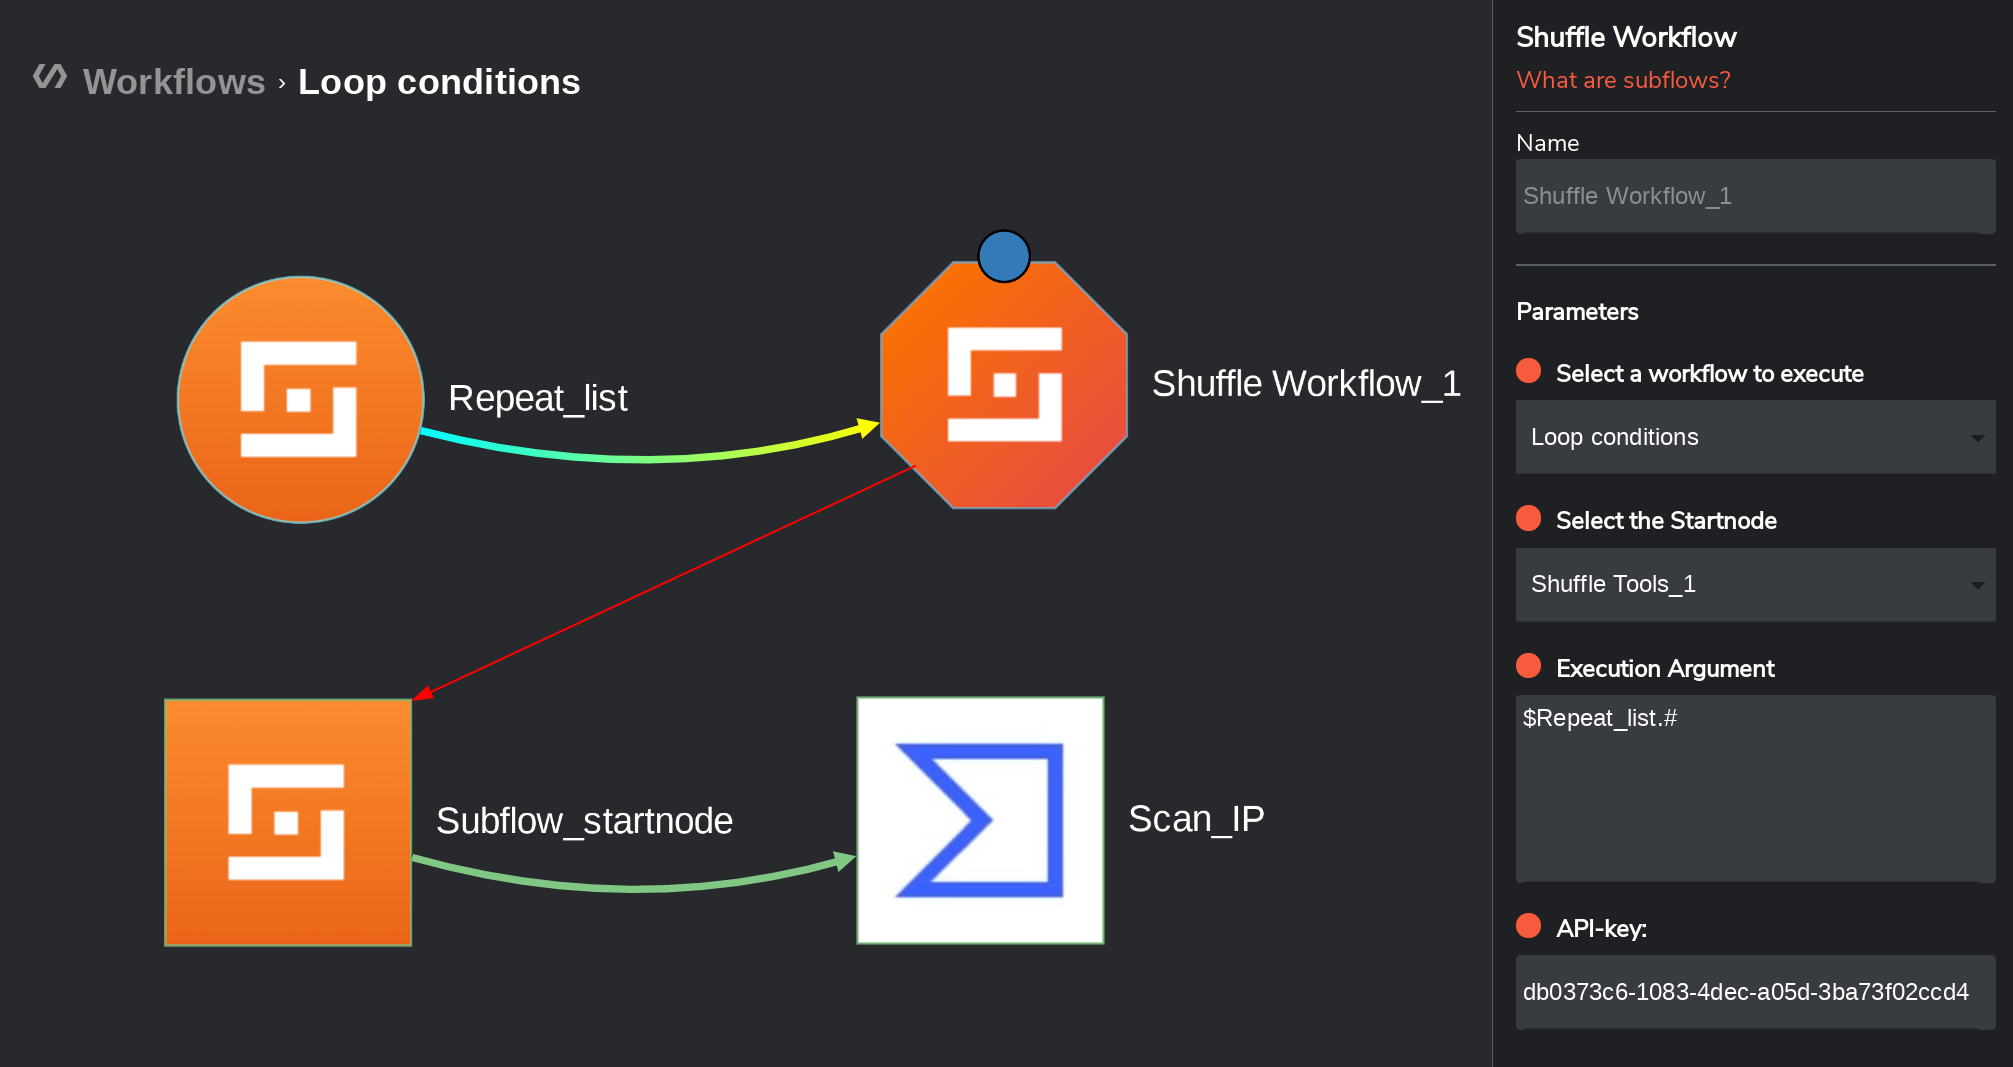
- Drag a Subflow trigger into the parent workflow and click it.
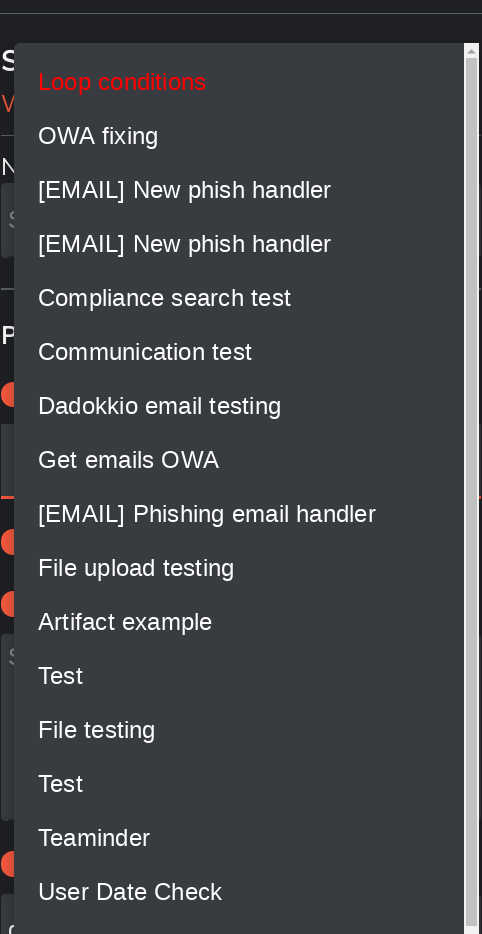
- Choose the child workflow to run. By default, it begins at the child workflow's starting node.
- Define the data passed to the child workflow. To process a list item-by-item, use the
.#notation:
[{"ip": "1.2.3.4", "malicious": true}, {"ip": "4.3.2.1", "malicious": false}, {"ip": "1.2.3.5", "malicious": true}]
Using $Repeat_list.# triggers an independent subflow execution for each object.
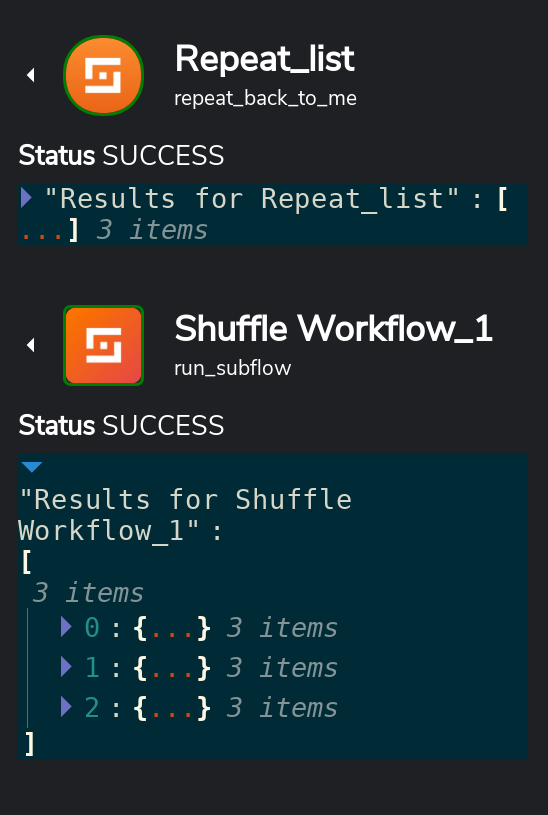
- Execute the parent workflow. In this example, four total executions occur: 1 for the parent workflow and 3 for the individual list items.
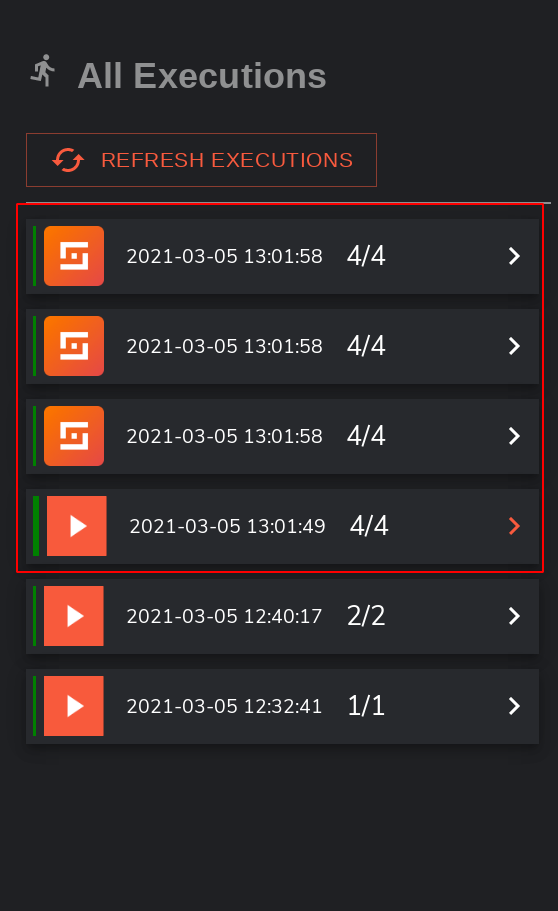
- Inspect the execution list. Subflow executions are designated with a subflow label.
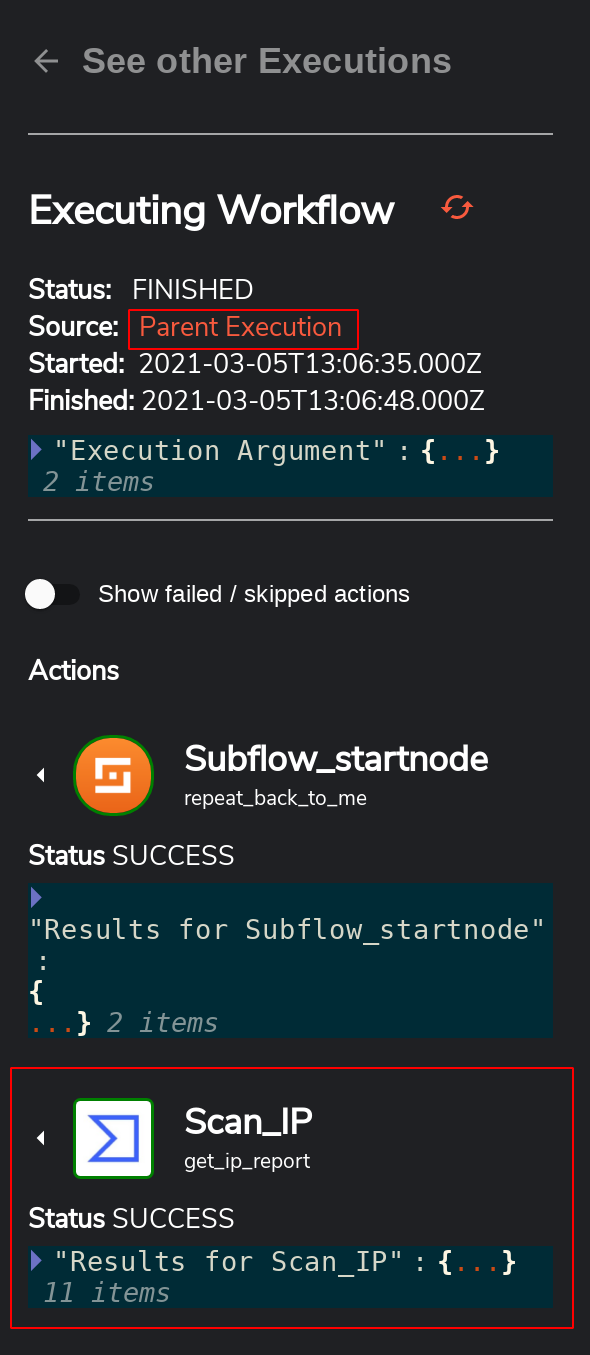
- Opening a child execution displays its individual input data and includes a link back to the parent execution.
User Input
The User Input trigger pauses workflow execution and waits for human review and approval/denial before continuing.
Common Scenarios:
- Access Control: Approving or revoking user permissions before changes take effect.
- Deployment Gates: IT administrator sign-off before rolling out patches or updates to production systems.
- Security Incident Response: SOC analyst authorization before isolating a host or blocking a firewall IP.
User Input Setup Example
- Open the triggers panel in the bottom-left corner and drag the User Input node onto the canvas.
- Configure the input method. Selecting Subflow is preferred for production because it allows full customization of notifications, response links, and fallback handling.
- Set up the trigger workflow (e.g. "UI test trigger") to handle formatting the notification message.
- When the main workflow runs, the trigger workflow receives the execution argument containing approval details, including callback URLs (
frontend_continue,frontend_abort,API_continue, andAPI_abort).
- Use the argument to dispatch a formatted message to email, Slack, Microsoft Teams, or ticketing tools.
- The recipient clicks the link in their notification:
frontend_continueandfrontend_abortdisplay an interactive confirmation prompt:
API_continueandAPI_abortimmediately confirm the action:
- Use the Workflow Run Debugger to audit paused executions, check approval statuses, and review pending inputs.
Pipelines
Pipelines provide high-throughput log ingestion and detection processing built on the Tenzir pipeline engine.
Pipeline Architecture
- Source: The origin where raw data enters (Syslog TCP listener, Kafka topics, log files, webhooks).
- Ingestion: Efficient extraction and structured import into the pipeline.
- Transformation: Real-time filtering, normalization, and Sigma detection rule matching.
- Sink: Emits refined events and matches directly into Shuffle workflows.
Pipeline Trigger Modes
- Syslog Listener: Starts a TCP listener (default port
5162) to ingest incoming Syslog streams. - Sigma Detection: Matches incoming log streams against enabled Sigma rules in real-time, executing a workflow when detections fire.
- Kafka Forwarder: Subscribes to a Kafka topic and automatically forwards messages into the workflow.
Setting Up and Managing Sigma Rules
- Visit the detections page at https://shuffler.io/detections/sigma to automatically download detection rules from GitHub into your Tenzir engine.
- Review, search, and edit existing Sigma rules directly in the UI.
- Enable or disable rules individually or globally:
Pipeline Step-by-Step Example
- Drag the Pipeline trigger from the left panel onto the canvas and connect it to your starting node.
- Click Syslog Listener to start the TCP listener on
0.0.0.0:5162. Point your syslog forwarders to this endpoint.
- For Sigma detection, click the Sigma search option to evaluate incoming logs against active rules.
- For Kafka streams, click Follow Kafka queue and configure the topic name and bootstrap servers.
- Click Stop on the node to pause pipeline ingestion, or delete the trigger to remove the pipeline.
Manual Sigma Forwarding (CLI)
If Shuffle cannot directly reach the log source, run detection on the host with Tenzir and forward matches to a Shuffle Webhook:
export | sigma /var/lib/tenzir/sigma_rules | to <webhook_url>
Direct email triggers have been superseded by Email Schedules. To trigger workflows from incoming emails, use scheduled polling workflows with dedicated apps:
File Handling
Files in workflows are managed by reference (file ID). The system stores metadata alongside each file: md5/sha256 hash, filename, filesize, tenant, originating workflow, creation time, and status.
Useful File Handling Info
- Files are identified by a unique, auto-generated ID.
- File API documentation →
- In workflows, files are typically referenced with the
File_idfield.
File statuses:
| Status | Meaning |
|---|---|
| Created | Metadata prepared, no upload started yet |
| Uploading | Upload in progress — no other file can be added |
| Active | File exists and data is immutable |
| Deleted | File deleted through Shuffle, metadata retained |
Using Files
Upload a file first in the Admin panel under the "files" tab. Copy the File ID from there.
Below is a screenshot of the Files management page in the Admin panel, showing the file list with metadata columns (name, workflow, MD5 hash, status, filesize, and actions).
Within a workflow, the Shuffle Tools app provides:
- Get file value — print file contents
- Download remote file — download from a URL
- Get file meta — retrieve file metadata
- Delete file — remove the file content (metadata persists)
The Testing app can create files directly in a workflow.
File uploads via the App Creator
To make an app action accept file uploads:
- Go to the /apps view, click "Edit App" on the target app.
- Click "New Action."
- Enable "File Upload" and enter the parameter name (e.g.
file). - Paste a curl request into the URL path field to auto-populate the endpoint.
- A file indicator on the action marks that it accepts files. A
File_idfield appears when used in a workflow.
Shuffle Datastore
The Datastore is a persistent key-value store for sharing data across workflows and executions. Unlike workflow variables (which are scoped to a single workflow) or execution variables (which last only one run), Datastore entries persist until you delete them. Any workflow in your tenant can read or write to the Datastore.
Common uses: tracking processed items, sharing configuration between workflows, maintaining counters, caching API responses.
Using the Datastore in Workflows
The Shuffle Tools app provides actions for Datastore operations:
- Set cache — write a key-value pair
- Get cache — read a value by key
- Delete cache — remove a key
- List cache — list all keys, optionally filtered by category
Using the Datastore via API
Set a key:
POST /api/v1/orgs/{org_id}/set_cache
{
  "key": "mykey",
  "value": "myvalue",
  "category": "optional"
}
Get a key:
POST /api/v1/orgs/{org_id}/get_cache
{
  "key": "mykey"
}
List keys:
GET /api/v1/orgs/{org_id}/list_cache?top=50&category=optional
Delete a key:
POST /api/v1/orgs/{org_id}/delete_cache
{
  "key": "mykey"
}
Bulk set (v2 API):
POST /api/v2/datastore?bulk=true
[
  {"key": "k1", "value": "v1"},
  {"key": "k2", "value": "v2"}
]
Deduplication with the Datastore
A common pattern: use the Datastore to track which items have already been processed, so the workflow skips duplicates.
- When a new item arrives, generate a unique key (e.g., the item's ID or hash).
- Check the Datastore for that key.
- If the key exists, the item was already processed — skip it.
- If the key does not exist, process the item and then write the key to the Datastore.
This is a special case of Datastore usage. The key acts as a flag: its presence means "already handled."
Typical Use Cases
Deduplication
Prevent the same item from being processed twice. Use the Datastore to track processed items (covered above). This is identical to the deduplication pattern but presented as a workflow-level concern: the workflow checks incoming data, looks up the unique identifier in the Datastore, and only proceeds if the item is new.
Formatting
Use Liquid formatting to transform data between nodes. Common formatting tasks:
- Convert timestamps to readable dates
- Strip whitespace from strings
- Extract specific fields from a JSON response
- Build URLs or file paths from variables
- Encode or decode Base64 values
Example — convert a Unix timestamp to ISO format:
{{ "now" | date: "%s" | plus: 0 | date: "%Y-%m-%dT%H:%M:%S" }}
HTTP Requests
Use the HTTP App to make API calls to any service. Common patterns:
- GET requests — fetch data from an API endpoint
- POST requests — send data to trigger an action or create a resource
- Authenticated requests — add headers for API keys, Bearer tokens, or Basic auth
When a service has a dedicated Shuffle app (like GitHub or Jira), prefer that app over the HTTP app. The dedicated app handles authentication, pagination, and error handling for you. Use the HTTP app for services without a dedicated integration, or when you need full control over the request.
Subflows & Loops
Standard Loops
To loop over a list within a single workflow, connect a node back to a previous node and use the .# syntax to iterate. Each item in the list triggers one iteration.
Limitation: Standard loops run in a single worker container. Large lists or long-running iterations can consume significant memory and time.
Subflows for Nested Loops
For nested loops (a loop within a loop), or when processing large lists, pass each item to a subflow using the Shuffle Workflow trigger. The child workflow runs independently, and the parent workflow collects the results.
This approach:
- Isolates each iteration in its own execution
- Prevents memory buildup in a single worker
- Allows parallel processing of list items
Parallel Execution
When multiple branches from the same node all evaluate to true, those branches run in parallel. Shuffle spins up separate worker containers for each branch. No special configuration is needed — the workflow engine handles it automatically.
Loop Filtering
Use the Filter List action in the Shuffle Tools app (covered in Condition Loops) to split a list into matching and non-matching items without a subflow. This is simpler but runs in-place, so it is best suited for small to medium lists.
Exploring Executions
Click the Executions button at the bottom-left of the workflow editor to open the execution sidebar. It shows the history of workflow runs and lets you dig into individual results.
Execution List
Each entry/run shows:
- Color: green (finished), yellow (running/waiting), red (failed/aborted)
- Execution Type: manual run, or trigger origin (webhook, schedule, subflow, etc.)
- Timestamp: when the execution started
- Arrow: white normally, orange for the last execution you clicked
Click "Refresh Executions" to update the list — executions run in the background and are not always pushed to the UI in real time.
Execution Details
Click an execution to see detailed results:
- Rerun: re-execute with the same argument and start node.
- Status: whether the execution finished, is still running, or failed.
- Timestamps: start and finish times. A large gap may indicate node delays or problems.
- Show Skipped actions: reveal nodes that did not execute (hidden by default).
The action list shows each step within the execution in order. For each action you can see: the app logo, the action name, the function name, and the result. Expand any action for more debug detail.
Tip: Clicking a JSON result value copies its path (e.g. #nodename.success). Clicking the Copy button copies the actual value.
Workflow Run Debugger
The Workflow Run Debugger lets you search, filter, and manage large volumes of executions — up to 500 at once. Use it when you need to find past runs or view more than the 100 executions shown in the sidebar.
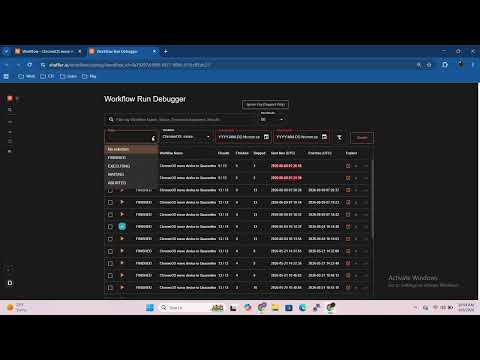
How to access:
- Open a workflow and click the Executions button (bottom-left).
- In the execution list, click Debugger (top-right).
- Or navigate directly to
https://shuffler.io/workflows/debug?workflow_id=<your-workflow-id>.
Features:
- Filter by workflow name, status, execution argument, date range, and results.
- View executions across your tenant and sub-tenants.
- Select multiple executions and mass-abort or mass-rerun them.
Collaboration Features
Sub-Tenant Distribution (Beta)
Build a workflow once and distribute it to sub-tenants. Each tenant can add their own nodes and branches; the parent controls the shared structure.
Requirements:
- Must be in a parent tenant
- Must have at least one sub-tenant
- Configure distribution in the workflow's "Edit" panel
Distributed workflows have a blue border.
Inside the workflow, you can switch between tenants.
Editing a child workflow is allowed, but the parent's version overrides shared nodes on the next save — except for nodes, branches, and authentication added by the child.
Workflow Revisions & Versioning
Every workflow is backed up at most once per 60 seconds. They are stored in a separate database index and can be reverted to at any time.
Access backups from the Revisions button in the bottom bar. Select a previous version to restore it. Your current state is also saved before reverting.
Authentication Groups (Beta)
Run a single workflow against multiple sets of credentials. See Authentication Groups.
Multiplayer (Beta)
Multiple users can edit the same workflow simultaneously on Shuffle Cloud.
Forms
Every workflow can be accessed as a form at /forms/{workflow_id}. Configure form fields in the workflow's edit panel under "Sections."
API
See the Workflow API documentation.
Workflow Backup
Shuffle automatically backs up workflows connected to GitHub or Azure DevOps whenever you make changes and save or execute.
GitHub Integration
Required details:
- Repository URL — the HTTPS URL from your GitHub repo (e.g.
https://github.com/<org>/<repo>.git). - Branch — e.g.
mainormaster. - Personal Access Token — generate at github.com/settings/tokens with
repoandworkflowscopes. - Username — your GitHub username.
Azure DevOps Integration
Required details:
- Repository URL — the HTTPS URL from Azure Repos (e.g.
https://dev.azure.com/<org>/<project>/_git/<repo>). - Branch — e.g.
mainordevelop. - Personal Access Token — generate from your Azure DevOps profile under Personal Access Tokens, with
Code (Read & Write)scope. - Username — your Azure DevOps email address.
Note: Azure DevOps support is available from version 2.1.1 and above.
Liquid Formatting
Liquid is a templating language implemented in Shuffle that enables flexible data transformation, string formatting, mathematical operations, and list manipulation across your workflows.
Shuffle uses the Python library Liquidpy. If you find something that should work in Liquid, but doesn't work in Shuffle, please make an issue.
Availability
Liquid parsing is available in any field used for execution in Workflows, except directly inside the trigger Execution Argument definition.
Supported:
- App Parameters (in all actions)
- Conditions (both left-side and right-side expressions)
- Workflow Variables
- Execution Variables
Not Supported:
- Node names
- Directly inside Trigger definitions
Shuffle's Implementation of Liquid
The main use of Liquid within Shuffle is to format text. We recommend using the Repeat back to me action in our Shuffle Tools app to test, before moving it into the field of choice once you know your formatting works.
Generally in Liquid:
- Output values are enclosed in double curly braces:
{{ variable }} - Control logic is enclosed in curly brace percentage signs:
{% if statement %}
Arbitrary Python Execution
Shuffle also allows writing inline Python within Liquid. Any output printed to stdout with print() is returned as the result:
{% python %}
tags = ["tag1", "tag2", "tag3"]
print(",".join(tags))
{% endpython %}
Most Used Use Cases
1. Get the Date for Tomorrow
By adding 86,400 seconds (1 day) to the Unix epoch of "now", we calculate tomorrow's timestamp:
Expression:
{{ "now" | date: "%s" | plus: 86400 | date: "%Y-%m-%dT%H:%M:%S" }}
Result:
2026-03-08T19:59:58
2. Create an Epoch Unix Timestamp
Convert "now" to seconds since January 1st, 1970:
Expression:
{{ "now" | date: "%s" }}
Result:
1773071998
Calculate a Time Range (e.g. 10 days ago):
TimeFrom={{ "now" | date: "%s" | minus: 864000 }}&TimeTo={{ "now" | date: "%s" }}
3. Get Size of an Array
Return the element count of a list:
Expression:
{{ ["this", "is", "an", "array"] | size }}
Result:
4
4. Perform Math on List Items
Given an earlier node (e.g. shuffle_tools_5) returning:
[{"number": 1}, {"number": 2}, {"number": 3}]
Add 1 to each item when constructing a JSON payload:
{"new_number": {{ $shuffle_tools_5.#.number | plus: 1 }} }
5. Dot Notation Workaround for Non-Standard Keys
When dealing with keys containing dots (e.g. Elasticsearch/Kibana alert fields like kibana.alert.rule.name), standard dot navigation may fail. You can use Python bracket notation to parse the dictionary safely:
{% python %}
import json
data = json.loads('''$nodename.body''')
print(data["_source"]["kibana.alert.rule.name"])
{% endpython %}
(Note: Dot notation for standard fields does not require Liquid and can be accessed directly as $node.field.)
6. Data Cleaning: Escaping Quotes and Newlines
Clean raw text containing quotes and newlines before injecting into JSON fields:
{
  "fields": {
    "project": {"key": "SEC"},
    "summary": "Automated incident ticket",
    "description": "{{ '$shuffle_tools_1' | newline_to_br | replace: '\"', '' | replace: '<br />', '\\\\n' }}",
    "issuetype": {"name": "Task"}
  }
}
7. Time Window Checking (Working Hours Evaluation)
Check whether the current time in EST falls between 4:30 PM and 8:00 AM:
{% python %}
import datetime

initial_timestamp = datetime.datetime.now(datetime.timezone.utc) - datetime.timedelta(hours=5)
timedata = {
    "now": initial_timestamp.strftime("%s"),
    "comparison": "",
    "run_alert": False,
}
midnight = datetime.datetime.combine(
    datetime.date.today(),
    datetime.time(0, 0)
)
if initial_timestamp.hour < 8 and initial_timestamp.hour >= 0:
    tomorrowtime = (midnight + datetime.timedelta(hours=8)).strftime("%s")
    timedata["comparison"] = tomorrowtime
    if timedata["now"] < tomorrowtime:
        timedata["run_alert"] = True
elif initial_timestamp.hour >= 16 and initial_timestamp.hour <= 23:
    todaytime = (midnight + datetime.timedelta(hours=16, minutes=30)).strftime("%s")
    timedata["comparison"] = todaytime
    if timedata["now"] > todaytime:
        timedata["run_alert"] = True

print(timedata["run_alert"])
{% endpython %}
Available Filters
Shuffle provides a comprehensive set of Liquid filters:
- abs: Returns the absolute value of a number. Example:
{{ -15 | abs }}→15. - append: Concatenates two strings. Example:
{{ "item_" | append: "123" }}→"item_123". - as_object: Casts stringified JSON data into an active JSON object.
- at_least: Sets a minimum threshold for a number. Example:
{{ 4 | at_least: 5 }}→5. - at_most: Sets a maximum threshold for a number. Example:
{{ 6 | at_most: 5 }}→5. - base64_encode: Encodes a string in Base64 format. Example:
{{ "admin:password" | base64_encode }}. - base64_decode: Decodes a Base64 encoded string.
- capitalize: Capitalizes the first character of a string.
- ceil: Rounds a floating-point number up to the nearest integer.
- compact: Removes all null/nil values from an array.
- concat: Concatenates multiple arrays together.
- csv_parse: Parses a CSV formatted string into a JSON list.
{{ "name,time\\nme,now" | csv_parse }} - date: Formats a timestamp using standard strftime directives. Example:
{{ "now" | date: "%Y-%m-%d" }}. - default: Provides a fallback value if the target is nil, false, or empty. Example:
{{ missing_var | default: "fallback" }}. - divided_by: Divides a number by an integer or float. Example:
{{ 20 | divided_by: 4 }}→5. - downcase: Converts a string to lowercase.
- eml_parse: Parses an RFC822 EML email string, extracting
to,from,subject, body, and attachments.{{ raw_eml_content | eml_parse }} - escape: Escapes HTML and URL syntax characters.
- escape_once: Escapes characters without double-escaping existing entities.
- first: Returns the first element of an array.
- floor: Rounds a number down to the nearest integer.
- get: Extracts a property using a path string. Example:
{{ my_obj | get: "network.ip" }}. - hmac_sha1: Computes SHA-1 HMAC using a secret key.
- hmac_sha256: Computes SHA-256 HMAC using a secret key.
- hmac_sha256_base64: Computes SHA-256 HMAC encoded in Base64.
- html_encode: Replaces HTML syntax characters with entities (e.g.
<becomes<). - html_decode: Converts HTML entities back into characters.
- in_cidr: Evaluates whether an IP address belongs to a CIDR block. Returns boolean.
{{ "10.0.1.5" | in_cidr: "10.0.0.0/8" }} - join: Joins elements of an array into a string using a delimiter.
{{ ["admin", "analyst", "auditor"] | join: ", " }} - json_parse: Parses an escaped JSON string into a structured JSON object.
- jsonpath: Evaluates complex JSONPath queries with filters and wildcards.
{{ receive_event | jsonpath: "$.items[*].id" }} - jwt_sign: Signs a JSON claim set into a JWT token using RS256 or HS256:
{{ claim_set | jwt_sign: CREDENTIAL.private_key, "RS256" }} - last: Returns the final element of an array.
- lstrip: Strips whitespace from the beginning of a string.
- map: Extracts values of a specific attribute across all items in an array of objects.
- md5: Generates the hex-encoded MD5 hash of a string.
- md5_base64: Generates the Base64-encoded MD5 hash of a string.
- minus: Subtracts a number. Example:
{{ 10 | minus: 3 }}→7. - modulo: Returns the remainder of division. Example:
{{ 7 | modulo: 2 }}→1. - neat_json: Pretty-prints a JSON object with indentation.
- newline_to_br: Replaces newlines (
\\n) with HTML line breaks (<br>). - pluralize: Selects singular or plural based on a count. Example:
{{ count | pluralize: 'alert', 'alerts' }}. - plus: Adds a number. Example:
{{ 5 | plus: 3 }}→8. - prepend: Prepends a string to the front. Example:
{{ "world" | prepend: "hello " }}. - random_element: Selects a random element from an array.
- regex_replace: Replaces occurrences matching a regex pattern with a replacement string.
{{ "alert_102" | regex_replace: "[0-9]+", "XXX" }} - remove: Removes all occurrences of a substring.
- remove_first: Removes only the first occurrence of a substring.
- replace: Replaces all occurrences of a string.
- replace_first: Replaces only the first occurrence of a string.
- reverse: Reverses an array.
- round: Rounds to the nearest integer or specified decimal places.
- rstrip: Strips whitespace from the end of a string.
- sha1: Computes the SHA-1 hash of a string.
- sha256: Computes the SHA-256 hash of a string.
- sha512: Computes the SHA-512 hash of a string.
- size: Returns character count of a string or element count of a list.
- slice: Extracts a substring by offset and length.
- sort: Sorts array elements by a property.
- sort_natural: Case-insensitive sort of array elements.
- split: Splits a string into an array by delimiter:
{{ "analyst@company.com" | split: "@" }} - strip: Removes all whitespace and newline characters from both ends of a string.
- strip_html: Removes HTML tags from a string.
- strip_newlines: Removes newline characters from a string.
- times: Multiplies numbers. Example:
{{ 5 | times: 4 }}→20. - to_csv: Formats an array into a CSV string.
- to_json: Formats an object into a JSON string.
- to_snake_case: Converts a string to snake_case.
- transliterate: Replaces non-ASCII characters with ASCII equivalents.
- truncate: Shortens a string to N characters with an ellipsis (
...). - truncatewords: Shortens a string to N words.
- type: Returns the class/type of an object (e.g.,
String,Array,Hash). - uniq: Removes duplicate values from an array.
- upcase: Converts a string to uppercase.
- url_decode: Decodes URL percent-encoded characters.
- url_encode: URL-encodes special characters.
- where: Filters array objects matching key/value:
{{ alerts | where: "severity", "critical" }} - zip: Compresses a file into a ZIP archive with optional password protection.
Filter Examples & Workarounds
Stripping Whitespace from an Uploaded File List
- A workflow loads a list of IP addresses from an uploaded file:

- The raw file contains leading whitespace that disrupts downstream node parsing:

- Apply
stripin the action parameter:

- The downstream node receives cleanly formatted data:

Reversing an Array Workaround
When reversing an array directly returns an iterator object, chaining reverse | join: ',' formats the array correctly:
{{ $shuffle_tools_1 | reverse | join: ',' }}

Dynamic App Authentication with Liquid
You can use Liquid Python in app authentication fields to dynamically compute credentials on every run (e.g. generating signed JWT tokens):
{% python %}
import jwt
import time

def generate_token():
    key = {
        "customerName": "",
        "accessID": "YOUR_ACCESS_ID",
        "accessKey": "YOUR_PRIVATE_KEY",
        "adminRestApiUrl": "https://api.example.com"
    }
    exp = time.time() + 3600
    jwt_claims = {
        "iat": time.time(),
        "exp": exp,
        "aud": key["adminRestApiUrl"],
        "sub": key["accessID"],
    }
    return jwt.encode(jwt_claims, key["accessKey"], algorithm="RS256")

print(generate_token())
{% endpython %}