Search
Ctrl+K
Configure Shuffle


On this page
Documentation for configuring Shuffle. Most information is related to onprem and hybrid versions of Shuffle.
Introduction
With Shuffle being Open Source, there is a need for a place to read about configuration. There are quite a few options, and this article aims to delve into those.
Shuffle is based on Docker and is started using docker-compose with configuration items in a .env file. .env has the configuration items to be used for default environment changes, database locations, port forwarding, github locations and more.
Installation
Check out the installation guide, however if you're on linux:
System requirements may be found further down in the Servers section.
git clone https://github.com/shuffle/Shuffle
cd Shuffle
Edit .env before your first start. Set at least:
SHUFFLE_ENCRYPTION_MODIFIER=<random-long-secret>
SHUFFLE_OPENSEARCH_PASSWORD=<strong-password>
OPENSEARCH_INITIAL_ADMIN_PASSWORD=<same-strong-password-for-first-start>
OUTER_HOSTNAME=<server-ip-or-dns-name>
SSO_REDIRECT_URL=http://<server-ip-or-dns-name>:3001
Start the stack:
docker compose up -d

Verify running containers:
docker compose ps
docker logs -f shuffle-backend
docker logs -f shuffle-orborus
docker logs -f shuffle-opensearch
Open Shuffle in your browser:
http://<server-ip-or-dns-name>:3001https://<server-ip-or-dns-name>:3443
First login & verification
Once Shuffle is running, open it in your browser:
http://<server-ip>:3001https://<server-ip>:3443
- Set up your admin user (or log in directly if you set
SHUFFLE_DEFAULT_USERNAMEandSHUFFLE_DEFAULT_PASSWORDin.env). - Go to
/appsand make sure the default apps are loaded. If they aren't, check your network/proxy connection to GitHub. - Build a quick test workflow with a Webhook/Schedule trigger and Shuffle Tools or HTTP to verify that executions run through properly.
PS: If you're also running Shuffle Security (for Incidents, Alerts, and Case Management), open http://<server-ip>:3002. It connects to the exact same backend and shares your login credentials.
Useful Docker commands
docker compose pull              # Pull latest container images
docker compose up -d             # Start all services in the background
docker compose down              # Stop and remove containers and networks
docker compose restart backend   # Restart backend service (useful after .env changes)
docker compose restart orborus   # Restart execution manager
docker ps                        # List all running containers (including active workers/apps)
docker network ls                # Inspect bridge and overlay networks
docker volume ls                 # List persistent volumes
Self-hosting Shuffle Security
Shuffle Security is the SOC and incident response frontend for Shuffle. It connects directly to your existing shuffle-backend over the Docker network on port 3002 (HTTP) and 3444 (HTTPS).
To add Shuffle Security to your existing docker-compose.yml:
  shuffle-security:
    image: ghcr.io/shuffle/shuffle-security:latest
    container_name: shuffle-security
    hostname: shuffle-security
    ports:
      - "${SHUFFLE_SECURITY_PORT:-3002}:80"
      - "${SHUFFLE_SECURITY_PORT_HTTPS:-3444}:443"
    networks:
      - shuffle
    environment:
      - BACKEND_HOSTNAME=${BACKEND_HOSTNAME:-shuffle-backend}
      - SHUFFLE_CORE_URL=${SHUFFLE_CORE_URL:-http://<server-ip>:3001}
      - SHUFFLE_SECURITY_URL=${SHUFFLE_SECURITY_URL:-http://<server-ip>:3002}
    restart: unless-stopped
    depends_on:
      - backend
Then pull and start the container:
docker compose up -d shuffle-security
Once running, access Shuffle Security at http://<server-ip>:3002. It uses the exact same backend API, user credentials, tenants, and OpenSearch database as Shuffle Core (:3001).
PS: If you want to deploy the standalone Shuffle Security repository directly:
git clone https://github.com/shuffle/shuffle-security
cd shuffle-security
docker compose up -d
Updating Shuffle
From version v1.1 onwards, we are using ghcr.io/shuffle/* registry instead of ghcr.io/frikky/*
As long as you use Docker, updating Shuffle is straight forward. To use a specific version of Shuffle, check out specific version. We recommend always sticking to the latest tag, and if you want experimental changes, use the nightly tag. You may however in specific cases want to use a static tag, such as 2.1.1
While being in the main repository, here is how to update Shuffle:
docker-compose down
git pull
docker-compose pull
docker-compose up -d
Please note: We will no longer provide support for older versions after January 31, 2026. To ensure uninterrupted access and the best possible experience, please upgrade to Shuffle v2.1.1.
Versions v2.1.1+ include strict, enforced limitations. We are now actively enforcing the differences between the Open Source (OSS) and Enterprise editions, differences that have always existed but were not previously enforced.
PS: This will NOT update your apps, meaning they may be outdated. To update your apps, go to /apps and click both buttons in the top right corner (reload apps locally & Download from Github)
Specific Versioning
To use a specific version of Shuffle, you'll need to manually edit the Docker-Compose.yml file to reflect the version - usually for the frontend and backend, but sometimes also the other containers. You can see all our released versions here. We recommend keeping the same version for the frontend and backend, and not to keep them separate, as seen in the image below.
Marketplace Setup
Using cloud marketplaces (AWS Marketplace, Google Cloud Marketplace, Azure Marketplace), you should be able to deploy Shuffle onprem with a few clicks. This is a great way to get started with Shuffle, as it's a fully managed service and test it out in your own environment without worrying about the setup. We are working with our cloud partners to get this up and running as soon as possible.
Production readiness
Shuffle is by default configured to be easy to start using. This means we have had to make some tradeoffs which can be enabled/disabled to make it easier to use, or scale better. The following section outlines a lot of what is necessary to make Shuffle's security, availability and scalability better.
Here are the things we'll dive into
- Production checklist
- Host & OpenSearch prerequisites (Linux)
- Environment Variables
- High Availability
Production checklist
Before running Shuffle in production, here are the key things to have in place:
- Storage & Backups: OpenSearch data (
./shuffle-database) and Shuffle file uploads (./shuffle-files) need persistent storage. If you run multiple backend nodes,./shuffle-filesshould be on shared storage like NFS. Don't forget to back up both folders regularly. - Resource Sizing:
- Testing / Lab: Minimum 2 vCPU, 4 GB RAM, 30 GB disk.
- Production: 2+ vCPU (4+ recommended for high-throughput), 8+ GB RAM, 100+ GB SSD.
- Network Access: Make sure Shuffle workers and app containers can reach your internal tools (SIEM, EDR, ticketing systems, mail servers, Active Directory / LDAP) and that your firewall allows inbound webhook triggers.
- Outbound & Proxies: Shuffle downloads apps from GitHub (
github.com/shuffle/python-apps) and Docker images fromghcr.io/ Docker Hub. If you're behind a corporate proxy, check the proxy section below. - Encryption Secret:
[!CAUTION] Make sure your
SHUFFLE_ENCRYPTION_MODIFIERstays the same! This is the master secret used to encrypt all app credentials. If you lose or change this variable, all your saved app authentications will break and you'll have to re-enter them.
Host & OpenSearch prerequisites (Linux)
OpenSearch is RAM-heavy and has a few Linux kernel requirements to run properly without crashing:
# 1. Give the database folder the right permissions (user 1000)
sudo chown -R 1000:1000 shuffle-database

# 2. Disable swap (OpenSearch runs much better without swap)
sudo swapoff -a

# 3. Increase max virtual memory map count (otherwise OpenSearch won't start)
sudo sysctl -w vm.max_map_count=262144

# Make it permanent across reboots:
echo "vm.max_map_count=262144" | sudo tee -a /etc/sysctl.d/99-opensearch.conf
Environment Variables
With Shuffle being a very technical system, it is important to understand that you have a lot of control mechanisms available to you in your local installation.
Check the .env file on your server to see what the default values are. They are broadly split into the following:
- Setup Configuration (default usernames & download locations for easy deployments)
- Network Configuration (e.g. how does the frontend route to the correct backend, or Orborus->Frontend->Backend through Nginx)
- Container Control (Registries, Docker & K8s-specific configs etc.)
- Health and Stability (Enable/Disable health checks, Log forwarding, automatic Reruns and Aborts etc.)
- Opensearch Configuration (Networking, password & security systems etc)
PS: Most of our environment variables start with SHUFFLE_
Most important environment variables
Here are the environment variables you'll be touching the most in .env:
| Variable | Default / Example | Description |
|---|---|---|
FRONTEND_PORT | 3001 | Default Web UI HTTP port (Shuffle Core). |
FRONTEND_PORT_HTTPS | 3443 | Default Web UI HTTPS port. |
SHUFFLE_SECURITY_PORT | 3002 | Default Web UI HTTP port for Shuffle Security. |
SHUFFLE_SECURITY_PORT_HTTPS | 3444 | Default Web UI HTTPS port for Shuffle Security. |
BACKEND_PORT | 5001 | REST API backend port. |
OUTER_HOSTNAME | <server-ip-or-fqdn> | Hostname or IP that Orborus and workers use to communicate with the backend. |
BASE_URL | http://<server-ip>:3001 | Internal and external base URL used by Shuffle services. |
SHUFFLE_ENCRYPTION_MODIFIER | <random-long-secret> | Master secret for encrypting app credentials and API keys in OpenSearch (AES-256). Keep this safe! |
SHUFFLE_OPENSEARCH_PASSWORD | <strong-password> | OpenSearch password used by Shuffle backend. |
OPENSEARCH_INITIAL_ADMIN_PASSWORD | <same-strong-password> | Initial OpenSearch bootstrap admin password (required on first launch). |
HTTP_PROXY / HTTPS_PROXY | http://proxy:8080 | Outbound proxy for downloading apps from GitHub or images from registries. |
SHUFFLE_PASS_WORKER_PROXY | true | Passes proxy settings into worker containers. |
SHUFFLE_PASS_APP_PROXY | true | Passes proxy settings into app containers. |
SHUFFLE_LOGS_DISABLED | true | Disables streaming container logs to backend to prevent high memory usage under heavy load. |
SHUFFLE_ORBORUS_EXECUTION_CONCURRENCY | 10 | Maximum number of concurrent workflow executions Orborus will schedule at once. |
Servers
When setting up Shuffle for production, we always recommend two or more servers (VMs), but it works fine with one to start. These are MINIMUM requirements, and we recommend adding more to avoid congestion.
The webserver is where your users and Shuffle's API is. Opensearch is a RAM heavy database, and we are doing A LOT of caching with to ensure scalable stability.
- Services: Frontend, Backend, Orborus, Opensearch (All)
- CPU: 2vCPU
- RAM: 8Gb
- Disk: >100Gb (SSD)
The default docker-compose file works well to scale on a single server.
Hybrid Cloud Configuration
- Onprem: If you want to try using Hybrid Shuffle, see Cloud sync documentation
- Cloud: If you want access to on-premises resources and API's, set up extra Environments
High Availability
When running Shuffle on multiple servers, you need to take multiple things into account. Among them are:
- Can the servers talk to each other?
- Do you want all Shuffle services on all servers?
- Do you want distributed storage?
- Do you already have a cluster, or does it need to be made?
- Do you want Docker or Kubernetes? Or containerless?
Here is a breakdown of the previous High Availability image of Shuffle, and how it works:
-
All the Green colored services are our providers, meaning they are built by someone else than Shuffle, but used in the Shuffle stack. Here is our recommendation on scaling these services:
- Opensearch (Database). Elasticsearch also works. If you are using more than one entrypoint to Opensearch/Elasticsearch, add the URL's comma separated in the .env file.
- Memcached (Shared Memory): We recommend starting with Memcached on a single server, and only scaling up as needed. Shuffle can run without it, but when scaling runtime locations it gives the Backend, Orborus and Workers a shared cache instead of separate process-local caches. Add multiple comma separated URL's here to configure multiple instances.
-
NFS is Network File Storage. This is for you to be able to store files across multiple servers. This is required if you are running multiple instances of the Shuffle backend, and for them to have consistent access to the Files that you store. Only configure this if you are storing files in Shuffle. When NFS is set up, mount your NFS storage to ./shuffle-files.
-
The Blue services are YOUR services. These can be in your Cloud, Onprem etc. The service in Shuffle that needs access to this are the
Apps, which have their network configuration copied from theOrboruscontainer. If you have on-premises services that Shuffle needs access to, set up an Orborus instance in the same network, which has access to your Shuffle instance + the service in question. -
The orange services are Shuffle's containers. Below is a breakdown of what and how to use them.
- Backend: Handles all of Shuffle's API requests, and are typically routed through the Frontend service. This means that it usually does NOT expose a port. Scale across ALL available servers. Available on shuffle-http://backend:5001 in the container network.
- Frontend: Handles frontend & backend routing, as well as the default certificates. Scale across ALL available servers. Available on http://shuffle-frontend:3001 or https://shuffle-frontend:3443 in the container network.
- Orborus / Worker / Apps: Orborus is in charge of this stack, and is how you control all three services. Orborus receives jobs from the Backend, and does NOT expose any port. Read more about configuring, scaling and managing them in your instance on the /admin?tab=locations page, or in the next section.
Scaling Shuffle
Orborus can run in Docker-swarm mode, and in early 2023, with Kubernetes. This makes the workflow executions A LOT faster, use less resources, making it more scalable both on a single, as well as across multiple servers. Since September 2024, scale has been partially open source, and can be achieved with changing environment variables in the "Orborus" container for Shuffle. Click here for Kubernetes details. If you have received a licensed version, don't forget step 3 to load in the correct worker.
Let's begin with setting up Docker, Docker Compose, and creating a Docker Swarm network with two manager nodes involves several steps. Below is a step-by-step guide to achieve this:
Step 1: Install Docker
Install Docker on both machines by following the official Docker installation guide for your operating system. Docker Installation Guide: https://docs.docker.com/get-docker/
Step 2: Install Docker Compose
Install Docker Compose on both machines by following the official Docker Compose installation guide. Docker Compose Installation Guide: https://docs.docker.com/compose/install/
Step 3: Load the license (skip if not a customer)
You should have received a license from the Shuffle team, which comes in form of a URL. This URL can be used to download the licensed version of the Worker as many times as you want. After downloading it, you need to docker load the file.
wget <url>
docker load -i shuffle-worker.zip
After these have been ran, it should be clear what the docker image is. This docker image needs to be used in the SHUFFLE_WORKER_IMAGE environment variable in step 4.
Step 4: Configure Orborus Environment Variables:
- Add and change the following environment variables for Orborus in the docker-compose.yml file.
BASE_URLis the external URL of the server you're running Shuffle on (the one you visit Shuffle with in your browser):
# Required:
- SHUFFLE_SWARM_CONFIG=run      # Enables SWARM scaling
- SHUFFLE_LOGS_DISABLED=true    # Ensures we don't have memory issues
- BASE_URL=http://YOUR-BACKEND-IP:3001   # replaced by the backend's public IP
- SHUFFLE_WORKER_IMAGE=ghcr.io/shuffle/shuffle-worker:latest

# Optional configuration:
- SHUFFLE_AUTO_IMAGE_DOWNLOAD=false                       # This should be set to false IF images are already downloaded
# Please use the correct ports for SHUFFLE_WORKER_SERVER_URL when using a custom URL.
# Else, we simply default to port 80 if no port is mentioned (Note: the default shuffle-workers URL is treated a bit
# differently than other custom URLs. Shuffle automatically appends the right port to it on the fly unlike other custom URLs)
- SHUFFLE_WORKER_SERVER_URL=http://shuffle-workers        # Internal Docker Worker URL (don't modify if not necessary)
- SHUFFLE_SWARM_NETWORK_NAME=shuffle_swarm_executions     # If you want a special network name in the executions
- SHUFFLE_SCALE_REPLICAS=1                                # The amount of worker container replicas PER NODE  (since 1.2.0)
- SHUFFLE_APP_REPLICAS=1                                  # The amount of app container replicas PER NODE     (since 1.2.1)
- SHUFFLE_MAX_SWARM_NODES=1                               # The max amount of swarm nodes shuffle can use     (since 1.3.2)
- SHUFFLE_SKIPSSL_VERIFY=true                             # Stops Shuffle's internal services from validating TLS/SSL certificates. Good to use if BASE_URL is a domain.
If this is configured properly, the "Status" and "Scale" section on your Runtime Locations in the Admin panel should show as "Running" and a green checkmark respectively.
To make swarm work, Please make sure that these ports are open on all your machines (to at least, both of these machines internally): 2377, 7946 and 4789
It is recommended to make sure that these ports are ONLY open internally to be sure that everything is secure.
- When step 1 is configured, take down the stack and pull it back up AFTER initializing swarm:
docker swarm init
docker-compose down
docker-compose up -d
docker swarm join-token manager # copy the command given
PS: In certain scenarios you may need extra configurations, e.g. for network MTU's, docker download locations, proxies etc. See more in the production readiness section.
Adding another machine to the swarm network:
Start by making sure docker works here. Then paste the output from the previous docker command to docker join. It adds the network in the docker swarm network as a manager (It is required to orchestrate the app containers).
It should look something like this:
docker swarm join --token SWMTKN-1-{token} {internal IP}:2377
Verify swarm
Run the following command to get logs from Orborus:
docker logs -f shuffle-orborus
And to check if services have started:
docker service ls
If the list is empty, or you see any of the "replicas" have 0/1, then something is wrong. In case of any swarm issues, contact us at support@shuffler.io or contact your account representative.
If you get EOFs or timeouts for workers in machine B, look here.
Swarm: Manual worker service (Orborus scheduler-only)
If you want Orborus to only schedule jobs while you manage workers as a Swarm service yourself, you can pre-create the shuffle-workers service and point Orborus at it. Orborus will still poll the backend queue and send execution requests to /api/v1/execute.
- Create the overlay network (if not already created):
docker network create --driver=overlay --attachable shuffle_swarm_executions
- Create the worker service manually:
docker service create \
  --name shuffle-workers \
  --replicas 3 \
  --network shuffle_swarm_executions \
  --publish published=33333,target=33333 \
  --env SHUFFLE_SWARM_CONFIG=run \
  --env SHUFFLE_MEMCACHED=shuffle-memcached:11211 \
  ghcr.io/shuffle/shuffle-worker:latest
-
Deploy
shuffle-orborusafter the worker service exists so the first execution can dispatch immediately. -
Configure Orborus to use the manual worker service:
- SHUFFLE_SWARM_CONFIG=run
- SHUFFLE_WORKER_SERVER_URL=http://shuffle-workers:33333
- SHUFFLE_SWARM_NETWORK_NAME=shuffle_swarm_executions
- CLEANUP=false
- SHUFFLE_LOGS_DISABLED=true
- Ensure Orborus is attached to the same overlay network as
shuffle-workers.
Limitations and gotchas
- Orborus still calls the Docker Swarm API (service list/create, network attach). It must run with manager-level Docker API access (direct socket or a socket proxy that exposes swarm/service/network endpoints).
- Workers also need manager-level Docker API access to deploy app services during executions; without it, app execution fails.
- If
shuffle-workersis deleted or scaled to 0, Orborus will try to recreate it and may fail if it lacks permissions. - If the worker service is not reachable as
shuffle-workers:33333, execution requests will fail. UseSHUFFLE_WORKER_SERVER_URLto point to the correct DNS/port.
Environment Variables
Shuffle has a few toggles that makes it straight up faster, but which removes a lot of the checks that are being done during your first tries of Shuffle.
Backend:
# Set the encryption key to ensure all app authentication is being encrypted. If this is NOT defined, we do not encrypt your apps. If this is defined, all authentications - both old and new will start using this key.
# Do NOT lose this key if specified, as that means you will need to reset all keys.

SHUFFLE_ENCRYPTION_MODIFIER=YOUR KEY HERE

# **PS: Encryption is available from Shuffle backend version >=0.9.17.**
# **PPS: There's a [known bug](https://github.com/frikky/Shuffle/issues/528) with Proxies and git**

# Set up distributed memcaching. See "Distributed Caching" for more.
SHUFFLE_MEMCACHED=<IP>:PORT
Orborus:
# Cleans up all containers after they're done. Necessary to help Docker scale. Default=false
CLEANUP=true

# Cleans up any containers related to Shuffle that have been up for more than 600 seconds.
SHUFFLE_ORBORUS_EXECUTION_TIMEOUT=600

# Decides the max amount of workflows to concurrenly run. Defaults to 10.
# Example math: 10 workflows * WITH 10 apps / second = 110 containers per second.
# We recommend starting with 10 and going higher as need be.
SHUFFLE_ORBORUS_EXECUTION_CONCURRENCY=10

# Configures a HTTP proxy to use when talking to the Shuffle Backend
HTTP_PROXY=
# Configures a HTTPS proxy when speaking to the Shuffle Backend
HTTPS_PROXY=

# Set to true to pass HTTP_PROXY/HTTPS_PROXY/NO_PROXY from Orborus to Worker
SHUFFLE_PASS_WORKER_PROXY=true

# Set to true to pass HTTP_PROXY/HTTPS_PROXY/NO_PROXY from Worker to Apps
SHUFFLE_PASS_APP_PROXY=false


### PAID: The environment variables below only work when you've acquired a paid license of Shuffle (not required, but VERY useful when scaling Shuffle):
SHUFFLE_WORKER_IMAGE=ghcr.io/shuffle/shuffle-worker-scale:latest
SHUFFLE_SWARM_NETWORK_NAME=shuffle_swarm_executions
SHUFFLE_SCALE_REPLICAS=1
SHUFFLE_SWARM_CONFIG=run

# Set up distributed caching for Orborus & Worker(s). See "Distributed Caching" for more.
SHUFFLE_MEMCACHED=<IP>:PORT
Distributed Caching
Once you have a scalable version of Shuffle, using Docker Swarm or Kubernetes, it becomes important for short-lived execution data to be visible across services. Shuffle supports distributed caching in the form of Memcached. Memcached helps reduce database load and gives runtime-location components a shared cache while workers are deployed and executions are updated.
- Backend
- Orborus
- Worker
The database remains the source of truth. Memcached is used for cache keys such as execution data, action results, validation data, health/stat counters and worker coordination. If SHUFFLE_MEMCACHED is empty, each service falls back to its own local in-memory cache.
To make use of Memcached, start a Memcached service on a host or service network Shuffle can access, then configure each service to use it with SHUFFLE_MEMCACHED. The default port is 11211. Here is a quickstart that reserves 1024 Mb of memory:
docker run --name shuffle-cache -p 11211:11211 -d memcached -m 1024
PS: This requires swap limit capabilities on the Docker host. More about running it in Docker here
Once this is up, it will be listening on port 11211. From here, set SHUFFLE_MEMCACHED on the Backend and Orborus. Orborus forwards the same value into workers it starts, including single Docker workers, the shuffle-workers Swarm service and Kubernetes worker deployments. Here's an example that fits into your docker-compose file:
services:
  shuffle-backend:
    image: ghcr.io/shuffle/shuffle-backend:latest
    environment:
      - SHUFFLE_MEMCACHED=10.0.0.1:11211
      ...
Set the same value on Orborus:
services:
  orborus:
    image: ghcr.io/shuffle/shuffle-orborus:latest
    environment:
      - SHUFFLE_MEMCACHED=10.0.0.1:11211
      ...
You can additionally add this to your docker compose with the following setting:
  memcached:
    image: memcached:latest
    container_name: shuffle-cache
    hostname: shuffle-cache
    mem_limit: 1024m
    restart: unless-stopped
    environment:
      - MEMCACHED_MEMORY=1024
      - MEMCACHED_MAX_CONNECTIONS=2500
    ports:
      - 11211:11211
Memcached on a Docker Swarm network
When running with SHUFFLE_SWARM_CONFIG=run, Memcached must be reachable from the worker network. Orborus creates or uses the overlay network from SHUFFLE_SWARM_NETWORK_NAME, and workers use that network when they execute workflows. If Memcached only exists on the main Shuffle network, workers may fail to resolve or connect to it.
You do not need to expose Memcached on the host machine for this setup. Do not add -p 11211:11211, --publish, or a Compose ports: entry unless something outside Docker must connect to Memcached. For Shuffle Swarm, keep Memcached internal and use tasks.shuffle-cache:11211 from services attached to the overlay network.
The common pattern is:
- Backend reaches Memcached on the main Shuffle network.
- Orborus reaches Memcached and forwards
SHUFFLE_MEMCACHEDto workers. - Workers reach Memcached on the execution overlay network.
Attach Memcached to both networks if backend and workers are not on the same overlay:
docker network create --driver=overlay --attachable shuffle
docker network create --driver=overlay --attachable shuffle_swarm_executions

docker service create \
  --name shuffle-cache \
  --network shuffle \
  --network shuffle_swarm_executions \
  --replicas 1 \
  --endpoint-mode dnsrr \
  memcached:1.6-alpine \
  -m 1024 -c 2048
Then set the same endpoint on backend and Orborus:
- SHUFFLE_MEMCACHED=tasks.shuffle-cache:11211
If you manage the worker service manually, attach it to the same execution network:
docker service create \
  --name shuffle-workers \
  --network shuffle_swarm_executions \
  --env SHUFFLE_SWARM_CONFIG=run \
  --env SHUFFLE_MEMCACHED=tasks.shuffle-cache:11211 \
  ghcr.io/shuffle/shuffle-worker:latest
For a Swarm stack file, the important parts look like this:
services:
  shuffle-cache:
    image: memcached:1.6-alpine
    command: ["-m", "1024", "-c", "2048"]
    networks:
      - shuffle
      - shuffle_swarm_executions
    deploy:
      replicas: 1
      endpoint_mode: dnsrr

  shuffle-backend:
    environment:
      - SHUFFLE_MEMCACHED=tasks.shuffle-cache:11211
    networks:
      - shuffle

  orborus:
    environment:
      - SHUFFLE_SWARM_CONFIG=run
      - SHUFFLE_SWARM_NETWORK_NAME=shuffle_swarm_executions
      - SHUFFLE_MEMCACHED=tasks.shuffle-cache:11211
    networks:
      - shuffle
      - shuffle_swarm_executions

networks:
  shuffle:
    driver: overlay
    attachable: true
  shuffle_swarm_executions:
    driver: overlay
    attachable: true
Verify connectivity from a temporary container on the execution network:
docker run --rm --network shuffle_swarm_executions alpine sh -c "apk add --no-cache busybox-extras >/dev/null && nc -vz tasks.shuffle-cache 11211"
Multi-server memcached
You can run Memcached on multiple servers as well, but may run into key inconsistency if clients do not route the same key to the same server. This should however not affect how things run in Shuffle, as we verify and fix request data. To do this, add multiple Memcached instances to the environment variable, comma separated.
Example:
- SHUFFLE_MEMCACHED=10.0.0.1:11211,10.0.0.2:11211,10.0.0.3:11211
If you need help with this, please contact us.
Disaster Recovery/High Availability
In a production system within a high-criticality environment concerning requirements and security, it is crucial that all our tools possess the property of High Availability or, at least, Disaster Recovery.
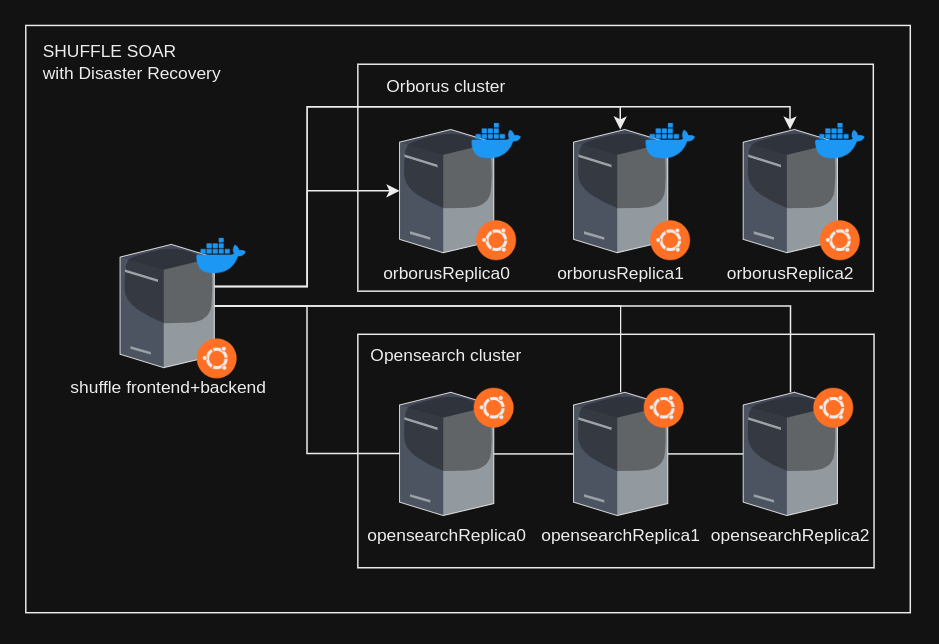
The following architecture illustrates how Shuffle should be deployed in its On-Premise free mode to achieve at least Disaster Recovery, which ensures that even if one node of the system fails, there will be no loss of information. In the worst case scenario, if it was a critical node, it should be able to resume operation promptly.
The first step to ensure this is to distribute the database in a way that guarantees the property that even if one node fails, there will be no data loss.
The second point to consider is that for Workflows to continue running even if one Orborus node goes down, there should be another node of the same type to ensure this.
In this manner, we can ensure that, in the worst case, the backend+frontend may experience negative consequences due to being in a Docker container. However, its automatic restart can be configured, and in any case, bringing this node back into operation is swift.
The resulting architecture that emerges after applying these properties is as follows:
To implement this, follow these steps:
-
Define in all your nodes the list of hostnames in /etc/hosts so all the machines can do the necessary IP resolutions when they have a hostname.
-
Configure an OpenSearch database cluster. For this step, it is recommended to follow the official documentation https://opensearch.org/docs/latest/tuning-your-cluster/index/. Anyways to achieve this in a easy way you just need to change this settings in each opensearch node and reload the service:
cluster.name -> Set its new value to "shuffle-cluster".
node.name -> Set its new value to the hostname of the current node.
network.host -> Set its new value to the IP of your node(you need to be able to ping this IP from each one of the opensearch nodes and also from the backend+frontend one).
discovery.seed_hosts -> Set its new value to a list that contains each one of the hostnames of the OpenSearch nodes for example like this: ['opensearchReplica0', 'opensearchReplica1', 'opensearchReplica2']
cluster.initial_cluster_manager_nodes -> All the nodes should be able to be masters so as done before use that list of hostnames like: ['opensearchReplica0', 'opensearchReplica1', 'opensearchReplica2']
- Deploy a node containing both the frontend and backend components. In the configurations of this node, all nodes of the database cluster should be included to experience the effects of the previous step. The dockerfile should look like this:
version: '3'
services:
  frontend:
    image: ghcr.io/shuffle/shuffle-frontend:latest
    container_name: shuffle-frontend
    hostname: shuffle-frontend
    ports:
      - "${FRONTEND_PORT}:80"
      - "${FRONTEND_PORT_HTTPS}:443"
    networks:
      - shuffle
    environment:
      - BACKEND_HOSTNAME=${BACKEND_HOSTNAME}
    restart: unless-stopped
    depends_on:
      - backend
  backend:
    image: ghcr.io/shuffle/shuffle-backend:latest
    container_name: shuffle-backend
    hostname: ${BACKEND_HOSTNAME}
    # Here for debugging:
    ports:
      - "${BACKEND_PORT}:5001"
    networks:
      - shuffle
    volumes:
      - /var/run/docker.sock:/var/run/docker.sock
      - ${SHUFFLE_APP_HOTLOAD_LOCATION}:/shuffle-apps
      - ${SHUFFLE_FILE_LOCATION}:/shuffle-files
      #- ${SHUFFLE_OPENSEARCH_CERTIFICATE_FILE}:/shuffle-files/es_certificate
    env_file: .env
    environment:
      - SHUFFLE_APP_HOTLOAD_FOLDER=/shuffle-apps
      - SHUFFLE_FILE_LOCATION=/shuffle-files
    restart: unless-stopped
networks:
  shuffle:
    driver: bridge
Also for this step you need to change the value of a variable inside the .env so it looks like this:SHUFFLE_OPENSEARCH_URL=SHUFFLE_OPENSEARCH_URL=https://192.168.0.30:9200,https://192.168.0.31:9200,https://192.168.0.32:9200. Each one of that IPs is the corresponding one to each opensearch node.
- Deploy as many Orborus nodes as desired. At a minimum, it is recommended to deploy 2 nodes. If scaling is required regarding the maximum number of concurrently executing Workflows, the number of these nodes can be increased. The dockerfile of each one of the orborus nodes should look like this:
version: '3'
services:
  orborus:
    #build: ./functions/onprem/orborus
    image: ghcr.io/shuffle/shuffle-orborus:latest
    container_name: shuffle-orborus
    hostname: shuffle-orborus
    networks:
      - shuffle
    volumes:
      - /var/run/docker.sock:/var/run/docker.sock
    environment:
      - BASE_URL=http://192.168.0.49:5001
      - SHUFFLE_APP_SDK_VERSION=1.1.0
      - SHUFFLE_WORKER_VERSION=latest
      - ENVIRONMENT_NAME=Shuffle
      - DOCKER_API_VERSION=1.40
      - SHUFFLE_BASE_IMAGE_NAME=frikky
      - SHUFFLE_BASE_IMAGE_REGISTRY=ghcr.io
      - SHUFFLE_BASE_IMAGE_TAG_SUFFIX="-1.0.0"
      - CLEANUP=true
      - SHUFFLE_ORBORUS_EXECUTION_TIMEOUT=600
    restart: unless-stopped
networks:
  shuffle:
    driver: bridge
You need to change the value of the environment BASE_URL of this Dockerfile, so it aims to the IP of your Shuffle frontend+backend node.
Kubernetes
Shuffle on Kubernetes is possible thanks to our official Helm chart! This lets you run Shuffle across your cluster nodes with native pod management. For chart details and source templates, visit the Shuffle Kubernetes repository.
Things to prepare for Kubernetes
Before installing Shuffle with Helm:
- Cluster & CLI: A running Kubernetes cluster (v1.23+) with
kubectland Helm 3+. - Dedicated Namespace: Always use a dedicated namespace (
shuffle). Don't deploy unrelated services into the same namespace, because Shuffle-created worker and app Deployments/Services are dynamically managed here. - RBAC Permissions: Permissions to create namespace-scoped deployments, services, roles, role bindings, service accounts, PVCs, secrets, and network policies.
- Storage Class: A default storage class (or explicit volume claim) for persistent OpenSearch storage.
- Database: Decide whether to use the chart's built-in OpenSearch or point Shuffle to an external OpenSearch/Elasticsearch cluster via
backend.openSearch.url. - Registry Access: Image pull access to
ghcr.ioand required app container registries.
Preparing Kubernetes Secrets
Store sensitive environment variables in a Kubernetes Secret rather than plain-text Helm values:
kubectl create namespace shuffle

kubectl create secret generic shuffle-backend-env \
  --namespace shuffle \
  --from-literal=SHUFFLE_OPENSEARCH_PASSWORD='<strong-password>' \
  --from-literal=SHUFFLE_ENCRYPTION_MODIFIER='<random-long-secret>' \
  --from-literal=SHUFFLE_DEFAULT_USERNAME='admin' \
  --from-literal=SHUFFLE_DEFAULT_PASSWORD='<strong-admin-password>' \
  --from-literal=SHUFFLE_DEFAULT_APIKEY='<uuid-v4>'
Creating values.yaml
Create a production values.yaml file:
shuffle:
  baseUrl: "https://shuffle.example.com"
  org: "Shuffle"

backend:
  replicaCount: 1
  extraEnvVarsSecret: shuffle-backend-env

frontend:
  replicaCount: 1

orborus:
  replicaCount: 1

ingress:
  enabled: true
  hostname: shuffle.example.com
Installing with Helm
Deploy Shuffle directly from the official OCI registry:
helm install shuffle oci://ghcr.io/shuffle/charts/shuffle \
  --namespace shuffle \
  --create-namespace \
  --values values.yaml
Verifying Deployment
Check pod status, services, and ingress:
kubectl get pods -n shuffle
kubectl get svc -n shuffle
kubectl get ingress -n shuffle
helm status shuffle -n shuffle
Upgrading Shuffle
To upgrade your deployment when a new chart version is released:
helm upgrade shuffle oci://ghcr.io/shuffle/charts/shuffle \
  --namespace shuffle \
  --values values.yaml
Uninstalling and Resource Cleanup
When uninstalling Shuffle, Helm deletes chart-managed objects. Dynamically spawned worker and app pods managed by Orborus should be cleaned up using label selectors:
# 1. Uninstall the Helm release
helm uninstall shuffle --namespace shuffle

# 2. Clean up dynamic worker and app deployments & services created during executions
kubectl delete svc --namespace shuffle \
  -l "app.kubernetes.io/managed-by in (shuffle-orborus,shuffle-worker)"

kubectl delete deploy --namespace shuffle \
  -l "app.kubernetes.io/managed-by in (shuffle-orborus,shuffle-worker)"
Shuffle Apps on Kubernetes
By default, Shuffle Worker creates a Kubernetes Deployment and Service for each app. Each app and version has its own Deployment and Service. Shuffle automatically deploys a set of apps, and other apps are deployed on demand when they are first used.
You can use app.* Helm values to control parts of the app deployment (resources, security context, etc.). These values are converted to environment variables on Orborus, and Orborus passes them to Worker when creating app Deployments. When worker.enableHelmDeployment is set, the app configuration is set on the worker directly. This configuration applies to all apps (you cannot scale or resource-tune individual apps in this mode).
If you want to set CPU and memory for apps that are created dynamically by Worker, use app.resources (or app.resourcesPreset) in the chart. These values are applied to all dynamically created app Deployments.
If you want full control, you can deploy apps using Helm instead. This gives you:
- full control over app deployments via Helm values
- granular control per app and version (replicas, resources, etc.)
- fewer issues with on-demand started apps (see https://github.com/Shuffle/Shuffle/issues/1739)
To deploy apps using Helm, set apps.enabled=true. By default, this deploys shuffle-tools, shuffle-subflow, and http. You can add your own apps as well.
app:
  replicaCount: 1
  resources: {}

apps:
  enabled: true

  shuffleTools:
    enabled: true
  shuffleSubflow:
    enabled: true
  http:
    enabled: true
    replicaCount: 1
    resources: {}

  opensearch:
    enabled: true
    name: opensearch
    version: 1.1.0
    replicaCount: 3
    resources: {}
Notes:
- The key under
appsis only used to identify the app in values. It can be any unique name. - You can override any
app.*value for a specific app viaapps.<appKey>.*(for example,apps.shuffleTools.replicaCount). - Hybrid mode is supported: deploy some apps with Helm while still letting Worker create others on demand.
If you do not want Worker to manage app deployments, set worker.manageAppDeployments=true. This removes the required permissions from the Shuffle Worker Kubernetes Service Account and requires you to deploy all apps manually using Helm.
Shuffle App Service Accounts
By default, apps use a shared shuffle-app service account. If you deploy apps with Helm, you can use a dedicated service account per app.
apps:
  myAppWithCustomServiceAccount:
    enabled: true
    name: my-custom-service-account
    version: 1.0.0
    serviceAccount:
      create: true
      name: shuffle-app-myapp

  anotherAppWithExistingServiceAccount:
    enabled: true
    name: another-app
    version: 1.0.0
    serviceAccount:
      create: false
      name: existing-service-account-name
All app service accounts use the shuffle-app role by default.
Orborus with Kubernetes
To configure Kubernetes, you need to specify a single environment variable for Orborus: RUNNING_MODE. By setting the environment variable RUNNING_MODE=kubernetes, execution should work as expected!
Scaling Kubernetes
To scale Shuffle in Kubernetes, use the following environment variables in the Orborus container:
SHUFFLE_SCALE_REPLICAS=3 # HPA coming soon. This is for static scaling.
SHUFFLE_WORKER_IMAGE=ghcr.io/shuffle/shuffle-worker-scale:nightly
IS_KUBERNETES=true
SHUFFLE_SWARM_CONFIG=run
SHUFFLE_MEMCACHED=shuffle-memcached:11211 # this depends on your setup.
Private apps on Kubernetes
To run private apps on Kubernetes, you need a private container registry to pull images from. Once you configure REGISTRY_URL to point to your private registry, Shuffle will automatically pull app images from there.
To install the Shuffle Helm chart pointing to your custom registry, run:
helm install shuffle oci://ghcr.io/shuffle/charts/shuffle \
  --namespace shuffle \
  --create-namespace \
  --set env[0].name=REGISTRY_URL \
  --set env[0].value="YOURIP:5000"
If your registry allows unauthenticated pushes (or you're not using Docker Hub), you can skip this step. However, if your private registry requires authentication, create and share a Docker registry secret using:
kubectl create secret docker-registry <your_secret_name> \
  --docker-server=<registry-url> \
  --docker-username=<user> \
  --docker-password=<pass> \
  --docker-email=<email> \
  -n shuffle

kubectl set env deployment/backend SHUFFLE_REGISTRY_SECRET="<your_secret_name>" -n shuffle
After switching to your private registry, the images for already-installed apps will not be available in the new registry. To avoid image-pull failures, you can mirror all existing Shuffle app images from Docker Hub into your private registry.
You can use skopeo to mirror the entire repository (docker.io/frikky/shuffle) or run the following script to pull and push every tag manually:
registry="your-registry.domain:5000"

page=1
while true; do
  tags=$(curl -s "https://hub.docker.com/v2/repositories/frikky/shuffle/tags?page=$page&page_size=100" | jq -r '.results[].name')
  [ -z "$tags" ] && break

  for tag in $tags; do
    echo "-> $tag"
    docker pull frikky/shuffle:$tag
    docker tag frikky/shuffle:$tag $registry/shuffle:$tag
    docker push $registry/shuffle:$tag
  done

  page=$((page+1))
done
Swarm HAProxy for worker load balancing
In Docker Swarm, Orborus sends requests to shuffle-workers:33333 through the Swarm VIP. The routing mesh is not load-aware, so requests can hit saturated workers and time out under load. You can improve distribution by placing HAProxy in front of the worker tasks and pointing Orborus to HAProxy.
This can be done after the Swarm stack is up, without changing how Orborus deploys workers or apps.
1) Create the HAProxy config
Create a file named haproxy.cfg on a Swarm manager:
global
  log stdout format raw local0
  maxconn 4000

defaults
  mode http
  log global
  option httplog
  option dontlognull
  timeout connect 5s
  timeout client  120s
  timeout server  120s

resolvers docker
  nameserver dns 127.0.0.11:53
  resolve_retries 3
  timeout retry 1s
  hold valid 10s

frontend worker_front
  bind *:33333
  default_backend worker_back

backend worker_back
  balance leastconn
  option tcp-check
  server-template worker 1-50 tasks.shuffle-workers:33333 check resolvers docker init-addr last,libc,none
2) Deploy HAProxy as a Swarm service
Ensure the worker overlay network exists (Orborus creates shuffle_swarm_executions by default):
docker network create --driver=overlay --attachable shuffle_swarm_executions
Create the HAProxy config and deploy it. Do not publish port 33333 on HAProxy if the worker service already uses it (Swarm only allows one published service per port). Orborus can reach HAProxy over the overlay network:
docker config create haproxy-cfg ./haproxy.cfg

docker service create \
  --name shuffle-haproxy \
  --config source=haproxy-cfg,target=/usr/local/etc/haproxy/haproxy.cfg \
  --network shuffle_swarm_executions \
  haproxy:2.9
3) Point Orborus to HAProxy
Set the worker server URL so Orborus sends executions through HAProxy:
SHUFFLE_WORKER_SERVER_URL=http://shuffle-haproxy:33333
Restart Orborus after updating the environment:
docker restart shuffle-orborus
4) Verify
docker service logs shuffle-haproxy --tail 200
docker service ps shuffle-haproxy
Swarm HA deployment (Gateway + API + Runtime)
This is a production-style Swarm setup that is reliable for first deployment and easy to scale later.
Traffic flow:
- Users hit
gatewayon:8080. gatewayroutes/api/*toshuffle-backendand/tofrontend.shuffle-backendtalks to OpenSearch and Memcached over internal overlay DNS.orborusruns execution scheduling and uses a dedicated execution overlay network.
Nginx-HA-behavior
In this setup, gateway is Nginx and acts as the edge router for both API and UI traffic.
/api/*is proxied to backend tasks./is proxied to frontend tasks.- If one backend/frontend task fails, Nginx continues routing to remaining healthy tasks.
To make Nginx itself highly available:
- run
gatewaywith 2+ replicas, - spread replicas across nodes,
- use an external load balancer or DNS round-robin to route traffic to node IPs when using
ports.mode: host.
Example scaling:
docker service scale shuffleha_gateway=2
docker service scale shuffleha_frontend=2
docker service scale shuffleha_shuffle-backend=2
When using host-published ports, avoid scheduling all gateway replicas on one node. Verify distribution with:
docker service ps shuffleha_gateway
Pre-flight (run once)
# 1) Initialize swarm if needed
docker swarm init || true

# 2) Create persistent folders
mkdir -p /srv/shuffle/shuffle-apps /srv/shuffle/shuffle-files /srv/shuffle/shuffle-database

# 3) Make sure this node can schedule services
docker node ls
File 1: docker-stack.ha.yml
version: "3.9"

services:
  gateway:
    image: nginx:1.27-alpine
    ports:
      - target: 80
        published: 8080
        protocol: tcp
        mode: host
    configs:
      - source: shuffle_gateway_nginx
        target: /etc/nginx/conf.d/default.conf
    networks:
      - shuffle
    deploy:
      replicas: 1
      restart_policy:
        condition: on-failure

  frontend:
    image: ghcr.io/shuffle/shuffle-frontend:latest
    environment:
      - BACKEND_HOSTNAME=shuffle-backend
    networks:
      - shuffle
    deploy:
      replicas: 1
      restart_policy:
        condition: on-failure

  shuffle-backend:
    image: ghcr.io/shuffle/shuffle-backend:latest
    volumes:
      - /var/run/docker.sock:/var/run/docker.sock
      - /srv/shuffle/shuffle-apps:/shuffle-apps
      - /srv/shuffle/shuffle-files:/shuffle-files
    environment:
      - SHUFFLE_APP_HOTLOAD_FOLDER=/shuffle-apps
      - SHUFFLE_FILE_LOCATION=/shuffle-files
      - SHUFFLE_OPENSEARCH_URL=http://tasks.shuffle-opensearch:9200
      - SHUFFLE_MEMCACHED=tasks.shuffle-cache:11211
      - SHUFFLE_OPENSEARCH_SKIPSSL_VERIFY=true
    networks:
      - shuffle
      - swarm_executions
    deploy:
      replicas: 1
      restart_policy:
        condition: on-failure

  orborus:
    image: ghcr.io/shuffle/shuffle-orborus:latest
    volumes:
      - /var/run/docker.sock:/var/run/docker.sock
    environment:
      - SHUFFLE_SWARM_CONFIG=run
      - SHUFFLE_SWARM_NETWORK_NAME=swarm_executions
      - SHUFFLE_WORKER_SERVER_URL=http://shuffle-workers:33333
      - BASE_URL=http://shuffle-backend:5001
      - SHUFFLE_MEMCACHED=tasks.shuffle-cache:11211
    networks:
      - shuffle
      - swarm_executions
    deploy:
      replicas: 1
      restart_policy:
        condition: on-failure

  shuffle-opensearch:
    image: opensearchproject/opensearch:3.2.0
    environment:
      - discovery.type=single-node
      - DISABLE_SECURITY_PLUGIN=true
      - OPENSEARCH_JAVA_OPTS=-Xms1024m -Xmx1024m
    volumes:
      - /srv/shuffle/shuffle-database:/usr/share/opensearch/data
    networks:
      - shuffle
    deploy:
      replicas: 1
      endpoint_mode: dnsrr
      restart_policy:
        condition: on-failure

  shuffle-cache:
    image: memcached:1.6-alpine
    command: ["-m", "1024", "-c", "2048"]
    networks:
      - shuffle
    deploy:
      replicas: 1
      endpoint_mode: dnsrr
      restart_policy:
        condition: on-failure

configs:
  shuffle_gateway_nginx:
    file: ./swarm-nginx.conf

networks:
  shuffle:
    driver: overlay
    attachable: true
  swarm_executions:
    driver: overlay
    attachable: true
File 2: swarm-nginx.conf
resolver 127.0.0.11;

upstream backend {
    server tasks.shuffle-backend:5001;
    keepalive 32;
}

upstream frontend {
    server tasks.frontend:80;
    keepalive 32;
}

server {
    listen 80;
    server_name _;
    client_max_body_size 256m;

    location /api/ {
        proxy_pass http://backend;
        proxy_http_version 1.1;
        proxy_set_header Host $host;
        proxy_set_header X-Real-IP $remote_addr;
        proxy_set_header X-Forwarded-For $proxy_add_x_forwarded_for;
        proxy_set_header X-Forwarded-Proto $scheme;
        proxy_set_header Connection "";
        proxy_connect_timeout 60s;
        proxy_send_timeout 60s;
        proxy_read_timeout 60s;
    }

    location / {
        proxy_pass http://frontend;
        proxy_http_version 1.1;
        proxy_set_header Host $host;
        proxy_set_header X-Real-IP $remote_addr;
        proxy_set_header X-Forwarded-For $proxy_add_x_forwarded_for;
        proxy_set_header X-Forwarded-Proto $scheme;
        proxy_set_header Connection "";
        proxy_connect_timeout 60s;
        proxy_send_timeout 60s;
        proxy_read_timeout 60s;
    }
}
Deploy
docker stack deploy -c docker-stack.ha.yml shuffleha
Verify (must pass)
docker service ls | grep shuffleha_
docker service ps shuffleha_gateway
docker service ps shuffleha_frontend
docker service ps shuffleha_shuffle-backend
docker service ps shuffleha_shuffle-opensearch
docker service ps shuffleha_shuffle-cache
docker service ps shuffleha_orborus
Quick API checks:
API Call
curl -X GET 'http://localhost:8080/'
Response
No response received.
If startup feels slow in the first 1-3 minutes, this is usually normal due to backend init tasks and OpenSearch warmup.
Single-node-vs-multi-node-replicas
- The example above is tuned to work on a single node on the first try.
- For multi-node HA, increase replicas after initial validation:
docker service scale shuffleha_frontend=2
docker service scale shuffleha_shuffle-backend=2
docker service scale shuffleha_orborus=2
If you use max_replicas_per_node: 1, make sure you have enough swarm nodes. Otherwise replicas stay pending.
max_replicas_per_node: 1 can be useful for HA spreading when you run multiple nodes.
Recommended usage:
- Set it on services you want distributed, for example
shuffle-backendandorborus. - Keep replicas equal to or lower than the number of eligible nodes.
- For
orborus, eligible nodes are manager nodes because ofnode.role == managerconstraint.
Example:
services:
  shuffle-backend:
    deploy:
      replicas: 3
      placement:
        max_replicas_per_node: 1

  orborus:
    deploy:
      replicas: 2
      placement:
        constraints:
          - node.role == manager
        max_replicas_per_node: 1
Practical checks:
docker node ls
docker service ps shuffleha_shuffle-backend
docker service ps shuffleha_orborus
If tasks stay Pending, lower replicas or add more eligible nodes.
Important Swarm DNS notes
- In some Swarm environments, service VIP routing can become unstable after many updates.
- If you see
no route to hostor random internal timeouts, prefertasks.<service-name>for internal service-to-service traffic. endpoint_mode: dnsrron OpenSearch and Memcached reduces reliance on VIP routing.
Swarm-overlay-network-encryption
If you want encrypted node-to-node traffic on Swarm overlays, pre-create encrypted networks and point your stack file to those external networks.
- Pre-create encrypted overlays:
docker network create --driver overlay --attachable --opt encrypted shuffle
docker network create --driver overlay --attachable --opt encrypted swarm_executions
- In your stack/compose config file, use external networks:
networks:
  shuffle:
    external: true
    name: shuffle
  swarm_executions:
    external: true
    name: swarm_executions
- Deploy as normal:
docker stack deploy -c docker-compose.yml shuffle
- Verify encryption and service attachment:
docker network inspect shuffle | grep -i encrypted
docker network inspect swarm_executions | grep -i encrypted
docker service inspect shuffle_backend --format '{{json .Spec.TaskTemplate.Networks}}'
docker service inspect shuffle_orborus --format '{{json .Spec.TaskTemplate.Networks}}'
Notes:
- Overlay encryption secures node-to-node container traffic on those overlays.
- It does not replace HTTPS/TLS for user-facing traffic.
- Orborus can create missing Swarm networks dynamically; pre-creating encrypted overlays avoids accidental unencrypted network creation.
Slow backend response troubleshooting
If backend APIs are slow after deployment, check these first:
-
Backend startup/init window:
- Backend may perform index checks, rollovers, and startup validation.
- During this phase, response times can be temporarily high.
-
Memcached connectivity:
- Repeated memcache timeouts add latency to many API calls.
- Validate from backend container:
docker exec -it <backend-container> sh -lc 'getent hosts shuffle-cache tasks.shuffle-cache'
docker exec -it <backend-container> sh -lc 'nc -vz -w2 tasks.shuffle-cache 11211'
- OpenSearch connectivity:
docker exec -it <backend-container> sh -lc 'nc -vz -w2 tasks.shuffle-opensearch 9200'
- Live logs:
docker service logs --since 10m shuffleha_shuffle-backend
docker service logs --since 10m shuffleha_shuffle-cache
docker service logs --since 10m shuffleha_shuffle-opensearch
Temporary mitigation if memcached routing is unstable:
- Remove
SHUFFLE_MEMCACHEDfrom backend/orborus and redeploy. - This usually improves API responsiveness immediately while you fix cache routing.
Production recommendations
- Use at least 3 Swarm manager/worker nodes for HA.
- Run OpenSearch as a proper multi-node cluster for production data durability.
- Mount persistent volumes for:
- OpenSearch data (
shuffle-database), - Shuffle files (
shuffle-files), - app hotload directory (
shuffle-apps).
- OpenSearch data (
- Keep gateway, backend, and frontend on the same overlay network.
- Keep execution workloads isolated on
swarm_executions. - Monitor
docker service psanddocker service logscontinuously during upgrades.
Preferred-OpenSearch-HA-setup
The shuffle-opensearch service in the Swarm HA example above is intentionally single-node. It is suitable for first deployment validation, but it is not the preferred production architecture for durable data.
For production, the recommended setup is:
- 3 dedicated OpenSearch nodes
- one persistent data path per OpenSearch node
- replication handled by OpenSearch itself, not by sharing one filesystem
- Shuffle backend configured with all OpenSearch endpoints
The most important storage rule is:
- do not mount the same shared
shuffle-databasefolder into multiple OpenSearch nodes - do not use one NFS path as
/usr/share/opensearch/datafor several OpenSearch nodes - do give each node its own local persistent disk or block volume
This means the storage model is different for different Shuffle components:
shuffle-files: shared storage is fine, and NFS is a common optionshuffle-apps: shared storage is fine if you want hotload content available across nodesshuffle-database: should be local and dedicated per OpenSearch node
Example topology:
opensearch-1on node A with/srv/opensearch-dataopensearch-2on node B with/srv/opensearch-dataopensearch-3on node C with/srv/opensearch-data
Each OpenSearch node should have equivalent settings to the following:
environment:
  - cluster.name=shuffle-cluster
  - node.name=opensearch-1
  - network.host=_site_
  - discovery.seed_hosts=opensearch-1,opensearch-2,opensearch-3
  - cluster.initial_cluster_manager_nodes=opensearch-1,opensearch-2,opensearch-3
  - bootstrap.memory_lock=true
  - node.store.allow_mmap=false
  - OPENSEARCH_JAVA_OPTS=-Xms4g -Xmx4g
Notes:
node.namemust be unique on each nodediscovery.seed_hostsandcluster.initial_cluster_manager_nodesshould contain all 3 OpenSearch nodesnetwork.hostmust be reachable from the other OpenSearch nodes and from Shuffle backend- size the Java heap according to available memory; a common starting point is 50% of RAM, with equal
-Xmsand-Xmx
Once the OpenSearch cluster is healthy, configure Shuffle backend to talk to all nodes:
SHUFFLE_OPENSEARCH_URL=https://10.0.0.30:9200,https://10.0.0.31:9200,https://10.0.0.32:9200
If you use TLS or authentication on OpenSearch, keep the matching backend settings in place as well, such as:
SHUFFLE_OPENSEARCH_SKIPSSL_VERIFY=false
SHUFFLE_OPENSEARCH_CERTIFICATE_FILE=/shuffle-files/es_certificate
OpenSearch TLS certificate setup
SHUFFLE_OPENSEARCH_CERTIFICATE_FILE should point to a CA certificate file inside the backend container/pod. Shuffle reads this file and uses it as the CA trust when connecting to OpenSearch.
Quick start
- Place your OpenSearch CA certificate on the host (PEM format), for example
./certs/es-ca.pem. - Mount it into backend at a stable path (for example
/shuffle-files/es_certificate). - Set backend environment variables:
SHUFFLE_OPENSEARCH_URL=https://<opensearch-host>:9200
SHUFFLE_OPENSEARCH_USERNAME=<username>
SHUFFLE_OPENSEARCH_PASSWORD=<password>
SHUFFLE_OPENSEARCH_CERTIFICATE_FILE=/shuffle-files/es_certificate
SHUFFLE_OPENSEARCH_SKIPSSL_VERIFY=false
- Restart/redeploy backend.
- Verify:
API Call
curl -X GET 'http://localhost:8080/api/v1/checkusers'
Response
No response received.
Expected backend log line:
[INFO] Added certificate /shuffle-files/es_certificate elastic client.
Compose example (backend service):
volumes:
  - ./certs/es-ca.pem:/shuffle-files/es_certificate:ro
environment:
  - SHUFFLE_OPENSEARCH_URL=https://shuffle-opensearch:9200
  - SHUFFLE_OPENSEARCH_CERTIFICATE_FILE=/shuffle-files/es_certificate
  - SHUFFLE_OPENSEARCH_SKIPSSL_VERIFY=false
Kubernetes/Helm example:
backend:
  openSearch:
    url: https://opensearch.example.svc:9200
    certificateFile: /certs/es-ca.pem
    skipSSLVerify: false
    username: admin
  extraVolumes:
    - name: opensearch-ca
      secret:
        secretName: opensearch-ca
  extraVolumeMounts:
    - name: opensearch-ca
      mountPath: /certs
      readOnly: true
Production hardening checklist
- Keep
SHUFFLE_OPENSEARCH_SKIPSSL_VERIFY=falsein production. - Make sure every hostname in
SHUFFLE_OPENSEARCH_URLexists in certificate SANs. - Use
https://endpoints only when OpenSearch security/TLS is enabled. - Store OpenSearch credentials as secrets (not plaintext in committed files).
- Rotate certs and credentials regularly; test rollover in staging first.
- Validate failover with one OpenSearch node down while Shuffle remains operational.
Common failure patterns:
x509: certificate signed by unknown authority: wrong/missing CA file mount or path.certificate is valid for X, not Y: endpoint hostname does not match cert SAN.401/403: bad username/password or role permissions.- HTTP/HTTPS mismatch errors:
SHUFFLE_OPENSEARCH_URLprotocol does not match OpenSearch security mode.
If you prefer to keep OpenSearch inside Swarm, treat each node as a fixed service instead of one floating replicated service:
- deploy one OpenSearch service per host
- add placement constraints so each service stays on its intended node
- mount that host's local disk path into that service
- configure all OpenSearch nodes to join the same cluster
This avoids the common failure mode where one OpenSearch container is rescheduled onto another node that does not have the original data path.
OpenSearch HA validation checklist
Before pointing production Shuffle traffic at the new cluster, validate in this order:
- Confirm cluster formation from OpenSearch:
API Call
curl -X GET 'https://10.0.0.30:9200/_cluster/health?pretty'
Response
No response received.
-
Update
SHUFFLE_OPENSEARCH_URLon backend and redeploy Shuffle backend. -
Validate Shuffle itself:
API Call
curl -X GET 'http://localhost:8080/api/v1/checkusers'
Response
No response received.
Then log in, save a workflow, execute a workflow, and confirm execution history is written successfully.
- Run a failover test:
- stop one OpenSearch node
- confirm Shuffle remains usable
- confirm cluster health degrades but stays operational
- start the node again and verify it rejoins
- Run a persistence test:
- restart OpenSearch nodes one at a time
- confirm indices and execution history remain intact
For additional OpenSearch sizing, shard allocation, and cluster tuning guidance, follow the official OpenSearch documentation:
Network Configuration
Networking with Shuffle is pretty straight forward. What we check for are the following:
- Can Shuffle reach your services?
- Can the Shuffle services reach each other (frontend/backend/database/Orborus)
There are however many things that can go wrong with these simple mechanisms, leading to a need for network configuration changes. Shuffle is however built on HTTP, and can be easily modified and made to work both in air-gapped locations as well as with enterprise proxy environments.
Proxy configuration
Proxies are another requirement to many enterprises, hence it's an important feature to support. There are two places where proxies can be implemented:
- Shuffle Backend: Connects to Github and Dockerhub.
- Shuffle Orborus: Connects to Dockerhub and Shuffle Backend.
PS: Orborus settings are also set for the Worker
To configure these, there are two options:
- Internal vs External proxy (shuffle vs apps)
- Individual containers
- Globally for Docker
To DISABLE proxy for internal Shuffle traffic (between internal containers), add the following environment variables to Orborus:
SHUFFLE_INTERNAL_HTTP_PROXY=noproxy
SHUFFLE_INTERNAL_HTTPS_PROXY=noproxy
To disable proxy use for specific domains, use NO_PROXY with comma separation between domains:
NO_PROXY=myinternal-domain.com,random.org
If you need a separate no-proxy list for internal Shuffle traffic, set one of these on Orborus:
SHUFFLE_INTERNAL_NO_PROXY=shuffle-backend,shuffle-workers
# Legacy alias also supported by backend/shared code:
SHUFFLE_INTERNAL_NOPROXY=shuffle-backend,shuffle-workers
Global Docker proxy configuration
Follow this guide from Docker: https://docs.docker.com/network/proxy/
Internal Proxy settings
The main proxy issues may arise with the Backend and Orborus containers. This is related to how Orborus reaches the backend, how the worker downloads apps, and how apps connect to external systems.
Current behavior in code:
SHUFFLE_PASS_WORKER_PROXY=true: Orborus passesHTTP_PROXY,HTTPS_PROXY, andNO_PROXYto Worker containers.SHUFFLE_PASS_APP_PROXY=true: Worker passesHTTP_PROXY,HTTPS_PROXY,NO_PROXY, andno_proxyto App containers.- If set,
SHUFFLE_INTERNAL_HTTP_PROXYandSHUFFLE_INTERNAL_HTTPS_PROXYare also forwarded down to Worker and App containers. - Backend internal HTTP clients switch to
SHUFFLE_INTERNAL_*when talking to internal Shuffle targets (shuffle-*hosts, worker/app ports, and theBASE_URLhost match). - Setting
SHUFFLE_INTERNAL_HTTP_PROXY=noproxyandSHUFFLE_INTERNAL_HTTPS_PROXY=noproxydisables internal proxying for those internal routes.
Environment variables to be sent to the Orborus container:
# Configures a HTTP proxy to use when talking to the Shuffle Backend
HTTP_PROXY=
# Configures a HTTPS proxy when speaking to the Shuffle Backend
HTTPS_PROXY=

# Set to true to pass HTTP_PROXY/HTTPS_PROXY/NO_PROXY from Orborus to Worker
SHUFFLE_PASS_WORKER_PROXY=true

# Set to true to pass HTTP_PROXY/HTTPS_PROXY/NO_PROXY from Worker to Apps
SHUFFLE_PASS_APP_PROXY=false

# Optional: separate no-proxy list for internal Shuffle routes
SHUFFLE_INTERNAL_NO_PROXY=
Environment variables for the Backend container:
# A proxy to be used if Opensearch / Elasticsearch (database) is behind a proxy.
SHUFFLE_OPENSEARCH_PROXY

# Configures a HTTP proxy for external downloads
HTTP_PROXY=
# Configures a HTTPS proxy for external downloads
HTTPS_PROXY=
Opensearch / Elasticsearch proxies
Connections from Shuffle's backend to the Opensearch database does NOT follow normal HTTP_PROXY and NOPROXY environment variables.
Opensearch and Elasticsearch proxy configuration can be set using the SHUFFLE_OPENSEARCH_PROXY environment variable.
Individual container proxy
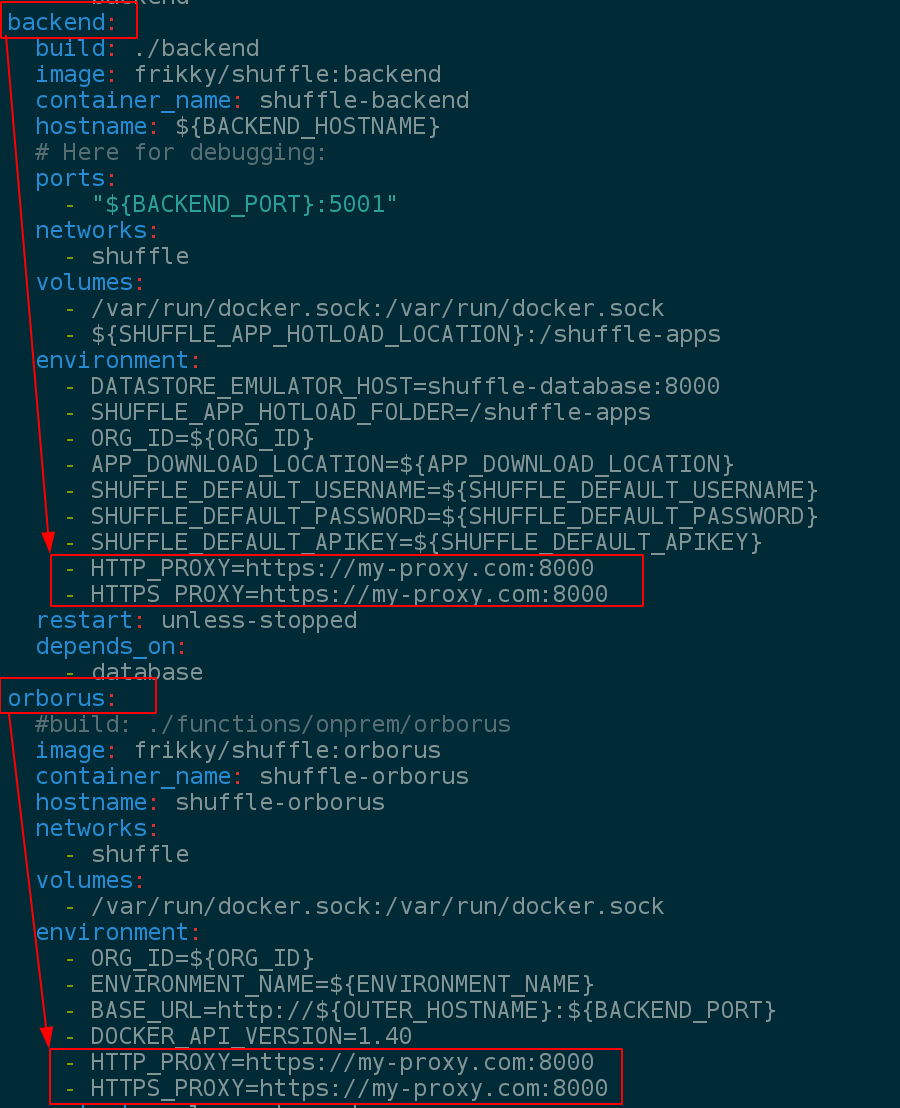
To set up proxies in individual containers, open docker-compose.yml and add the following lines with your proxy settings (http://my-proxy.com:8080 in my case).
PS: Make sure to use uppercase letters, and not lowercase (HTTP_PROXY, NOT http_proxy)
Orborus running on a different network
All you'll need to do is allow orborus to have access to the backend OR frontend of Shuffle.
Internal vs External proxy
As of November 2023, we added another way to configure a difference between these two:
- Internal tools like Backend -> Orborus -> Worker <-> Apps
- Apps -> External tools
This makes it possible to have an internal proxy that is different from what apps use for external services. These environment variables should be added to the Orborus container.
HTTP_PROXY=<external proxy>                     # used by default for everything
HTTPS_PROXY=<external https proxy>

SHUFFLE_INTERNAL_HTTP_PROXY=<internal proxy>     # Overrides HTTP_PROXY, making internal services in Shuffle use this proxy instead of HTTP_PROXY.
SHUFFLE_INTERNAL_HTTPS_PROXY=<internal https proxy>
SHUFFLE_INTERNAL_NO_PROXY=shuffle-backend,shuffle-workers
PS: This is in beta. Reach out to support@shuffler.io if you have any trouble with this.
App SDK proxy behavior
shuffle_sdk initializes proxy settings in this order:
HTTP_PROXY,HTTPS_PROXY,NO_PROXY- Override with
SHUFFLE_INTERNAL_HTTP_PROXY,SHUFFLE_INTERNAL_HTTPS_PROXY, andSHUFFLE_INTERNAL_NO_PROXYwhen set - If proxy value is
noproxy, it is treated as disabled
The SDK applies this proxy config to its own HTTP calls (for example: results streaming, datastore/cache APIs, and file APIs).
Current implementation note: when SHUFFLE_INTERNAL_HTTPS_PROXY is set, the SDK currently applies the value from SHUFFLE_INTERNAL_HTTP_PROXY for HTTPS traffic as well. Set both internal proxy vars to the same value if you need consistent behavior.
HTTPS
HTTPS is enabled by default on port 3443 with a self-signed certificate for localhost. If you would like to change this, the only way (currently) is to add configure and rebuild the frontend. If you don't have HTTPS enabled, check updating shuffle to get the latest configuration. Another workaround is to set up an Nginx reverse proxy you can control yourself. See further down for more details
After setting this up, make sure to change the BASE_URL for Orborus to talk to your new HTTPS url if you want encrypted traffic everywhere.
Default Routing: Orborus -> Backend:5001.
New Routing: Orborus -> Nginx -> Frontend -> Backend.

The New Routing steps are automatic as long as you update the BASE_URL to point to your new reverse proxy URL.
Necessary info for the truststore to create TLS/SSL certificates:
- Certificates are located in ./frontend/certs.
- ./frontend/README.md contains information on generating a self-signed cert
- (default): Privatekey is named privkey.pem
- (default): Fullchain is named fullchain.pem
If you want to change this, edit ./frontend/Dockerfile and ./frontend/nginx.conf.
After changing certificates, you can rebuild the entire frontend by running (./frontend)
./run.sh --latest
Make sure that the output image is the same in your docker-compose.yml file. This should work seemlessly for you next.
App Certificates
As of November 2023, it is possible to mount folders into apps. This is in order for you to have better control of what Shuffle Apps can do, with the main reason being to manage certificates or dynamic, large files.
To mount in certificates to ALL App containers, add the following environment variable to the "Orborus" container, but change the source and destination folder. The item BEFORE the colon (:) is the source folder on your machine, with the one AFTER the colon (:) being for the destination folder in the app itself.
If you want more multiple folders mounted, add them with a comma. Folders MUST exist, otherwise apps may not run, and the Worker will throw an error in the logs with Workflow Runs not finishing. If you are in production, we recommend trying this feature in a separate Runtime Location.
SHUFFLE_VOLUME_BINDS="/etc/ssl/certs:/usr/local/share/ca-certificates,/srcfolder:/dstfolder"
Using the Nginx Reverse Proxy for TLS/SSL
If you intend to use Nginx as a Reverse Proxy, the main steps are below. Here is a basic single-server architecture for it. The Docker version is further down.
- Install Nginx on your server (find the correct distro), or in a Docker container by itself.
- Make sure you have a VALID certificate that matches your domain/hostname and add this to your Nginx server
- In the nginx.conf file (/etc/nginx/conf.d/default.conf or similar), under "server", add the information below. Make sure to change the "proxy_pass" part. This is how it will redirect all /api requests.
location / {
    proxy_pass SHUFFLE FRONTENDIP;
    proxy_buffering off;
    proxy_http_version 1.1;

    proxy_connect_timeout 900;
    proxy_send_timeout 900;
    proxy_read_timeout 900;
    send_timeout 900;
    proxy_ssl_verify off;
}
- Restart Nginx!
systemctl restart nginx
Nginx in Docker
- Add the following service to your docker-compose.yml
  nginx-proxy:
    image: nginx:latest
    container_name: shuffle-nginx-proxy
    networks:
      - shuffle
    ports:
      - "80:80"
    volumes:
      - ./nginx-conf:/etc/nginx/conf.d
      - ./certs:/etc/nginx/certs
    restart: always
- Add a new nginx configuration file called
nginx-confwith the following (you may add additional Nginx configuration to this):
server {
    listen 443 ssl;
    server_name yourdomain.com;

    ssl_certificate /etc/nginx/certs/cert.crt;
    ssl_certificate_key /etc/nginx/certs/cert.key;

    location / {
        proxy_pass http://shuffle-frontend:80;

        proxy_buffering off;
        proxy_http_version 1.1;

        proxy_connect_timeout 900;
        proxy_send_timeout 900;
        proxy_read_timeout 900;
        send_timeout 900;
        proxy_ssl_verify off;
    }
}
- Add a folder called "certs" with your certificates named
cert.crtandcert.key. - Restart everything:
docker-compose down; docker-compose up -d
Internal Certificate Authority
By default, certificates are not being verified when outbound traffic goes from Shuffle. This is due to the massive use of self-signed certificates when using internal services. You may ignore certificate warnings by adding SHUFFLE_SKIPSSL_VERIFY=true to the environment of each relevant service - most notably used for Orborus. If you want to accept your Certificate Authority for all requests, there are a few ways to do this:
- Mount your CA certificates (recommended): Add the
./certs:/certsmount to the Orborus service in your docker-compose.yml. Ensure that the shuffle directory contains a certs subdirectory with all the necessary certificate files. This will automatically append all certificates in./certsto the system's root CA. - Docker Daemon level - point to your cert:
$ dockerd --tlscacert=/path/to/custom-ca-cert.pem - Add it to every app (per-image configuration). You can do this by modifying the Dockerfile for an app and manually building it with the certificate in the Dockerfile of each Docker image. Restart Shuffle after this is done.
As this may require advanced Docker understanding, reach out to ask us about it: support@shuffler.io
IPv6
Shuffle supports IPv6 in Docker by default, but your docker engine may not. IPv6 can be enabled in Docker by adding it to the /etc/docker/daemon.json file on the host as per this article by Docker:
https://docs.docker.com/config/daemon/ipv6/
Enterprise Environments
In most enterprise environments, Shuffle will be behind firewalls, proxies and other networking equipment. If this is the case, below are the requirements to make Shuffle work anywhere. The most common issue has to do with downloads from Alpine linux's Docker images while Shuffle is running.
PS: If external connections are blocked, you may further have issues running Apps. Read more about manual image transfers here.
Change the Database from OpenSearch to Elasticsearch
-
Open the Docker-compose.yml file in the Shuffle directory. Find the OpenSearch container section and either comment out or remove the details. Save your modifications to the file.
-
Now open the .env file and change the below value in the .env from false to true for Elasticsearch database enable.
-
Find the part in the .env file that defines database configurations. Update the Elasticsearch host configuration using your Elasticsearch IP address.
Domain Whitelisting
These URL's are used to get Shuffle up and running. Whitelisting them for the Shuffle services should make all processes work seamlessly.
PS: We do intend to make this JUST https://shuffler.io in the future.
# Can be closed after install with working Workflows
shuffler.io                                                      # Initial setup & future app/workflow sync
github.com                                                        # Downloading apps, workflows and documentation
pkg-containers.githubusercontent.com     # Downloads from Github Container registry (ghcr.io)
raw.githubusercontent.com                         # Downloads our Documentation raw from github (https://github.com/shuffle/shuffle-docs)

# Should stay open
dl-cdn.alpinelinux.org                        # Used for building apps in realtime
registry.hub.docker.com                     # Downloads apps if they don't exist locally
ghcr.io                                                        # Github Docker registry
auth.docker.io                                        # Dockerhub authentication
registry-1.docker.io                            # Dockerhub registry (for apps)
production.cloudflare.docker.com     # Protects of DockerHub
Incoming IP Whitelisting
When using Shuffle in the cloud (*.shuffler.io), the incoming IP to your services by default will be be from our cloud functions, if you are not using Runtime Locations. The range is not static, and may wary based on region. Here's a list (mostly IPv6 as of 2025):
Default (London): 2600:1900:2000:2a:400::0 -> 2600:1900:2000:2a:400::ffff
If you want direct access with ANY app in your on-premises environment, we recommend setting up a new environment on a server in the same network. Steps to set this up:
- Go to /admin?tab=locations and create a new runtime location
- Click the Copy button in the "Command" tab to copy the relevant Docker command. This requires Docker installed on the server in question.
- Run the copied command on your server on-premises.
- Change the Environment a workflow runs with to the new environment. When ran, it will automatically run on YOUR server, instead of on our cloud.
- Your server will now be reaching out to Shuffle cloud for jobs every few seconds. This requires outbound access from YOUR network to the domains shuffler.io and shuffle-backend-stbuwivzoq-nw.a.run.app.
Environment page:
Architecture connecting from cloud to onprem (hybrid):
Static inbound IPs for cloud
As a customer of Shuffle we can provide you with a static IP range with secondary domains that can be used for cloud routing. May incur costs depending on needs. Contact support@shuffler.io for more info.
Areas of relevance:
- Your Environment -> Shuffle Cloud (*.shuffler.io)
- Shuffle Cloud -> Your Environment
Manual Docker image transfers
In certain cases you may not have access to download or build images at all. If that's the case, you'll need to manually transfer them to the appropriate server. If the image to transfer is an app, it should be moved to the "Orborus" server. Otherwise; backend server.
# 1. Download the image you want. Go to [hub.docker.com](https://hub.docker.com/r/frikky/shuffle/tags?page=1&ordering=last_updated) and find the image. Download with docker pull. E.g. for Shuffle-tools:
docker pull frikky/shuffle:shuffle-tools_1.1.0

# 2. Save the image to a file to be transferred.
docker save frikky/shuffle:shuffle-tools_1.1.0 > shuffle_tools.tar

# 3. Transfer the file to a remote server
scp shuffle_tools.tar username@<server>:/path/to/destination/shuffle_tools.tar

# 4. Log into the remote server and find the repository
ssh username@<server>
cd /path/to/destination #same path as above

# 5. Load the file!
docker load shuffle_tools.tar

## All done!

# Transfer between 2 remote hosts:
#scp -3 centos@10.0.0.1:/home/user/wazuh.tar centos@10.0.0.2:/home/user/wazuh.tar
No Internet Install
This procedure will help you export what you need to run Shuffle on a no internet host.
The following features will not work without internet:
- Cloud Sync
- Automatic Health System (/health page)
- UI app activations
- Automatic App generation AI
- Depending on your network: Search engine. This is a frontend feature, if you are in a no-internet zone, it will stop working.
- Prerequise
-
Both machines has Docker and Docker Compose installed already
-
Your host machine already needs the images on it to make them exportable
- Pull images on original machine
Shuffle need a few base images to work:
- shuffle-frontend
- shuffle-backend
- shuffle-orborus
- shuffle-worker
- shuffle:app_sdk
- opensearch
- shuffle-subflow
docker pull ghcr.io/frikky/shuffle-backend & docker pull ghcr.io/frikky/shuffle-frontend & docker pull ghcr.io/frikky/shuffle-orborus & docker pull frikky/shuffle:app_sdk & docker pull ghcr.io/frikky/shuffle-worker & docker pull opensearchproject/opensearch:2.5.0 & docker pull registry.hub.docker.com/frikky/shuffle:shuffle-subflow_1.0.0
Be careful with the versioning for opensearch, all other are going to use the tag "latest". You will also need to download and transfer ALL the apps you want to use. These can be discovered as such:
docker images | grep -i shuffle
- Save images and archive them
mkdir shuffle-export & cd shuffle-export

docker save ghcr.io/frikky/shuffle-backend > backend.tar
docker save ghcr.io/frikky/shuffle-frontend > frontend.tar
docker save ghcr.io/frikky/shuffle-orborus > orborus.tar
docker save frikky/shuffle:app_sdk > app_sdk.tar
docker save ghcr.io/frikky/shuffle-worker:latest > worker.tar
docker save opensearchproject/opensearch:2.5.0 > opensearch.tar
docker save registry.hub.docker.com/frikky/shuffle:shuffle-subflow_1.0.0 > sublow.tar

git pull https://github.com/Shuffle/python-apps.git

wget https://raw.githubusercontent.com/Shuffle/Shuffle/master/.env
wget https://raw.githubusercontent.com/Shuffle/Shuffle/master/docker-compose.yml

cd .. & tar cvf shuffle-export.tar.gz shuffle-export
- Export data to the targeted machine
Use scp, usb key, ..., to copy the previous archive to the machine. More about manual transfers here
-
Import docker images to host without internet
tar xvf shuffle-export.tar.gz & cd shuffle-export find -type f -name "*.tar" -exec docker load --input "{}" \; -
Deploy Shuffle without Internet
Create folders to add the python apps
mkdir shuffle-apps
cp -a python-apps/ * shuffle-apps/
Now, you just need to configure and install Shuffler like in normal procedure
Database
To modify the database location, change "DB_LOCATION" in .env (root dir) to your new location.
Database indexes (OpenSearch)
Shuffle uses OpenSearch (or Elasticsearch) as its primary database. Below is a complete list of all indexes used by Shuffle, organized by category.
Default Credentials
The default OpenSearch credentials for Shuffle are:
- Username:
admin - Password:
StrongShufflePassword321!
These can be changed via environment variables in your .env file:
SHUFFLE_OPENSEARCH_USERNAMESHUFFLE_OPENSEARCH_PASSWORD
Index Prefix
You can set a custom prefix for all indexes using the SHUFFLE_OPENSEARCH_INDEX_PREFIX environment variable. This is useful when running multiple Shuffle instances on a single OpenSearch cluster.
Example: If SHUFFLE_OPENSEARCH_INDEX_PREFIX=prod, the workflow index becomes prod_workflow.
Core Indexes
| Index | Description |
|---|---|
workflow | Workflow definitions and configurations |
workflowexecution | Workflow execution records and results |
workflowapp | Workflow application definitions |
workflowappauth | App authentication configurations |
workflowappauthgroup | Authentication group configurations |
workflowqueue-{env} | Execution queue per environment (dynamic, based on Orborus environment) |
workflow_revisions | Workflow version history |
app_revisions | App version history |
Organization & User Indexes
| Index | Description |
|---|---|
organizations | tenant data and settings |
users | User accounts and profiles |
sessions | User session tokens |
apikey | API key storage |
partners | Partner tenant data |
org_statistics | tenant usage statistics |
org_cache | tenant cache data (KV store) |
org_cache_revisions | Cache version history |
Files & Storage Indexes
| Index | Description |
|---|---|
files | File metadata storage |
datastore_category | Datastore category definitions |
datastore_ngram | N-gram data for search functionality |
oauth2_storage | OAuth2 token storage |
Triggers & Automation Indexes
| Index | Description |
|---|---|
hooks | Webhook configurations |
schedules | Scheduled task definitions |
pipelines | Pipeline definitions |
trigger_auth | Trigger authentication data |
environments | Environment configurations |
gmail_subscription | Gmail trigger subscriptions |
Notifications & Communication Indexes
| Index | Description |
|---|---|
notifications | Notification records |
conversations | AI conversation data |
conversation_metadata | Conversation metadata |
suggestions | System suggestions |
Statistics & Monitoring Indexes
| Index | Description |
|---|---|
platform_health | Platform health check data |
app_execution_values | App execution value cache |
app_stats | App usage statistics |
creator_stats | Creator statistics |
environment_stats | Environment statistics |
singul_stats | Singul integration stats |
live_execution_status | Real-time execution status |
Detection & Rules Indexes
| Index | Description |
|---|---|
disabled_rules | Disabled detection rules |
selected_rules | Selected/enabled detection rules |
Other Indexes
| Index | Description |
|---|---|
openapi3 | OpenAPI spec storage |
usecases | Use case definitions |
reseller_deal | Reseller deal data |
training | Training/ML data |
synckey | Cloud sync key data |
shuffle_logs | Shuffle system logs |
Indexes with Aliasing & Rollover
The following 11 indexes are configured with aliasing and automatic rollover for better scaling. These indexes are created with the pattern {index}-000001 and have an alias pointing to the write index. This is handled by InitOpensearchIndexes() on startup.
workflowexecution, datastore_ngram, org_cache, org_cache_revisions,
notifications, shuffle_logs, environments, org_statistics,
workflowapp, workflow, workflow_revisions
Default rollover conditions:
- Max age: 90 days
- Max size: 40GB
- Max documents: 1,000,000
Default index settings:
- Shards: 3
- Replicas: 1
- Refresh interval: 30s
You can customize these with environment variables:
OPENSEARCH_INDEX_CONFIG- Custom JSON for index settings/mappingsOPENSEARCH_INDEX_ROLLOVER- Custom JSON for rollover conditionsSHUFFLE_SKIP_OPENSEARCH_INDEX_INIT=true- Skip automatic index initialization
Re-indexing & Index Management
When to Re-index
Re-indexing is rarely needed since Shuffle uses automatic rollover for high-volume indexes. However, you may need to re-index when:
workflowexecutionis slow - The most common issue. If this index grew large before rollover was configured, queries become slow. Re-index into a fresh index with proper aliasing.- Changing shard count - OpenSearch locks primary shard count at creation. If you need more shards for a large dataset, you must re-index.
- Field mapping changes - OpenSearch doesn't allow changing field types (e.g.,
texttokeyword). Schema changes require re-indexing. - Index corruption - Rare, but if an index gets corrupted, re-index from backups.
- Cluster migration - Moving from single-node to clustered OpenSearch, or migrating between clusters.
Re-indexing a Single Index
API Call
curl -X POST 'https://localhost:9200/_reindex' \
  -H 'Content-Type: application/json'
Response
No response received.
Checking Index Health
API Call
curl -X GET 'https://localhost:9200/_cat/indices/*workflow*?v'
Response
No response received.
Manual Rollover
If an index grows too large before automatic rollover triggers:
API Call
curl -X POST 'https://localhost:9200/workflowexecution/_rollover' \
  -H 'Content-Type: application/json'
Response
No response received.
Deleting Old Index Data
For indexes with rollover, you can delete old backing indexes:
API Call
curl -X DELETE 'https://localhost:9200/_cat/indices/workflowexecution-*?v'
Response
No response received.
Warning: Always backup data before re-indexing or deleting indexes. Use OpenSearch snapshots for production environments.
Debugging
As Shuffle has a lot of individual parts, debugging can be quite tricky. To get started, here's a list of the different parts, with the latter three being modular / location independent.
| Type | Container name | Technology | Note |
|---|---|---|---|
| Frontend | shuffle-frontend | ReactJS | Cytoscape graphs & Material design |
| Backend | shuffle-backend | Golang | Rest API that connects all the different parts |
| Database | shuffle-database | Google Datastore | Has all non-volatile information. Will probably move to elastic or similar. |
| Orborus | shuffle-orborus | Golang | Runs workers in a specific environment to connect locations. Defaults to the environment "Shuffle" onprem. |
| Worker | worker-id | Golang | Deploys Apps to run Actions defined in a workflow |
| app sdk | appname_appversion_id | Python | Used by Apps to talk to the backend |
| worker-8a666e4f-e544-440e-bf0f-4220e7cc9e25 |
Disabling Image downloads
There are cases where automatic image downloads may occur, such as when you restart Orborus. You can disable this with SHUFFLE_AUTO_IMAGE_DOWNLOAD=false
Execution debugging
Execution debugging might be the most notable issue you might explain. This is because there are a ton of reasons that it might crash. Before going into techniques to find what's going on, you'll need to understand what exactly happens when you click the big execution button.
Frontend click -> Backend verifies and deploys executions -> (based on environments) orborus deploys a new worker -> worker finds actions to execute -> your app is executed.
- A workflow is executed
- The backend verifies whether you can execute and deploys to environment
- Orborus is listening to environment and deploys worker if it's the correct one
- Worker deploys actions if they have the right environment
- App executes and returns data back to the execution
As previously stated, a lot can go wrong. Here's the most common issues:
- Networking (firewalls / proxies)
- Badly formed apps.
- Bad environment
General debugging
This part is mean to describe how to go about finding the issue you're having with executions. In most cases, you should start from the top of the list previously described in the following way:
-
Find out what environment your action(s) are running under by clicking the App and seeing "Environment" dropdown. In this case (and default) is "Shuffle". Environments can be specified / changed under the path /admin
-
Check if the workflow executed at all by finding the execution line in the shuffle-backend container. Take note that it mentions environment "Shuffle", as found in the previous step.
docker logs -f shuffle-backend
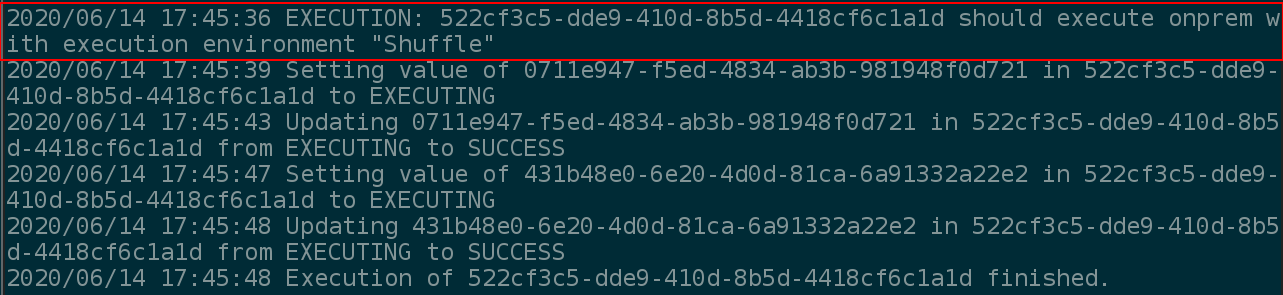
- If it executed, check whether Orborus is running, before checking it's logs for "Container <container_id> is created. The container_id is the worker it has deployed. Take not of the environment again at the end of the line. If you don't see this line, it's most likely because it's running in the wrong environment.
Check if shuffle-orborus is running
docker ps # Check if shuffle-orborus is running
Find whether it was deployed or not
docker logs -f shuffle-orborus # Get logs from shuffle-orborus

Check environment of running shuffle-orborus container.
docker inspect shuffle-orborus | grep -i "ENV"
Expected env result where "Shuffle" corresponds to the environment

- Check whether the worker executed your app. Remember that we found <container_id> previously by checking the logs of shuffle-orborus? Now we need that one. Workers are and will always be verbose, specifically for the reason of potential debugging.
Find logs from a docker container
docker logs -f CONTAINER_ID

As can be seen in the image above, is shows the exact execution order it takes. It starts by finding the parents, before executing the child process after it's finished. Take note of the specific apps being executed as well. It says "Time to execute <app_id> with app <app_name:app_version>. This indicates the app THAT WILL be executed. The following lines saying "Container <container_id> is the container created with this app.
- App debugging in itself might be the trickiest. There are a lot of factors like branches, bad workflow building etc that might come into play. This builds on the same concept as the worker, where you pass the container ID it specified.
Get the app logs
docker logs -f CONTAINER_ID # The CONTAINER_ID found in the previous worker logs
As you will notice, app logs can be quite verbose (optional in a later build). In essence, if you see "RUNNING NORMAL EXECUTION" in the end, there's a 99.9% chance that it worked, otherwise some issue might have occurred.
Please notify me if you need help debugging app executions ASAP, as I've done a lot of it, but it's more tricky than the other steps.
Hybrid docker image handling
We currently don't have a Docker Registry for Shuffle, meaning you need some minor configuration to get Orborus running remotely with the right containers. This only applies to containers not on dockerhub, as we automatically push PYTHON containers there when updated (not OpenAPI)
Here's an example of how to handle this with two different servers and Docker
ssh user@10.0.0.1
docker save frikky/shuffle:wazuh_api_rest_1.0.0 > wazuh.tar
exit
scp -3 centos@10.0.0.1:/home/user/wazuh.tar centos@10.0.0.2:/home/user/wazuh.tar
ssh user@10.0.0.2
docker load wazuh.tar
Docker socket
For now, the docker socket is required to run Shuffle. Whether you run with Kubernetes or another clustering technology, Shuffle WILL need access to ContainerD, which is what the docker socket provides. If this is against internal policies and you want a single point of contact for controlling permissions, please have a look at docker socket proxy farther down.
Usage of the socket:
- Backend (Not required, but used for app management)
- Orborus (Required, deploying Workers)
- Worker (Required, deploying Apps. Apps don't have access to the socket.)
API's in use
- Backend: Create, Make, Export docker images. No direct container management.
- Orborus: Download and Remove images. Make, List and Remove containers. Make, List and Remove services.
- Worker: Download and Remove images. Make, List and Remove containers. Make, List and Remove services.
Docker Socket Proxy
In certain scenarios or environments, you may find the docker socket to not have the right permissions, or running the socket directly on your software to be against internal policies. To solve this problem, we've built support for the docker socket proxy, which will give the containers the same permissions, but without the socket being directly mounted in the same container. Another good reason to use the docker socket proxy is to control the docker permissions required.
To use the docker socket proxy, add the following to your docker-compose.yml as a service. This will lauch it together with the rest:
  docker-socket-proxy:
    image: tecnativa/docker-socket-proxy
    privileged: true
    environment:
      - SERVICES=1
      - TASKS=1
      - NETWORKS=1
      - NODES=1
      - BUILD=1
      - IMAGES=1
      - GRPC=1
      - CONTAINERS=1
      - PLUGINS=1
      - SYSTEM=1
      - VOLUMES=1
      - INFO=1
      - DISTRIBUTION=1
      - POST=1
      - AUTH=1
      - SECRETS=1
    volumes:
      - /var/run/docker.sock:/var/run/docker.sock
    networks:
      - shuffle
When done, remove the "/var/run/docker.sock" volume from the backend and orborus services in the docker-compose. To enable the docker rerouting, add this environment variable to both of them
- DOCKER_HOST=tcp://docker-socket-proxy:2375
This will route all docker traffic through the docker-socket-proxy giving you granular access to each API.
Uptime Monitoring
Uptime monitoring of Shuffle can be done by periodically polling the API for userinfo located at /api/v1/getinfo. This is an API that connects to our database, and which will be stuck if we any platform issues occur, whether in your local instance or in our Cloud instance on https://shuffler.io.
Shuffle has and will not have any planned downtime for services on https://shuffler.io, and have built our architecture around being able to upgrade and roll back without any downtime at all. If this occurs in the future for our Cloud platform, we will make sure to notify any active users. We plan to launch a status monitor for our services in 2022.
Basic monitoring can be done with a curl request + sendmail + cronjob as seen in this blogpost with the curl command below. Your personal API key can be found on https://shuffler.io/settings or in the same location (/settings) in your local instance.
API Call
curl -X GET 'https://uk.shuffle.security/api/v1/getinfo' \
  -H 'Authorization: Bearer apikey'
Response
No response received.
Shuffle Server Healthcheck
There are multiple things to check in the Shuffle server to ensure that the health of server is in a good state:
- Disk Space
- Memory
- Elasticsearch service state
For this, the scripts have been prepared with the alerting mechanism which will check if everything is proper or not.
Disk Space Script
This script will determine whether or not the disc space is more than 75% full. If so, an alert will be sent to your Webhook URL. Replace the script's with your Webhook URL.
#!/bin/sh
df -H | grep -vE '^Filesystem|tmpfs|cdrom' | awk '{ print $5 " " $1 }' | grep -v overlay | while read output;
do
  #echo $output
  usep=$(echo $output | awk '{ print $1}' | cut -d '%' -f1  )
  partition=$(echo $output | awk '{ print $2 }' )
  if [ $usep -ge 75 ]; then
    curl -X POST -H 'Content-type: application/json' --data '{"Alert":"Almost out of disk space","Server":"Local-Lab Shuffle Server"}' <Webhook-URL>
  fi
done
Memory Check Script
This script will determine whether or not the memory utilization is more than 70%. If so, an alert will be sent to your Webhook URL. Replace the script's with your Webhook URL.
#check server health
STATUS="$(curl http://172.17.14.102:3001/api/v1/_ah/health)"
if [ "${STATUS}" = "OK" ]; then
    :
else
    curl -X POST -H 'Content-type: application/json' --data '{"Alert":"There is a problem with this server(172.17.14.102), status is not OK"}' <Webhook-URL>
    exit 1
fi
Elasticsearch Service Script
This script will determine whether or not the Elasticsearch service is running or not. If not so, an alert will be sent to your Webhook URL. Replace the script’s with the Elasticsearch IP of your environment. Replace the script's with your Webhook URL.
#check server health
STATUS="$(curl <Elasticsearch-IP>)"
if [ "${STATUS}" = "OK" ]; then
    :
else
    curl -X POST -H 'Content-type: application/json' --data '{"Alert":"There is a problem with this server(172.17.14.102), status is not OK"}' <Webhook-URL>
    exit 1
fi
~
Cron Jobs to automate the Process
You can set a cron job to execute the scripts on every 15 minutes and the whole process can be automated.
*/15 * * * * bash /root/diskspacecheck.sh
*/15 * * * * bash /root/healthchech.sh
*/15 * * * * bash /root/memorycheck.sh
Using podman
Our main goal is to provide stable support for docker. But a lot of members from our community run podman (Especially because RHEL 8 uses it). We have tested Shuffle with podman and it works for most parts. While it's not our main focus, The way to run Shuffle with podman is nearly the same.
- Make sure to remove the usage of double quotes from .env after you git clone Shuffle. This is because podman doesn't support double quotes in the .env file.
You can do it like this:
sed -E "s/(.*)=['\"]?([^'\"]*)['\"]?/\1=\2/" .env -i
- Edit the existing docker-compose.yml to support podman by:
In shuffle-backend, comment back in the volume: /var/run/docker.sock:/var/run/docker.sock And in environments, Comment back out: # DOCKER_HOST=tcp://docker-socket-proxy:2375
So that the shuffle-backend service block ends up looking like this:
  backend:
    image: ghcr.io/shuffle/shuffle-backend:latest
    container_name: shuffle-backend
    hostname: ${BACKEND_HOSTNAME}
    # Here for debugging:
    ports:
      - "${BACKEND_PORT}:5001"
    networks:
      - shuffle
    volumes:
      - /var/run/docker.sock:/var/run/docker.sock
      - ${SHUFFLE_APP_HOTLOAD_LOCATION}:/shuffle-apps:z
      - ${SHUFFLE_FILE_LOCATION}:/shuffle-files:z
    env_file: .env
    environment:
      #- DOCKER_HOST=tcp://docker-socket-proxy:2375 # we commented this out
      - SHUFFLE_APP_HOTLOAD_FOLDER=/shuffle-apps
      - SHUFFLE_FILE_LOCATION=/shuffle-files
- Run Shuffle with podman by:
sudo podman-compose -f docker-compose.yml pull
sudo podman-compose -f docker-compose.yml up