Search
Ctrl+K
Shuffle extensions


On this page
This is documentation for integrating and sending data from third-party services to Shuffle, along with being a brief overview of our Research & Development (R&D) activities. Not to be confused with apps and workflows
Introduction
From the start, Shuffle has been a platform about integrations. We've focused on making them as open and usable as possible, but were missing one part; inbound data. The general way Shuffle handles this has been through third-party API's, where we poll for data on a schedule. There are however some cases where this doesn't do the trick. That's what extensions are.
These integrations will typically entail third party services connecting to Shuffle with inbound Webhooks as triggers in a workflow.
Single Signon
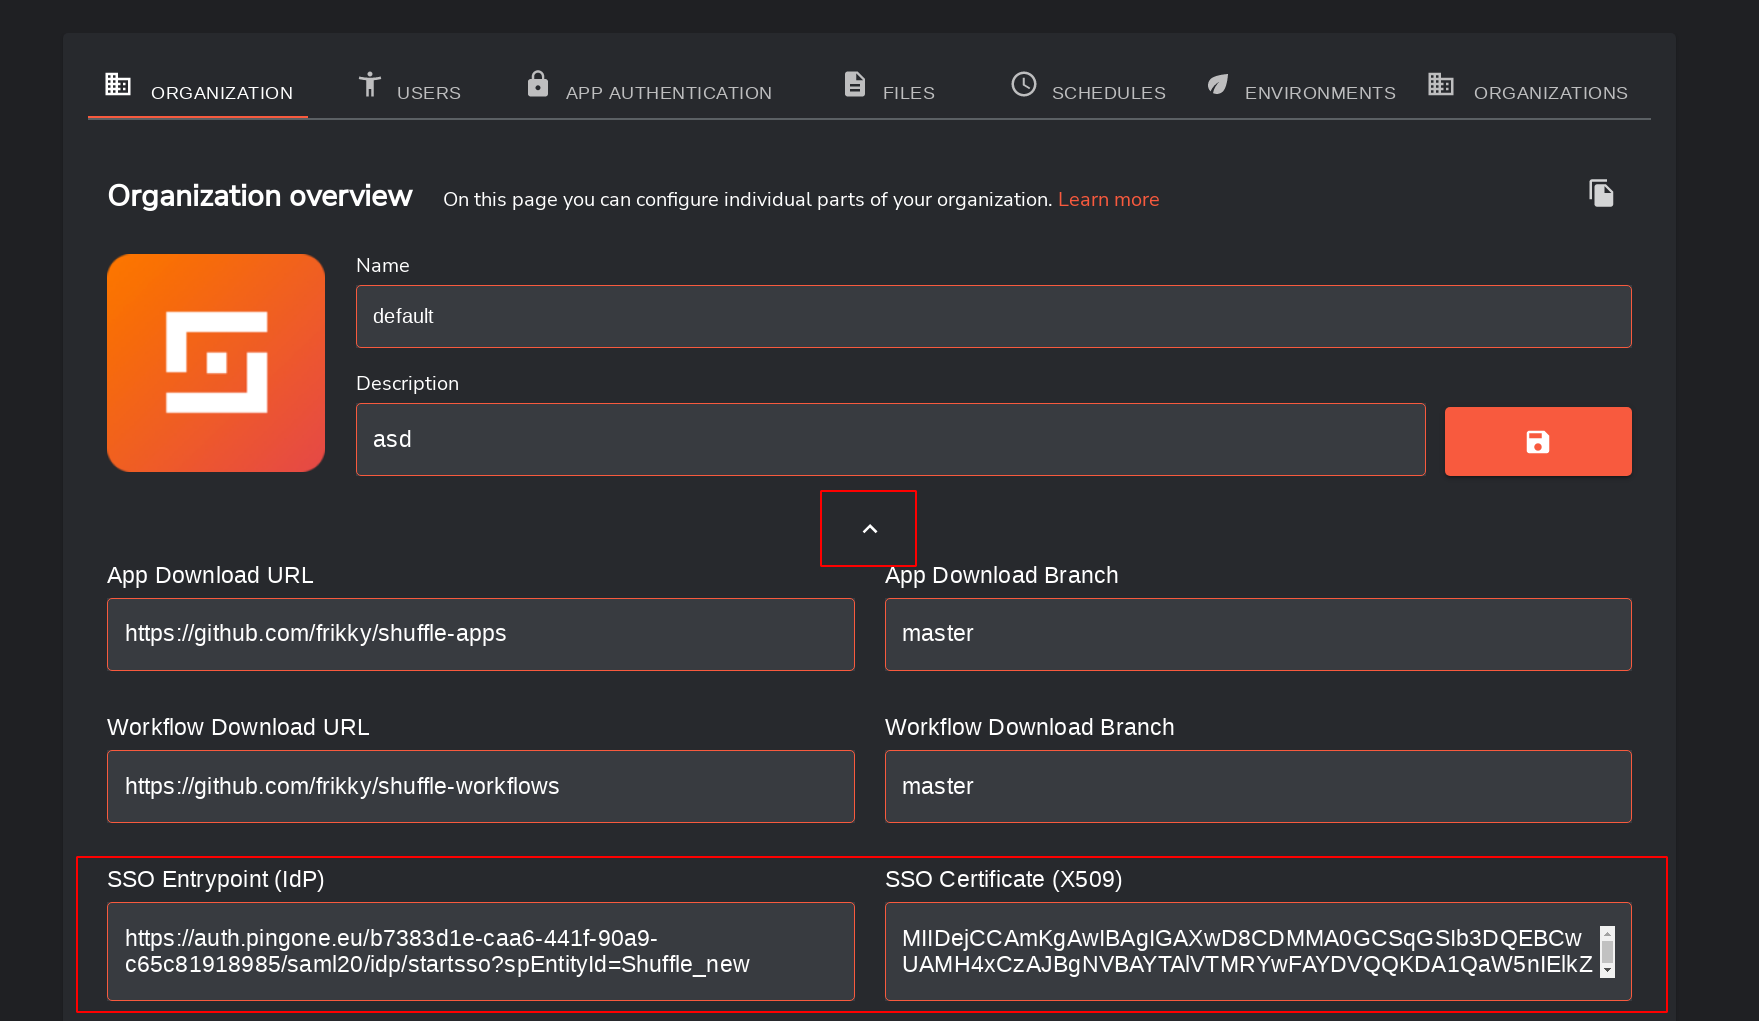
Shuffle added Single Signon (SAML v1.0) from Shuffle version 0.9.16 & OpenID in Shuffle version 1.0.0. This allows you to log into Shuffle from other identity platforms, entirely controlled by you. SSO is available for onprem AND cloud. It works by setting an Entrypoint (IdP) and X509 Certificate, both used to validate who the requester is. This can be added in your admin panel.
Note: This feature will be depreciated on cloud by 10th December 2025. Please migrate to OAuth2/OpenID Connect as soon as possible.
Tenant Swapping behavior
If an tenant requires SSO, it will FORCE you through the SSO login unless your session already has been through SSO for that tenant. This may feel counter-intuitive at first, but is a required system as each tenant is controlled for SSO individually, and there is no limit to how many tenant a user can have.
Using ANY SSO platform
ONPREM ONLY: You will have to change the SSO_REDIRECT_URL variable in the .env file to match your front end server link i.e SSO_REDIRECT_URL=http://<URL>:<PORT>
How it works:
- Every user gets the role "user" by default.
- If the user DOESN'T exist, it will be created, based on an identifier provided from the SSO provider.
- If the user DOES exist, it will simply log them in.
- After login, each user is redirected to /workflows as per a normal login.
PS: In some cases, the persons' username may be appear an ID in Shuffle. If so, an admin should login to Shuffle and change their username. SSO should still work.
PPS: The callback URL/redirect URL/recipient URL is https://<URL>:<PORT>/api/v1/login_sso
Okta
To use Okta SSO with Shuffle, first make an app in Okta. Their guide for making an app can be found here.
Once an application is made, it's time to find the required information. Go to the app > Sign On > Click "View Setup Instructions" under SAML 2.0. This will open a new page with the credentials.

Move these fields over to Shuffle:
- Identity Provider Single Sign-On URL -> SSO Entrypoint (IdP)
- X.509 -> SSO Certificate (X509)
After adding them, click "Save", saving the configuration. After saving, log out of your user to verify the SSO configuration. If you don't see a button for "Use SSO", you most likely configured the wrong tenant.
Okta OpenID
To use Okta OpenID with Shuffle, first make an app in Okta.
Configure the following in Okta:
- Sign-in redirect URIs ->
https://shuffler.io/api/v1/login_openid - Initiate login URI ->
https://shuffler.io/api/v1/login_openid - Under Client Credentials, enable "Require PKCE as additional verification"
- Under Grant type, enable "Implicit (hybrid)" and "Allow ID Token with implicit grant type"
After adding them, click "Save", saving the configuration. After saving, log out of your user to verify the SSO configuration.
Google SAML SSO
• Log in to your Google Workspace portal as admin -> Apps -> Web and mobile apps.
• Click Add app -> Add custom SAML app.
• In the popup window, enter shuffle as the name of the app, you can upload the app logo here as well. Then click continue.
• The next page will provide the IDP data. Download IdP metadata then click continue.
• Next page will be the SP information, this is where you should provide the Single Sign On URL, and SP Entity ID.
- ACS URL :
	- For Cloud : https://shuffler.io/api/v1/login_sso
	- For On-prem: https://<your-ip>:3443/api/v1/login_sso
- Entity ID : shuffle-saml
- Name ID: Basic Information > Primary Email
• The next page is where you add the below attributes and click on Finish and the app is added to the Google Workspace.
• After completing the app creation on Google Workspace. You can select the shuffle app under the "Web and mobile apps". Click on the shuffle app, and note the SPID in the URL, that is the SPID that will be needed.
• Now we configure the Google SAML SSO in shuffle portal. Log in to your Shuffle web portal.
• Click on profile -> Admin --> Edit Details --> Now add the Entrypoint (IdP) and SSO Certificate under the SAML SSO and click on save.
Note : The IdP metadata contains the Idp ID and certificate. Use this link as your SSO entry point, substituting your SP ID for "YourSPID" and your IDP ID for "YourIDPId."
- SSO Entrypoint (IdP) : https://accounts.google.com/o/saml2/initsso?idpid=C0ivw&spid=634181550209&forceauthn=false
Auth0
To use Auth0 SSO with Shuffle, first make an app on https://manage.auth0.com. Documentation can be found here.
After the app is made, click "Addons" > "SAML2 Web App".
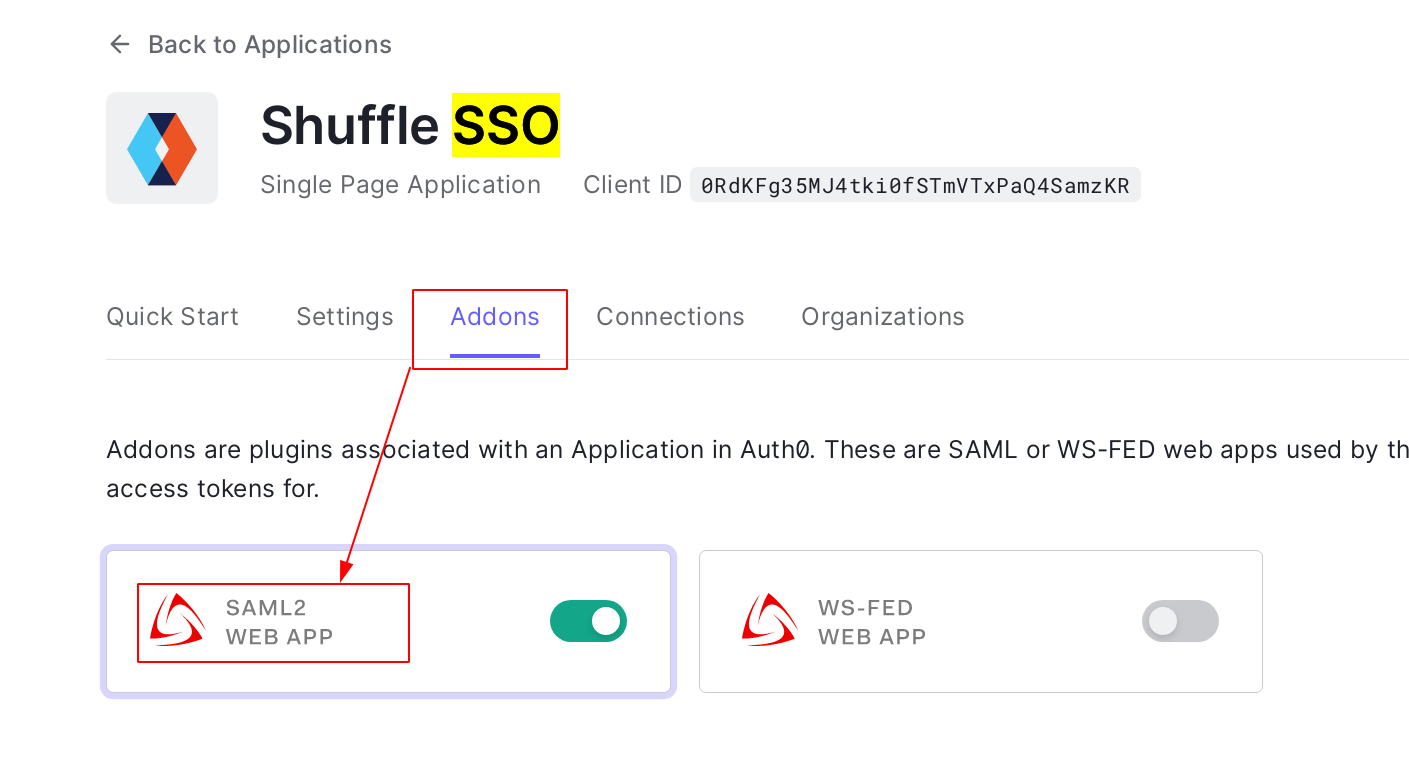
In the popup, move the data of these fields to Shuffle:
- Identity Provider Login URL -> SSO Entrypoint (IdP)
- Identity Provider Certificate -> SSO Certificate (X509)
Open the Certificate file in a text editor, and copy it's contents.
After adding them, click "Save", saving the configuration. After saving, log out of your user to verify the SSO configuration. If you don't see a button for "Use SSO", you most likely configured the wrong tenant.
PingIdentity
To use PingID SSO with Shuffle, first make an app on https://console.pingone.eu/. Documentation can be found here.
After the app is made, click the dropdown for it on the right side > Configuration > find these fields.
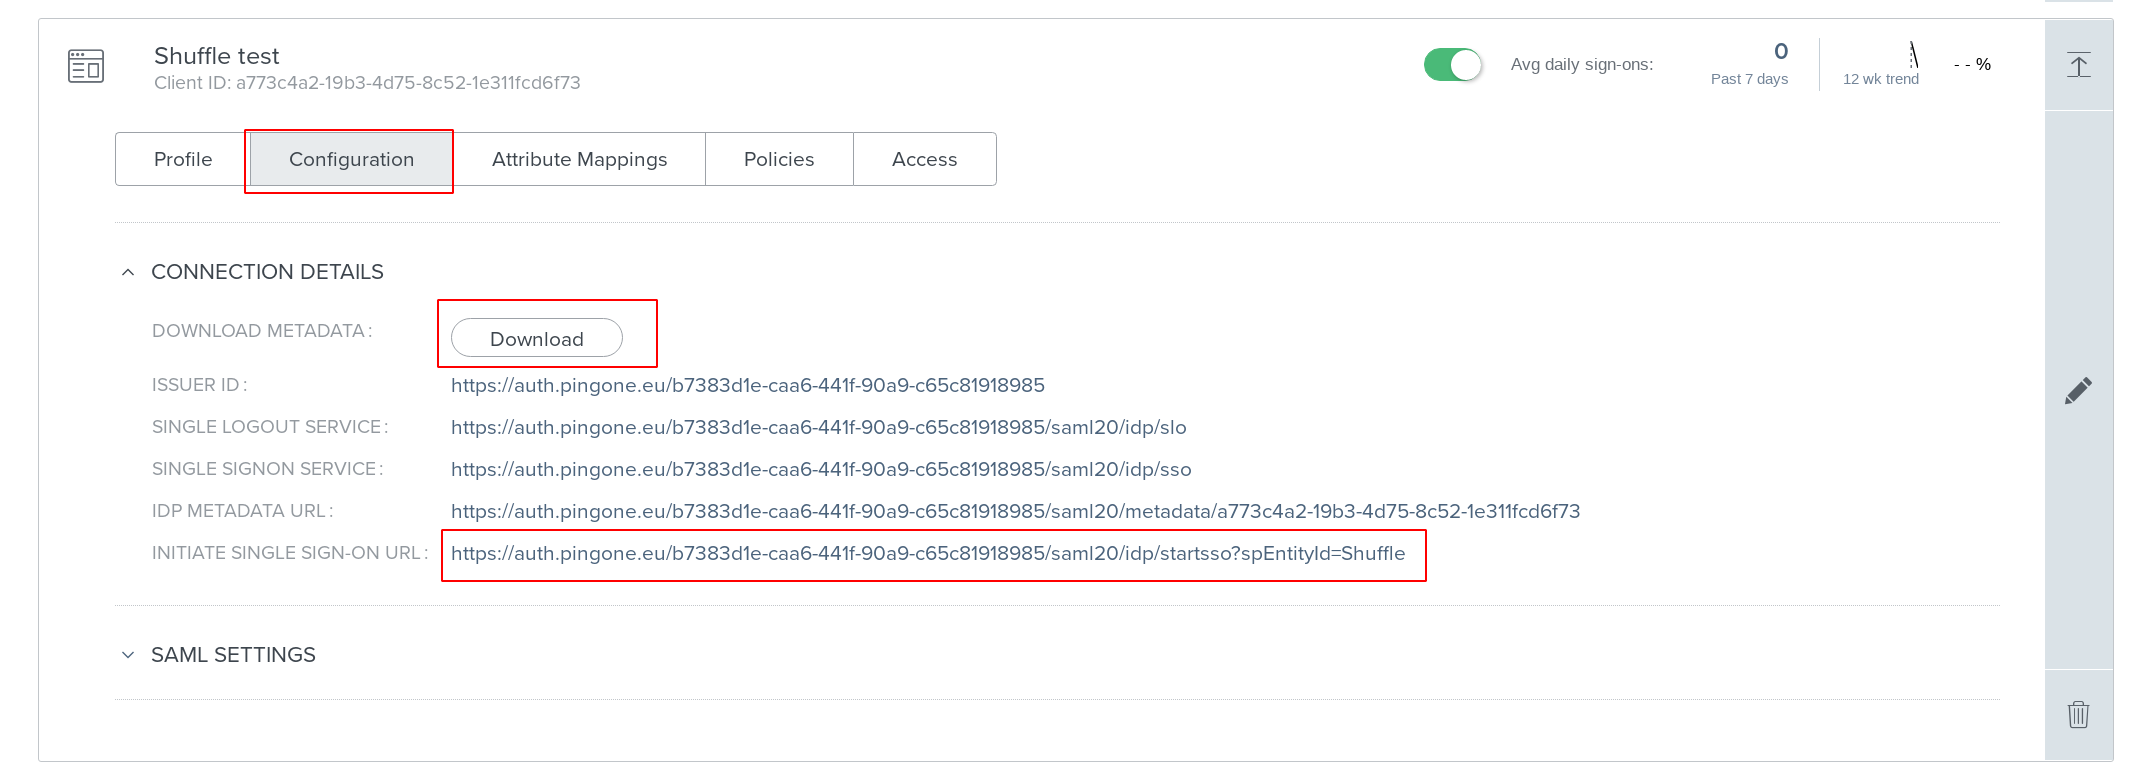
In the view above, move the data of these fields to Shuffle:
- INITIATE SINGLE SIGN-ON URL -> SSO Entrypoint (IdP)
- DOWNLOAD METADATA -> SSO Certificate (X509)
Open the Certificate file in a text editor, and copy it's contents in the field.
After adding them, click "Save", saving the configuration. After saving, log out of your user to verify the SSO configuration. If you don't see a button for "Use SSO", you most likely configured the wrong tenant.
Keycloak
Open ID SSO setup with Keycloak:
- Click on clients
- Create new client
- Set client id
- Ensure client protocol is openid-connect
- Hit save
You now have a client. Click on settings and configure them as follows
- Your client ID
- Set up a name
- Client Protocol set to openid-connect
- Access Type set to public
- Standard Flow Enabled toggled to ON
- Direct access grants toggled to ON

For the Valid Redirect URI https://shuffler.io/api/v1/login_openid
- Backchannel Logout URL https://shuffler.io/*
- Backchannel Logout Session toggled to ON
Under the Fine Grain OpenID Connect Configuration.
Valid Request URIs https://shuffler.io/login?autologin=true

Once this is done head over to your shuffle instance.
- Click on Admin button
- Scroll down and click on the downward facing arrow beneath tenant overview
- Scroll down again to OpenID connect
- Fill in the client ID (It should be the same as what you entered in Keycloak)
- Authorization URL http://<Your_Keycloak_URL>:/auth/realms/openid/protocol/openid-connect/auth
- Token URL http://<Your_Keycloak_URL>:/auth/realms/openid/protocol/openid-connect/token

If you keep getting redirected to your backend url, head on to your Shuffle folder on your server.
- Vim .env

- In vim change the BASE URL to your server link; i.e SSO_REDIRECT_URL=http://:

Finally go back to shuffle and use SSO button to login.

Assigning a Role from Keycloak to Shuffle for a New User
If you want to assign a Shuffle tenant role (admin, user, org-reader) from your Keycloak client, you can achieve this using the following method:
Steps to Assign Roles
-
In your Keycloak client, create three new roles with the names
shuffle-admin,shuffle-user, andshuffle-org-reader, as shown in the image below: -
After creating the roles, assign them to the users you want. The
shuffle-admin,shuffle-user, andshuffle-org-readerroles in Keycloak correspond to theadmin,user, andorg-readerroles in Shuffle. -
Once the roles are assigned to users, navigate to:
Client Scopes → Roles → Mapper → Client Roles
On the Client Roles page:
- Update the
Token Claim Nametoroles - Enable the option "Add to ID Token" so that the roles are included in the response.
- Update the
Important Notes:
- After completing these settings, if valide role is present in roles claim during sso login then that user will be assign role from sso provider. If no role is assigned, the default role will be
user. - You can achieve this behavior starting from Shuffle version 2.0.1 or later. Make sure you are using this version or a newer one
Azure AD
To use OpenID with Azure AD, Shuffle supports OpenID connect with the use of Client IDs and Client secrets. To set up OpenID Connect with Azure, we use "ID_token" authentication. This entails a few normal steps regarding app creation in Azure App Registration.
-
Set up an app in Azure AD with ID tokens enabled Go to app registrations and create a new app. Make it use "Web" for redirect URI's and direct it to your Shuffle instance at /api/v1/login_openid. From here, make sure to go to "authentication" and enable "ID Tokens"

-
Get the Client ID, Client Secret and your Tenant Start by generating a client secret. Keep it safe, as we'll use it later.

The client secret and tenant ID can be found in the "Overview" tab:

-
Go to the admin panel in Shuffle and put in the Client ID and Secret

-
Put in your Tenant ID in the authorization URL The URL is as such:
https://login.microsoftonline.com/TENANT_ID/oauth2/v2.0/authorize. The Token URL is not strictly required for ID Token auth.
-
In the "Token Configuration" tab on the left, click "Add Optional Claim." Select the token type as "ID" and choose "email" as the claim, then click "Add."
-
Done! Click save and log out. Try your new login based on your Azure AD configuration.
PS: When a user signs in, they are granted the access rights of a "user" within the designated tenant. The username will be derived from the email address listed in the Azure users list. Therefore, when creating or adding a new user in Azure, ensure that the email field in their profile is populated. If this email field is empty, the user will not be able to log in to the tenant.
Other Platforms
As long as you can create an identity and acquire an Entrypoint (IdP) and X509, paste them into the Shuffle fields, and it should work with any SAML/SSO provider.
Testing SSO
Testing Single Sign-On (SSO) ensures that your SSO setup is functioning correctly. When you click the "Test SSO" button, you will be redirected to your SSO authentication page. After authentication, you will be redirected to https://shuffler.io/workflows if you are using the cloud version, or https://frontend-url/workflows if you are using the on-premises version. There are two test cases to verify the SSO feature:
- User Change During Authentication: If you log into your Shuffle account with username "A" and authenticate with username "B", your user will change to "B". If user "B" does not exist in the tenant, they will be added. The video below demonstrates logging into Shuffle with "lalitdeore12@gmail.com" and authenticating with Azure username "lalitdeoretest@lalitdeore12gmail.onmicrosoft.com" (which has the email "lalit@shuffler.io"). After authentication, the user changes from "lalitdeore12@gmail.com" to "lalit@shuffler.io".
https://github.com/user-attachments/assets/8c3474a5-bfdd-4c68-bd59-0b7b1ddb2b0c
- User Remains the Same During Authentication: If you log into Shuffle with user "A" and authenticate with the same user "A", your user will not change. The video below shows logging into Shuffle with "lalitdeore12@gmail.com" and authenticating with the same user in Azure. After authentication, the user remains unchanged.
https://github.com/user-attachments/assets/0a927283-d39e-4200-8ba3-654ef6f1b9c1
Note: Ensure that the "email" field is included in the SSO response from your SSO provider. If this field is empty, you may encounter errors. The email from your SSO provider will be assigned as the username in Shuffle.
How to Assign a Role to a New User from an SSO Provider (OpenID Connect) in Shuffle
If you want to assign a role to a user from an SSO provider, you can do so using the following method:
-
Create three roles in your SSO application/client:
shuffle-adminshuffle-usershuffle-org-reader
-
Assign one of these roles to new users when granting them access to the application/client.
- The
shuffle-admin,shuffle-user, andshuffle-org-readerroles in your SSO provider correspond to theadmin,user, andorg-readerroles in Shuffle.
- The
-
Ensure that the
rolesclaim is included in the ID token response from your SSO provider.
- If none of the specified roles are assigned, or if the
rolesclaim is missing, the user will be assigned the default role:userin Shuffle.
Important Notes
- Currently, this feature is only available for OpenID Connect. Support for SAML SSO may be added in the future.
- After completing these settings, if valide role is present in roles claim during sso login then that user will be assign role from sso provider. If no role is assigned, the default role will be
userfor new users. - You can achieve this behavior starting from Shuffle version 2.0.1 or later. Make sure you are using this version or a newer one.
If you have any questions or need further assistance, please feel free to reach out to us at support@shuffler.io.
SSO Required for Tenant
In Shuffle, user can configure whether Single Sign-On (SSO) is required or optional for a tenant. By default, SSO is optional. However, when the "Require SSO" option is enabled from the SSO tab in the admin panel, all users within that tenant must log in through SSO. If SSO is required for an tenant and a user logs in using their username and password (not SSO), then switches to a non-SSO tenant, they can access it without SSO. However, if they later switch back to the SSO-required tenant and the session has changed or expired, they will be required to authenticate via SSO again.
Auto Provisioning
In Shuffle, users can configure whether auto-provisioning is enabled or disabled for a tenant. By default, auto-provisioning is enabled, meaning that if SSO is configured for the tenant, a new user account will be automatically created using the email address provided by the SSO provider—even if the user does not already exist in the tenant. However, when the "Disable Auto Provisioning" option is enabled from the SSO tab in the admin panel, new user accounts will not be created automatically. In this case, only users who already exist in the tenant will be allowed to log in through SSO.
Role-Based Restriction
In Shuffle, you can now assign roles to users directly from the SSO provider. This functionality is currently supported only for SSO providers using OpenID Connect. By default, if no valid role is passed from the SSO provider during login, the user is automatically assigned the user role. If you want to restrict login for users who do not receive a valid role from the SSO provider, you can enable the "Restrict user login if no valid role is assigned" option from the SSO tab in the admin panel. When this option is enabled, only users with a valid role received from the SSO provider will be allowed to log in.
Skip SSO for Admins in Subtenants
In Shuffle, you can now allow parent tenant admins to skip SSO login when switching to subtenants. By default, all users are required to authenticate via SSO when switching to a subtenant if SSO is required for that subtenant and the user's session has changed or expired. However, by enabling the "Skip SSO for Admin" option from the SSO tab in the admin panel, users with an admin role in the parent tenant can bypass the SSO login when switching to a subtenant, even if SSO is required there and user session is changed or expired.
CACAO
CACAO is a standardization framework for playbooks. It is still lacking significantly in capabilities as compared to Shuffle's own workflow system, but may be a good way to handle interoperability.
The goals are as follows:
- Ensure CACAO playbook imports work
- Ensure Shuffle Workflow -> CACAO playbook exports work well
Shuffle may in the future be based on CACAO playbooks to make workflow documentation work better.
Detection Manager
The Shuffle Detection Manager is a system introduced in beta in December 2024, allowing Shuffle to work with platforms like Tenzir and other systems to help with Detection Engineering. The goal of the system is not to replace actual detection systems themselves, but to offer a centralized way to control Detection rules across tenants and different tools. As an example, below is a focus on Sigma rules with Tenzir. The system is tested with Yara rules, Email detection rules and custom rule systems.
Testing Tenzir + Sigma
- Rule Manager: At least One Shuffle tenant
- Job Handler: An Orborus instance running
- Detection Handler: A Tenzir instance running on the same server as Orborus (no setup needed)
- Log Forwarder: Any system that can forward logs to Tenzir
To test the Tenzir detection system, it is first important to ensure that your Orborus instance is attached to Shuffle, which can be found on the /admin?tab=Locations path. Below is a BAD instance, where Orborus both says "Stopped" AND Pipelines is crossed out. The first goal is to re-enable these.
Fixing the pipeline setup
To solve the pipeline issue shown in the previous image, we have to do two things:
- Start Orborus and get it to the "Running" state. To do this, click the Location in question and copy the command to one of your servers. After this has been done, you should see a the Red "Stopped" part change to a Green "Running" box as in the image below. If this does not occur, reach out to support@shuffler.io.
- Go to /detections/Sigma in the UI, and click "Connect" in the top-right corner. Refresh the page after a minute or so, and the Pipeline system should be showing as green on the Location page and in the top-right corner of the Detection page. If it does not, please reach out to support@shuffler.io.
Tenzir setup configuration:
- Adding a custom storage folder for Sigma rules: Mount in the folder you want to control into the Orborus command. Then add the environment variable
SHUFFLE_STORAGE_FOLDER=/tmp/foldernameto Orborus. The default is/tmp/. - Connecting to an EXTERNAL Tenzir node: Add the following environment variables to the Orborus command:
SHUFFLE_PIPELINE_URL=http://<SERVER_IP>:5160. Change the<SERVER_IP>to your values (localhost does NOT work). This requires that the web API is enabled on the node.
Connecting to a remote Tenzir
If Tenzir is ran separately, follow these steps to set connect to it from Shuffle. The first step is to enable webserver mode. This is for systemd.
sudo nano /etc/systemd/system/tenzir-node.service- Find the line that says "ExecStart" and add
"--commands=web server --mode=dev --bind=0.0.0.0"to the end of it
It should look like this: ExecStart=/opt/tenzir/bin/tenzir-node "--commands=web server --mode=dev --bind=0.0.0.0"
- Save and close the file.
systemctl daemon-reload & systemctl restart tenzir-node- Try to connect to it:
curl -XPOST http://localhost:5160/api/v0/ping
- Control the Shuffle Tenzir node from Tenzir Cloud: Go to Tenzir Cloud and create a node configuration. Download the configuration file, then add the variables found in it to the following environment variables to Orborus:
TENZIR_PLUGINS__PLATFORM__API_KEY=<apikey>,TENZIR_PLUGINS__PLATFORM__CONTROL_ENDPOINT=<url>,TENZIR_PLUGINS__PLATFORM__TENANT_ID=<tenant>
Mounting the Tenzir Sigma location into Orborus
- You need to mount in the folder that is going to store the sigma rules, controlled from within Shuffle
- The default location is /tmp/sigma_rules, so to mount it in, use
--volume "/tmp:/tmp"in the Dockerfile. - If you end up changing the storage location, use the
SHUFFLE_STORAGE_FOLDERenvironment variable with the full path. - Test whether it works by going to /detections/Sigma, then switch the "Global Enable/Disable" off and on again. This makes the rules get downloaded onto your server.
- Verify if the files actually exist on the server. By default, you can find the rules in the
/tmp/sigma_rulesfolder (ls /tmp/sigma_rules). If the folder exists, then it worked.
PS: This folder is deleted if rules are globally disabled in the UI.
Running the Tenzir Detection pipeline
With detection rules in the /tmp/sigma_rules folder, you can now test the Sigma rules directly. To do this, there are two parts:
- Ingest some kind of logs. We suggest using Syslog, but almost data format you want is supported. You can enable this by going to the "Triggers" page in Shuffle: /admin?tab=triggers, then clicking
Deploy New Pipeline, and running theSyslog listenerpipeline.
It can take up to 60 seconds to deploy, and should look like this in the UI when ready to receive logs.
- Now that you got a way to receive logs, we can deploy the Sigma Rules pipeline. Follow the same process as in step #1, and ensure the "Webhook URL" part is filled in properly.
Running a sample Detection
To run a sample detection requires that the correct rules are in place in the /tmp/sigma_rules folder.
-
One of the test rules is called
notepad_test.yamland works as follows. This should already exist in your sigma_rules folder.
detection:
    selection:
        EventID: 4688
        NewProcessName: '*notepad.exe*'
        Context: Testing
    condition: selection
- This detection requires three events to match: EventID, NewProcessName & Context. To trigger this, you may run the following from any machine with connectivity to the Tenzir machine on port 1514.
printf '<165>1 2025-10-06T12:34:56.789Z myhost.example.com myapp 1234 ID47 [huh eventSource="App" EventID="4688" NewProcessName="notepad.exe"] This is a test log message' | nc IP 1514`
- Find your detection workflow here.
PS: If you can't see whether it is triggering in the workflow, run this locally to see if it is being ingested: tenzir 'export live=true'
- Detections are live! Feel free to add or change them on /detections/sigma.
Storing Tenzir logs in Opensearch
Since we are already ingesting logs using the import mechanism, it means we in theory can just route those logs forward.
Tenzir -> Opensearch documentation
Modify the following:
export live=true | to_opensearch "localhost:9200", action="create", index="shuffle_logs", user="admin", passwd="PASSWORD"`
Additional to_opensearch docs here.
-
Debugging
Running a pipeline manually. This example dumps database content (export) into the /tmp/events.ndjson file.
API Call
curl -X POST 'http://localhost:5160/api/v0/pipeline/launch' \
  -H 'Content-type: application/json' \
  -d '{
  "definition": "export | write_ndjson | save_file \"/tmp/events.ndjson\""
}'
Response
No response received.
Listing all pipelines
API Call
curl -X GET 'http://localhost:5160/api/v0/pipeline/list' \
  -H 'Content-Type: application/json'
Response
No response received.
Delete a pipeline
API Call
curl -X POST 'http://localhost:5160/api/v0/pipeline/delete' \
  -H 'Content-Type: application/json' \
  -d '{
  "id": "ID"
}'
Response
No response received.
Manually testing pipelines Tenzir:
Ensures pipelines act as they should, and you get a reasonable output
# 1. Make a sample csv file to import
echo -e "type1,type2\nline1.1,line1.2\nline2.1,line2.2\nline3.1,line3.2" > /tmp/test.log

# 2. Get into the Docker container (if applicable)
docker exec -u 0 -it tenzir-node bash

# 3. Import the sample log file. /tmp is mounted to /var/lib/tenzir by default.
tenzir 'load_file "/var/lib/tenzir/test.log" | read_csv | import'

# 4. Export it as a JSON file (sample)
tenzir 'export | to "/var/lib/tenzir/output.json"'

# 5. You should now have a file called 'output.json' on your host in the /tmp folder with the CSV data in JSON format.

## PPS: You can use tenzir `export` to see the data live as well (print database)
Network Tests
In case the exports aren't working and you need to figure out what is going wrong.
# 1. Set up a tcpdump listener on port TCP/1514. Ports <1024 need root, so this makes it easier to test.
sudo tcpdump -n tcp port 1514 -v

# 2. Start the syslog listener pipeline in Tenzir
tenzir 'from "tcp://0.0.0.0:1514" { read_syslog } | import'

# 3. Send logs to it manually
logger --tcp -n 192.168.86.67 -P 1514 "more logs for testing"

# 4. Check if the logs arrived
tenzir 'export'

# 5. Clear the database
tenzir ''
KMS
Shuffle by default allows you to store authentication tokens within Shuffle itself, which are encrypted in the database. Since February 2024, we additionally support the use of external KMS systems to handle authentication, which is based on Native Actions and Schemaless. Native Actions run in the background to perform the "Get KMS key" action, and the run of the app is NOT stored.
The Shuffle KMS system is built as a third party Key:Value provider. You can reference keys from the KMS in any field marked as "Authentication" in the UI, or from within a Shuffle authentication itself (meaning you can authenticate the authentication..). The way you reference the keys is path-based, starting with kms/. Requirements:
- Have an Authentication called kms shuffle storage in Shuffle. On the Auth page, it should clearly stand out as a different type of authentication.
- The Authentication needs to be associated with an App in the IAM category
- The App needs to have an action labeled as "Get KMS key"
- If it's the FIRST translation, it may fail out without internet access to github.com
When these requirements are fullfilled, you can do the following to use the KMS system:
-
Find the required parameters for the action. The first image below shows the parameters IN ORDER for Hashicorp Cloud Platform Vault.
-
Use the following format:
kms/field1/field2/field3/field4/.... This NEEDS to start withkms/ -
Make sure the Environment is correct. It uses your default environment to connect to the KMS if not otherwise specified on the Auth page.
-
Example referencing the "username" in the app name "Jira":
kms/998067a9-33f2-4c4d-bbb6-4a997d784def/2e9a877f-1a89-4394-a242-f2c6d9dd2420/jira/username
If all of this is fulfilled, you can run the workflow, and Shuffle will automatically reference the KMS correctly. If it fails to authenticate, you should see a Notification show up like in the following image.
Failure handling and Debugging
During the initial configuration of KMS, there are many things that CAN go wrong. After the setup is initially completed and it works, it should not fail again, meaning spending time to set it up properly the first time is well worth it.
If you are using Shuffle onprem and have trouble with KMS translations, we suggest setting the environment variable SHUFFLE_KMS_DEBUG=true on the shuffle-backend container. This will allow you to test individual keys in ANY field, meaning you can e.g. print out the KMS value that it should translate to. This further means we will not be deleting the KMS execution, and you can see the execution on the Workflow Runtime Debugger page.. KMS debug mode is NOT enabled on shuffler.io.
If your KMS translation fails, it is most likely due to network connectivity OR translation errors for the standard in use. After running a translation, you should see the following three file categories in the admin panel:
- translation standards - The available translation standards
- translation input - The data FROM the kms used for translation. Does NOT contain values, only keys.
- translation output - The translation OUTPUT. Includes JSON paths to the correct keys
IF your translation fails, the first area to look at is the "translation output" file category, as this is where the translation for the schema happens. The hash will match the data you have sent in, which can be found in the "translation input" folder. Documentation about schemaless explains how translations happen, and how they can be fixed. If you need further help, contact support@shuffler.io
A valid KMS translation file should be in the following format:
{
   "kms_value": "path.in.kms.json"
}
The "kms_key" field is NOT relevant - the ONLY thing that is important is that the kms_value path is correct.
Using any KMS
KMS is supported for any system as long as the sections above are covered. It has been tested for the following:
- Microsoft Azure KMS
- Hashicorp Vault
- Google Cloud Key Management
- AWS Key Management Service
- Hashicorp Cloud Platform
- Github
- AliCloud
- ... and more! Ask if you need help.
Inbound Webhooks
This section describes inbound webhooks to Shuffle, and how to set them up in many commonly used third-party systems. If your system support outbound Webhooks, it can also forward to Shuffle as a GET or POST request. More about webhook triggers
Wazuh
Wazuh is a SIEM platform for security operations. We've used it through their API multiple ways, but were missing an important component; alerting. That's why we've developed a simple alert forwarder from Wazuh to Shuffle.
PS: If you expect more than 10 alerts per second, you should add multiple workflows AND webhook forwarders to Wazuh
These are the steps to set it up:
- Create a Workflow which will receive alerts
- Add a Webhook to the Workflow
- Configure Wazuh with the Webhook URL
- Test the integration
1. Create a Workflow which will receive alerts This one is pretty easily explained. Go to Shuffle an make a new Workflow.
2. Add a Webhook to the workflow Add a webhook and find the Webhook URL. Remember to start the Webhook!
Copy the URL and keep it for the next steps
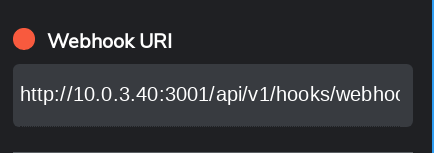
3. Configure Wazuh with the Webhook URL Start by logging into your Wazuh management console with access to edit the ossec.conf file. We'll first start by adding the Shuffle webhook forwarder.
- Transfer these integration files to the server. Ignore the file named "ossec.conf" for now.
- Move the custom-* files to the location /var/ossec/integrations
[root@wazuh]# pwd
/var/ossec/integrations
[root@wazuh]# ls -alh
total 76K
drwxr-x---.  2 root  ossec  187 Apr 25 04:34 .
drwxr-x---. 19 root  ossec  242 Dec 14 09:40 ..
-rwxr-x---   1 ossec ossec 1.1K Dec 20 04:50 custom-shuffle
-rwxr-x---   1 ossec ossec 4.5K Jan 19 09:32 custom-shuffle.py
-rwxr-x---.  1 root  ossec 4.3K Nov 30 08:41 pagerduty
-rwxr-x---.  1 root  ossec 1.1K Nov 30 08:42 slack
-rwxr-x---.  1 root  ossec 3.8K Nov 30 08:41 slack.py
-rwxr-x---.  1 root  ossec 1.1K Nov 30 08:42 virustotal
-rwxr-x---.  1 root  ossec 6.3K Nov 30 08:41 virustotal.py
- Change the files' ownership and access rights. This MAY be necessary if Wazuh doesn't have root privileges (it shouldn't)
$ chown root:ossec custom-shuffle
$ chown root:ossec custom-shuffle.py
$ chmod 750 custom-shuffle
$ chmod 750 custom-shuffle.py
- Configure ossec.conf to forward to Shuffle
Go to the location /var/ossec/etc/ossec.conf (or where the ossec.conf file is). Take the information below (including ) and paste it in. Find the webhook URL from earlier, copy it and add it to the <hook_url> section.
Find more fields like levels, groups and rule_id here.
	<integration>
		<name>custom-shuffle</name>
		<level>5</level>
		<hook_url>http://IP:PORT/api/v1/hooks/webhook_hookid</hook_url>
		<alert_format>json</alert_format>
	</integration>
- Restart ossec manager. Every time you change ossec.conf, you need to restart the ossec manager.
systemctl restart wazuh-manager.service
You should now start seeing data sent from Wazuh into Shuffle which can be used. If data is NOT sent, make sure of a few things:
- If https in the Shuffle URL: is the certificate of Shuffle signed? Default: no.
- Check /var/ossec/logs for logs: grep -R custom-shuffle
4. Test the integration There are many ways to test the integration, but you can simplify it by setting the "level" part of the configuration to a lower number (3~), as that would trigger it in a lot of cases, including when you SSH into the Wazuh manager. After an alert is supposed to have triggered, go to Shuffle, and you'll see something like the image below.

Running custom commands with Wazuh
Active response can be used with the command "Run Command" in the Wazuh app in Shuffle. This requires an Agent (Agent list) and Command (Active response command). Below, we will show how to set up the custom command "reboot".
- Wazuh API logs will be on the manager in: /var/ossec/logs/api.log
- Wazuh agent logs can be found in /var/ossec/logs
Testing custom active response from Shuffle: The goal with this section is to set up a bash script that can run custom commands from within Shuffle.
- Log into the Wazuh agent of choice (Linux), and add the following script to the active-response folder. Give it the name "shuffle.sh". Full path: /var/ossec/active-response/bin/shuffle.sh PS: Once done, make sure it's executable: chmod +x /var/ossec/active-response/bin/shuffle.sh
#!/bin/bash
# Extra arguments

# Installing jq
if ! command -v jq &> /dev/null
then
    echo "jq could not be found - installing"
    sudo apt install jq -y
    sudo yum install jq -y
fi


read -r INPUT_JSON
CMD=$(echo $INPUT_JSON | jq -r .parameters.alert.cmd)
CALLBACK=$(echo $INPUT_JSON | jq -r .parameters.alert.callback)
OUTPUT=$($CMD)
curl -XPOST $CALLBACK -d """$OUTPUT""" -k
- Open /var/ossec/etc/shared/ar.conf and ADD the following line to the bottom of the file:
shuffle - shuffle.sh - 0
- Restart the wazuh agent
/var/ossec/bin/wazuh-control restart
- Log into Shuffle and import this public workflow. Make sure to change the following:
- Activate the Wazuh app if it's not already
- Add a Wazuh username & password to the HTTP node
- Add the Wazuh URL to the HTTP node, as well as Get_agents and other Wazuh nodes.
- Make sure the last block after "Get_agents" runs the command "shuffle" with the "Agent list" containing your specific agent's ID.
The default from this workflow is that it will reboot the server.
TheHive
TheHive is a case management platform for and by security professionals. One of their key capabilities is webhooks, which can send realtime updates to a third party system whenever ANYTHING is changed within TheHive (e.g. a new alert or a case task is written). Shuffle has an ideal way of handling this, outlined in this blogpost (TheHive4).
PS: There is a difference between TheHive3 and TheHive 4 on how to set this up. We are referring to TheHive4 in this section.
- Create a Workflow in Shuffle
- Add a Webhook to the Workflow
- Configure TheHive with the Webhook URL
- Test the integration
1. Create a Workflow in Shuffle This one is pretty easily explained. Go to Shuffle an make a new Workflow.
2. Add a Webhook to the workflow Add a webhook and find the Webhook URL. Remember to start the Webhook!
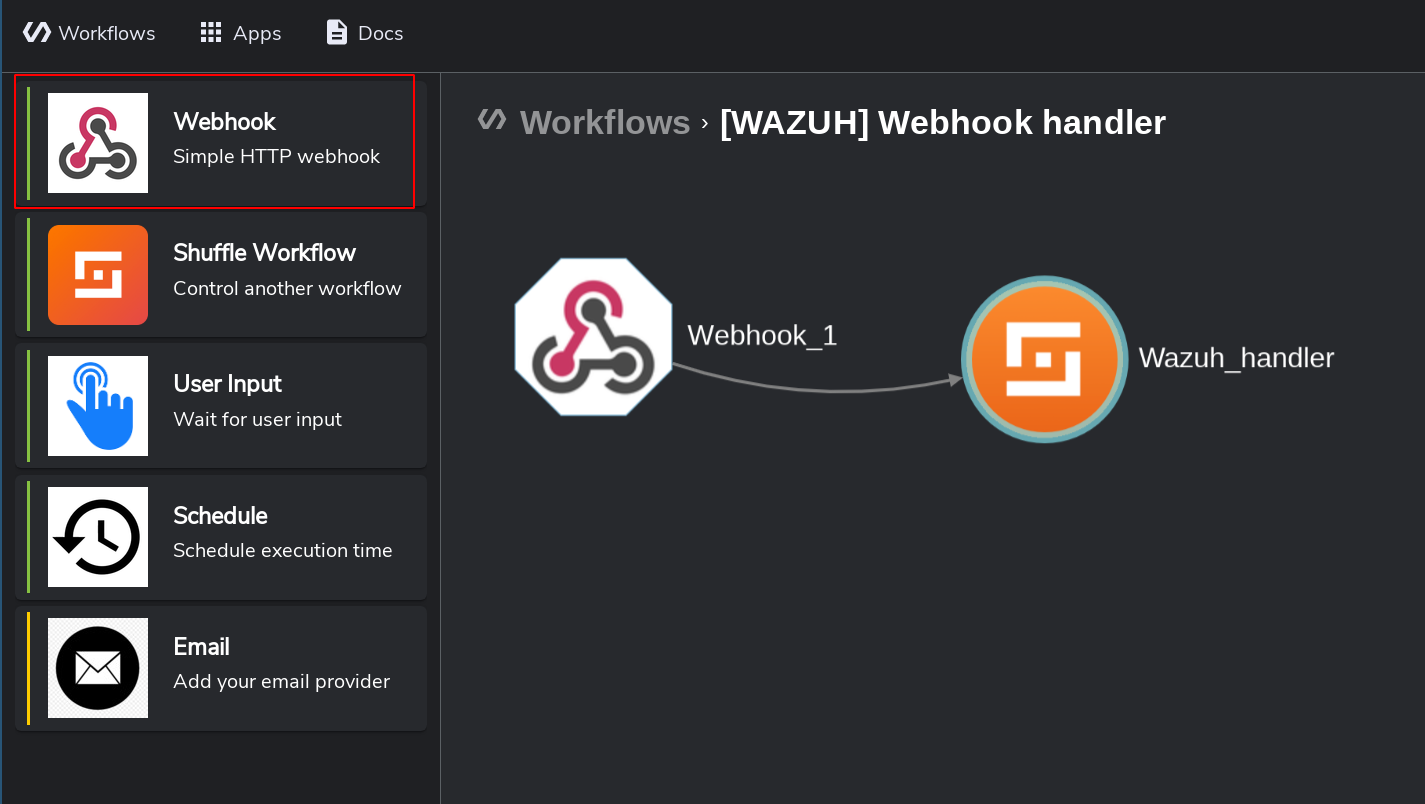
Copy the URL and keep it for the next steps
3. Configure TheHive with the Webhook URL Configuring TheHive is the only unique step here, and is different between versions. Full documentation about TheHive4 webhooks can be found here.
As can be seen in the documentation, there are three steps to setting up TheHive webhooks:
- Define the webhook forwarder:
Find the application.conf file and scroll to the webhook section. If it doesn't exist, add the following:
notification.webhook.endpoints = [
  {
    name: Shuffle
    url: "http://IP:PORT/api/v1/hooks/webhook_hookid"
    version: 0
    wsConfig: {}
    includedTheHiveOrganisations: ["*"]
    excludedTheHiveOrganisations: []
  }
]
Modify it to have the URL you found making the webhook in Shuffle. You can also use https by adding certificate references to wsConfig{}
- Restart TheHive
systemctl restart THeHive
- Activate the webhook Run this curl command (change the URL, username and password), which activates TheHive forwarding to Shuffle. PS: Make sure you have access to the tenant you want the Webhook for
API Call
curl -X POST 'https://uk.shuffle.security/api/v1' \
  -H 'Content-type: application/json' \
  -d '{
  "value": [
    {
      "delegate": false,
      "trigger": {
        "name": "AnyEvent"
      },
      "notifier": {
        "name": "webhook",
        "endpoint": "Shuffle"
      }
    }
  ]
}'
Response
No response received.
4. Test the integration In TheHive UI (NOT CLI), create a new case, or add a comment to an existing case. This will then be seen within Shuffle. After the webhook is supposed to have triggered, go to Shuffle, and you'll see something like the image below.
Logzio
1. Create a Workflow which will receive alerts This one is pretty easily explained. Go to Shuffle an make a new Workflow.
2. Add a Webhook to the workflow Add a webhook and find the Webhook URL. Remember to start the Webhook!
Copy the URL and keep it for the next steps
3. Configure Logz.io forwarding After logging into app.logz.io, navigate to Settings > Notifications Endpoint. This will make all rules send alerts to the assigned webhook target.
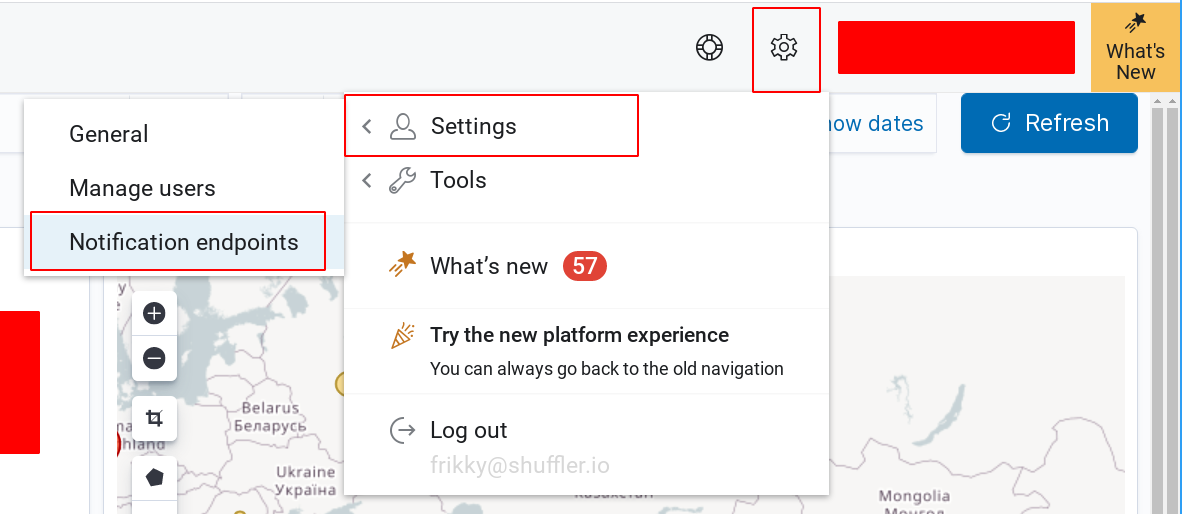
Once in the notification endpoint view, click "Add Endpoint". Configure the following elements:
- Type: Custom
- Name: Shuffle (or some other identifier)
- URL: The Webhook URL from step 2
- Method: POST
- Data (should be autofilled):
{
    "alert_title": "{{alert_title}}",
    "alert_description": "{{alert_description}}",
    "alert_severity": "{{alert_severity}}",
    "alert_event_samples": "{{alert_samples}}"
}
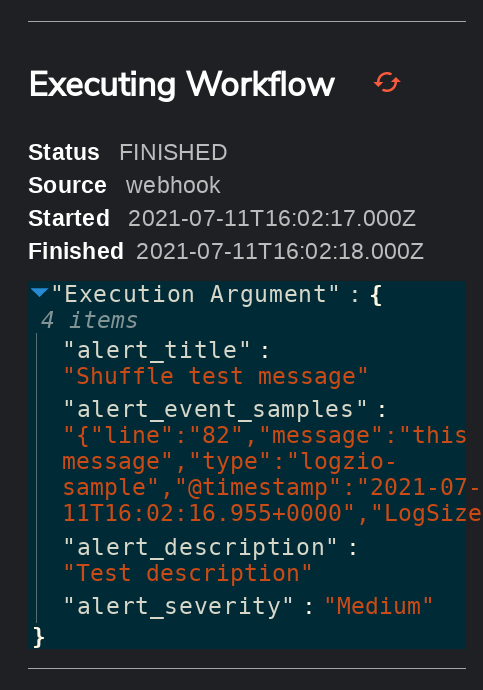
Custom data will be parsed into the field "alert_event_samples"
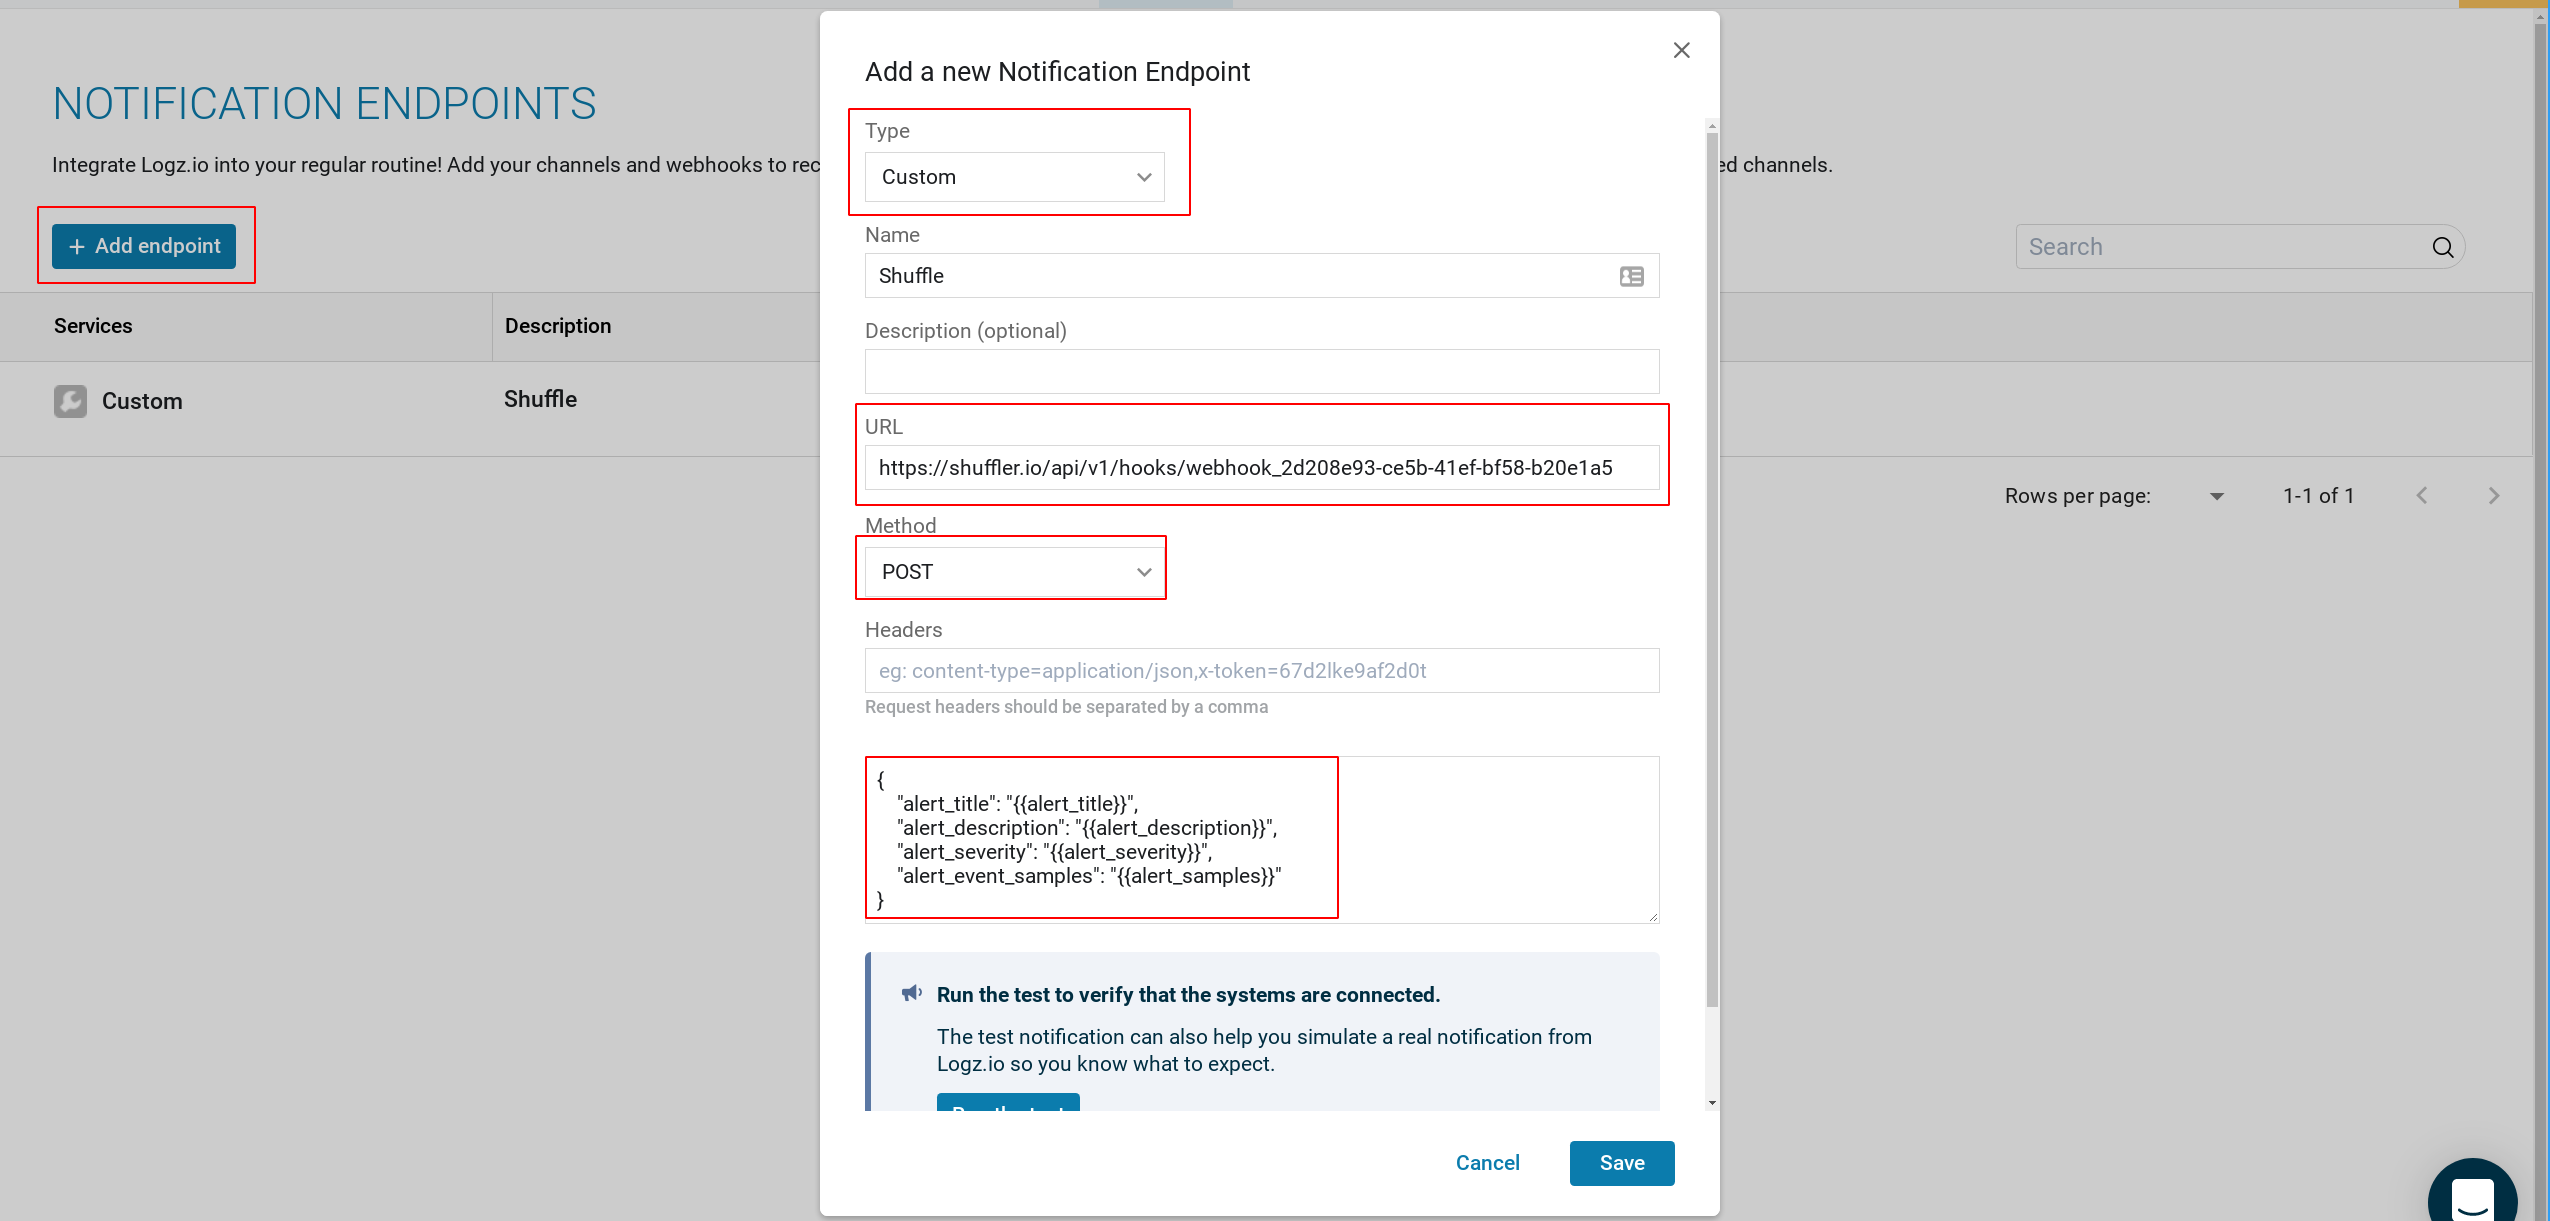
4. Test the integration Click "Run the test" at the bottom before saving. This allows for it to send a sample payload to Shuffle.
If the data payload is configured as in step 3, the custom data will be available as such:
$exec.alert_event_samples
MISP
MISP, short for Malware Information Sharing Platform, is one of the best Open Source alternatives for Threat Intelligence. For that reason, a lot of our users have wanted a way to handle data in realtime from MISP. What kind of data? Event updates, indicator updates, IDS flag edits, tenant edit etc.
That's why we released an extension for Shuffle which can read ZMQ messages from MISP in realtime and send them to a webhook.
Steps to set it up:
- Enable ZMQ in MISP by going to Server Settings -> Plugins in MISP. Make sure to enable the options for forwarding Events and Attributes.
- Install pyzmq and redis on the MISP server:
pip3 install pyzmq redis
- Go to Shuffle and create a new Webhook
- Install Docker and docker-compose on a host with access to ZMQ (localhost:50000 by default). This can be on the MISP server, but at scale, it preferably shouldn't be.
- Copy the docker-compose found here and edit the environment variables to point to your ZMQ instance (PS: Don't use localhost, even if it's on the MISP server)
version: '3'
services:
  zmq:
    image: ghcr.io/frikky/shuffle-zmq:latest
    container_name: shuffle-zmq
    hostname: shuffle-zmq
    environment:
      - ZMQ_HOSTNAME=10.1.2.3
      - ZMQ_PORT=9000
      - ZMQ_FORWARD_URL=<WEBHOOK_URL>
    restart: unless-stopped
- Run the docker-compose!
docker-compose up -d
- Test it by going to your MISP instance and changing an event or attribute
AWS S3 forwarder
Ever wanted to run an action as soon as something is uploaded to your S3 Bucket? Maybe you just want to build an S3 honeypot? If so, this part is for you. Herein we describe how you can get information about files being uploaded or changed from an S3 bucket into Shuffle.
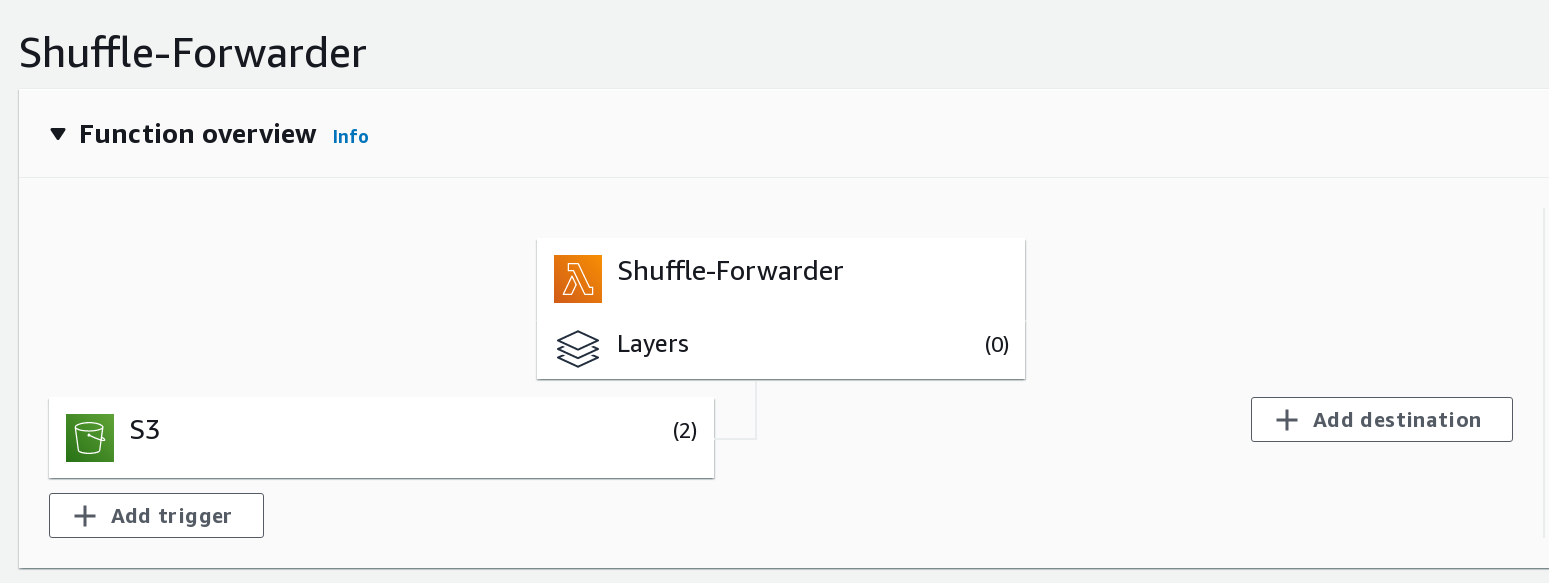
Basic overview: User -> Upload to S3 -> S3 triggers Lambda function -> Lambda function triggers Webhook -> File is downloaded from within Shuffle
Steps to set it up:
- Create a Workflow with Webhook inside Shuffle
- Create a Lambda function that triggers on S3 changes
- Configure the workflow to download the file
- Optional: Scan file with Yara
1. Create a Workflow which will receive alerts This one is pretty easily explained. Go to Shuffle an make a new Workflow. Add a webhook and find the Webhook URL. Remember to start the Webhook!
Copy the URL and keep it for the next steps
2. Create the lambda function
-
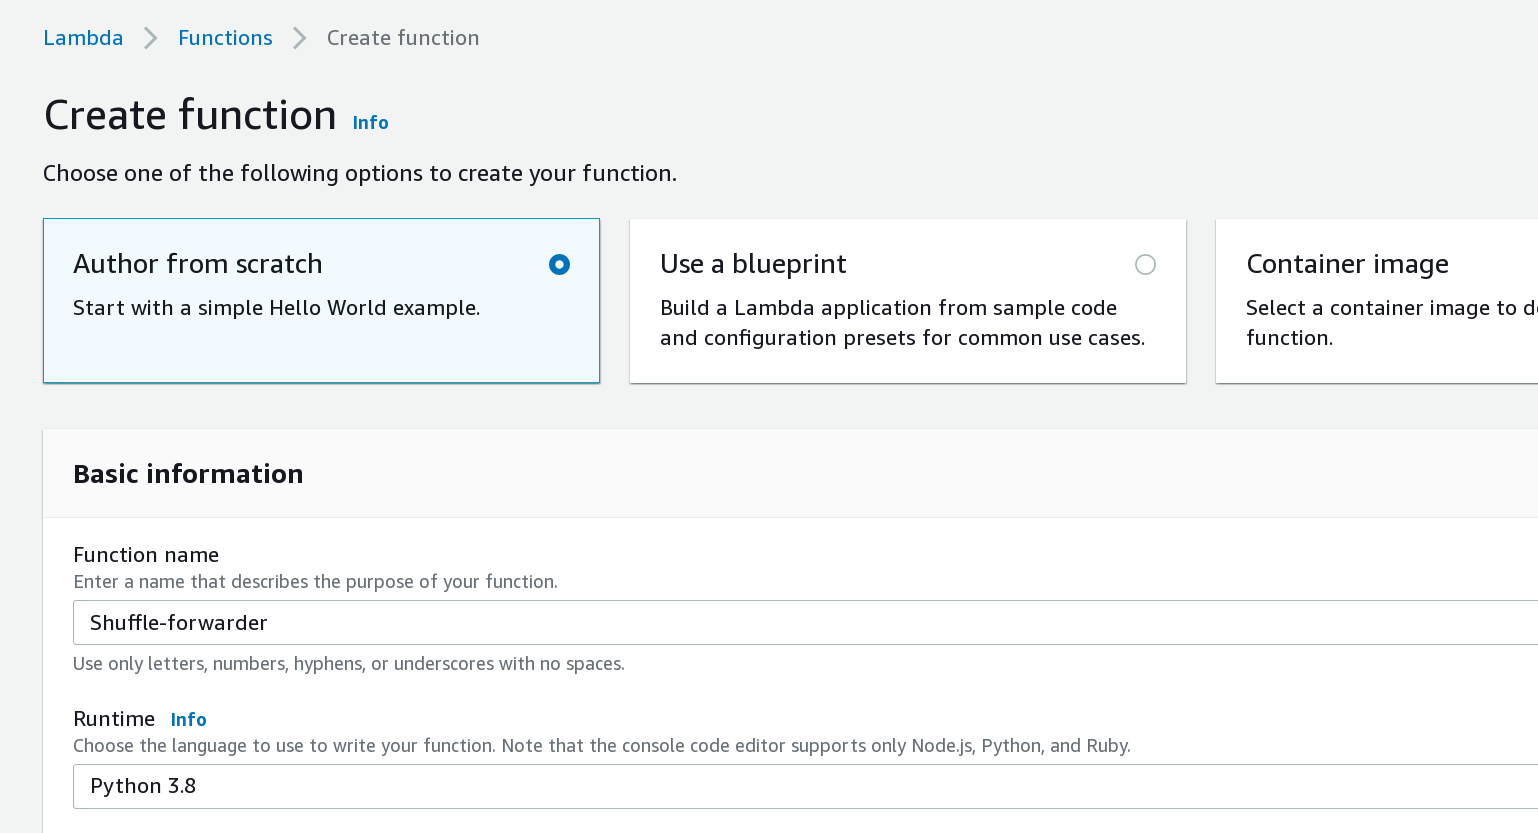
After logging into your AWS, go to Lambda functions and click "Create function" in the top right corner.
-
Use "Author from scratch", and type in a name like "Shuffle-forwarding" and make sure to choose Runtime as Python 3.8. Click "Create function" in the bottom right corner.
-
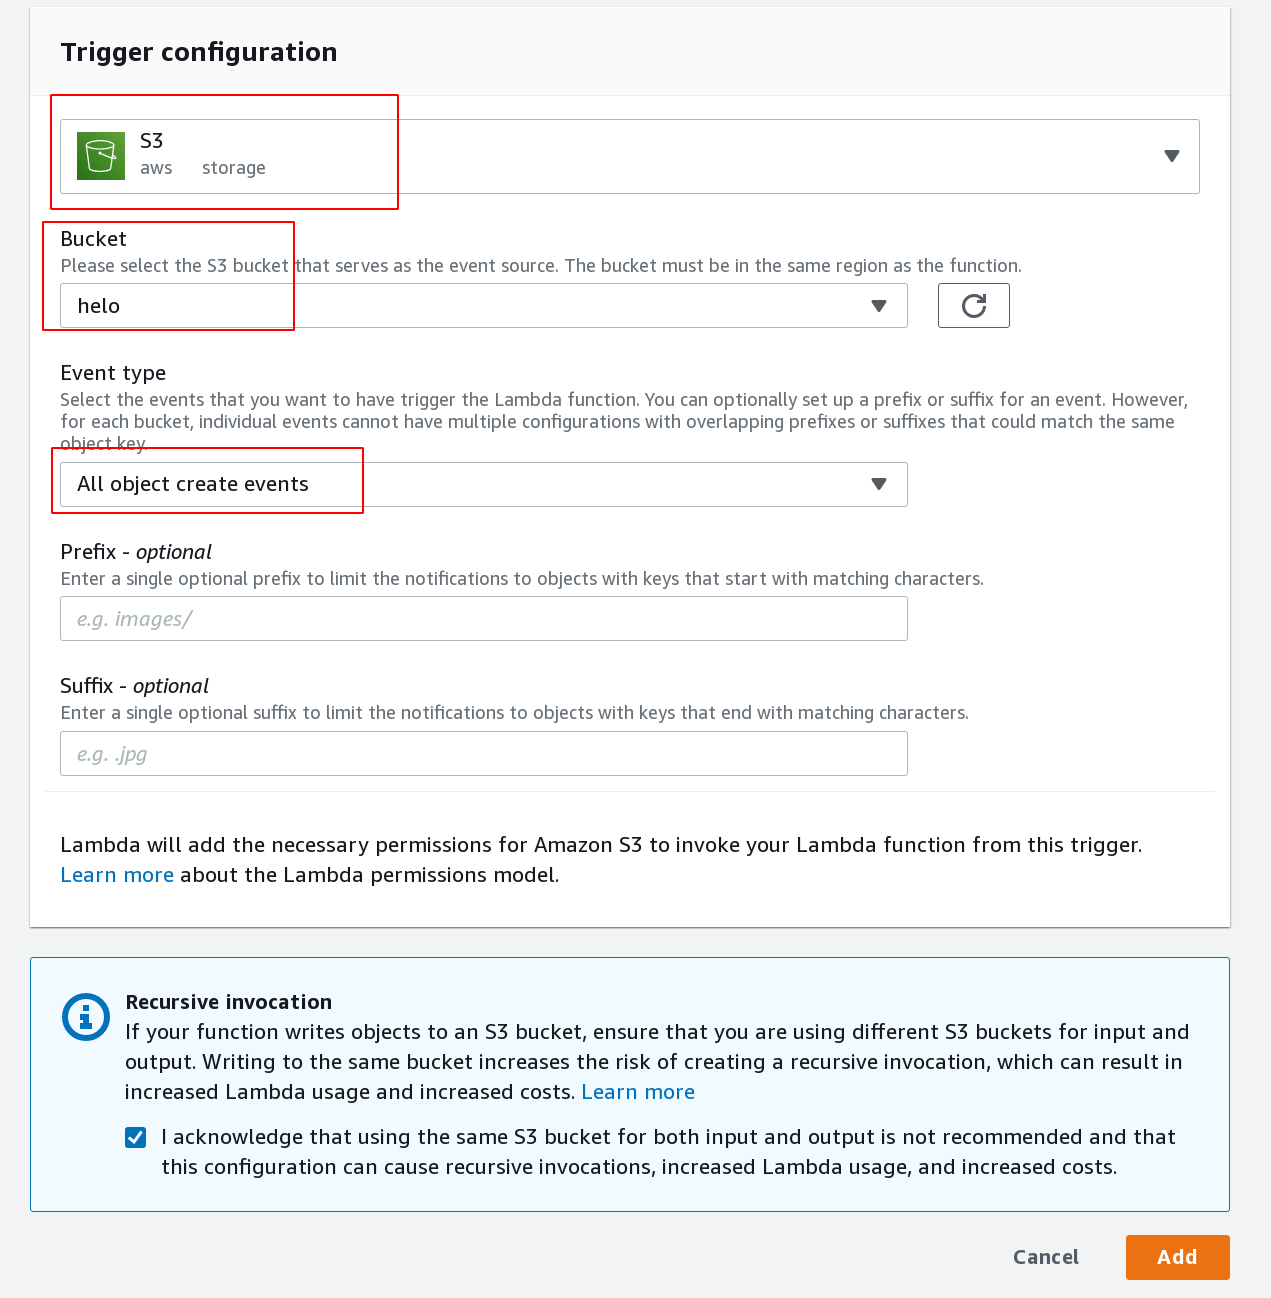
Click "Add trigger" in the window, left of the function. In the next menu find "S3", before choosing the bucket you want and the "Event type". Click "Add trigger" PS: The bucket and cloud function have to be in the same location
-
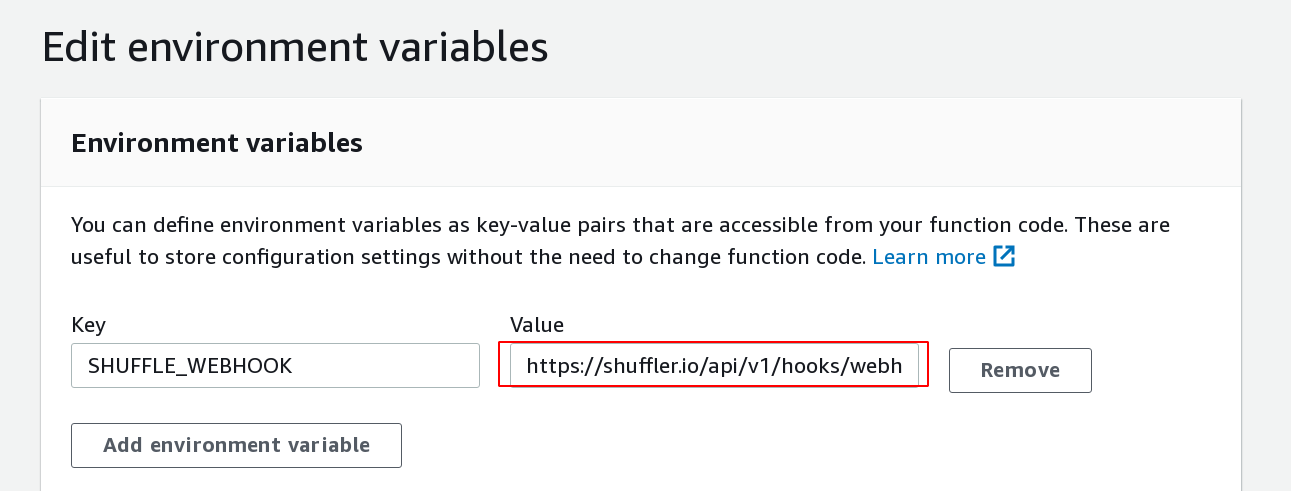
Under Configuration > Environment variables, click "Edit". Add variable with key "SHUFFLE_WEBHOOK", and the value from step 1. Click "Save".
-
Time to add some code. Go to the "code" tab and paste in the code below. Click "deploy". This should now forward the request to Shuffle.
import json
import urllib.parse
import requests
import os

def lambda_handler(event, context):
    # Get the object from the event and show its content type
    #bucket = event['Records'][0]['s3']['bucket']['name']

    webhook = os.environ.get("SHUFFLE_WEBHOOK")
    if not webhook:
        return "No webhook environment defined: SHUFFLE_WEBHOOK"

    ret = requests.post(webhook, json=event["Records"][0])
    if ret.status_code != 200:
        return "Bad status code for webhook: %d" % ret.status_code

    print("Status code: %d\nData: %s" % (ret.status_code, ret.text))
3. Configure and test the workflow
To test the previous step, we have to upload a file to the chosen S3 bucket. If everything is connected correctly, this will trigger an event to come into Shuffle. If it doesn't, have a look at the Lambda function's logs, or contact us.
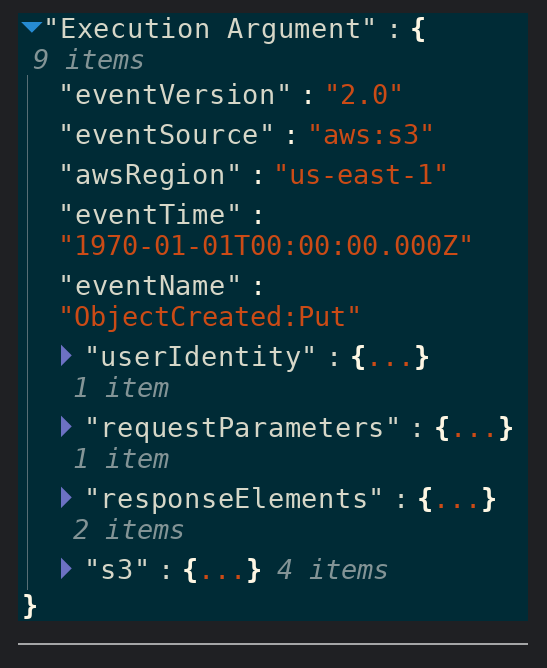
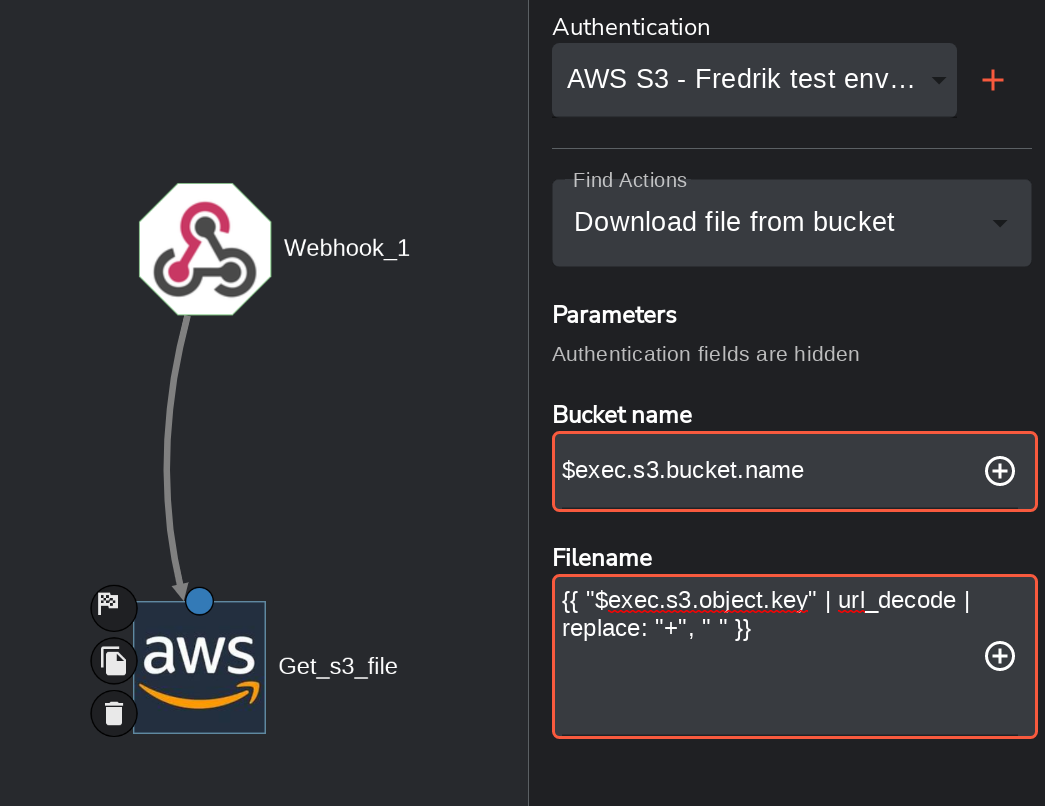
Now all we need is to do is actually download the file. This requires access rights to the bucket itself from the API in use. The app we use for this is the "AWS S3" app, with the action "Download file from bucket". See the next image for how to configure this action after authenticating it. (We may add file uploads to webhooks in the future).
And that's it! All file updates should now come into Shuffle, including a way to download the file.
4. Extra: Scan the file with Yara
In a lot of cases you would want to analyze the files somehow. But how..? Shuffle has a built in way to run Yara on files, and get results based on built-in rules (or your own). Most of the time, you would also want a response to that search, hence we've created a way to also delete the file if it matches too many Yara rules.

To do this, add in the "Yara" node with the action "Analyze file", and put "$get_s3_file.file_id" in the "File Id" field. This should match the file downloaded from the bucket.
After this, add another S3 node, and choose the action "Delete file from bucket" with these parameters:
- Bucket Name: $exec.s3.bucket.name
- Bucket Path: {{ "$exec.s3.object.key" | url_decode | replace: "+", " " }}
Last but not least, we need a way to see IF the file should be deleted. This can be done by clicking the branch between Yara and the S3 delete action > "New Condition" > with the following data:
{{ $run_yara.matches | size }} > 3

Done! Whenever a file is downloaded, it will be analyzed by Yara, checking matches, then removing the file if it's more than 3.
QRadar
QRadar send offense webhook to Shuffle.
STEP 1: Add the Script to QRadar & Config
Bash Code:
#!/bin/bash
# Version 1.0.0

shuffle_url=$1
api_token=$2
offense_id=${3%.*}

auth_header="SAuthorization:$api_token"

output=$(curl --insecure -H $auth_header $shuffle_url -d "$(cat <<EOF
{
        "offense_id": $offense_id
}
EOF
)")
What you should do to use it:
- Log In to QRadar;
- Go to Admin > Custom Actions > Define Actions;
- Click Add;
- Fill the Basic Information (name & description);
- In the Script Configuration set bash as interpreter, and import the bash script attached to this message; 6.** For the Script Parameters, add the parameters in the following order:**
1. [Fixed Property] **shuffle_url** - As value insert the Shuffle Webhook URI, for example https://shuffle.local/api/v1/hooks/webhook_15acc....
2. [Fixed Property] **authorization** - Insert the Required headers (**SAuthorization**), for example in Shuffle webhook if you set **SAuthorization=s873hn872n_s298ns2-98ns2ns** in the Required headers you authorization value will be "s873hn872n_s298ns2-98ns2ns". *If you change the token name, don't forget to change it in the bash code too*.
3. [Network Event Property] **offense_id** - Insert **offense_id** as value
- Save
- Deploy Changes


STEP 2: Create new offense alert rule
- Go to Offenses > Rules;
- Click Actions > New Event Rule:
    Rule Description
      Apply Shuffle new offense alert on events which are detected by the Local system
and when the event QID is one of the following (28250369) Offense Created

    Rule Responses
      Execute Custom Action QRadar to Shuffle  (previous added script)

This Rule will be: Enabled
QRadar Overview
- Easy, this way each time a new offense dispatches in QRadar it will send a webhook to Shuffle containing the offense_id, then the webhook node will receive this info and pass it to the next node (QRadar App) that will perform a get offense
dataaction using the received offense id as key.
This way you won't need to execute an api call every x time and save the last offense id. This is a better solution and improves the SLA, coz if you set 1 minute as you x time, you may have 1 minute delay or less, besides you are getting all "ungotten" offenses at once, when you can use shuffle to handle with multiple at the same time if it happen to dispatch more than one offense in QRadar at the same time or with just some seconds of difference.
FortiSIEM
FortiSiEM is the SIEM of Fortigate. It has the possibility of notifying Shuffle through a webhook when a rule triggers, which is exatly what this documentation section is for. The main caveat: all data is XML and needs to be transformed with the Shuffle Tools "XML to JSON" formatter.
1. Create a Workflow which will receive alerts This one is pretty easily explained. Go to Shuffle an make a new Workflow.
2. Add a Webhook to the workflow Add a webhook and get the Webhook URL. Remember to start the Webhook!
Copy the URL and keep it for the next steps
3. Configure FortiSIEM forwarding Log into the UI. When inside, go to ADMIN > Settings > Incident Notification. In the "Incident HTTP Notification", paste in the webhook from the previous step. Click "save", then "Test". After the test, check the workflow in Shuffle whether it triggered. If it didn't, your FortiSIEM can't access the Shuffle instance.

With the Notification Endpoint specified in the previous step, we need to decide what rules to add. By default, we add all of them. To do this, go to ADMIN > Settings > Notification Policy, and add a new policy. In here, select the "Send XML file over HTTP(S) to the destination set in...". This will make sure all alerts are sent to Shuffle.

That's it! It's now time to wait for an alert to actually trigger. When it has, make sure to send Execution Argument from the webhook ($exec) straight into an XML to JSON parser. That way you can use it easily in Shuffle.
Splunk SIEM
Splunk is a SIEM tool for security operations. There are multiple ways to forward the Splunk alerts to external systems. Simplest way to forward splunk alerts to Shuffle is with using webhook.
Step 1: First we'll have to create a Shuffle workflow which will recieve alerts from Splunk. Go to /workflows in Shuffle and create a new worfklow. Then, inside workflow editor drag in the webhook from the trigger section in left pane.

Step 2: Click on the webhook node and then click on start. Copy the webhook url.

Now that we have webhook running in the Shuffle, Go to your Splunk deployment server and log in.
Step 3: Now we'll have to configure Splunk with the webhook URL. Once logged in, go to the search and reporting app and type in the query you want to create an alert for.

Step 4: Save the search query as an alert.

Step 5: Fill out all the form details for saving as an alert. At the very bottom of thr form in Trigger action section click on Add actions select Webhook.

Step 6: Paste in the webhook URL in URL field and click Save.

You should now start seeing data sent from Splunk into Shuffle which can be used inside workflow for further actions.
Eventlog Analyzer
Note: API integration is unfortunately not supported with EventLog Analyzer. However, If you would like to forward logs from EventLog Analyzer to Shuffle. For more information please follow this guide
ServicePilot SIEM
ServicePilot is a high-performance analytics platform that supports observability and full-stack monitoring: metrics, traces and logs. You can collect data from many services and sources across your entire IT stack (ITIM, NPM, APM, DEM, SIEM) as well as view details of historical data stored by ServicePilot. Webhook integration service is not provided by the ServicePilot platform. Here am gonna mentioned the steps for how to use ServicePilot app workflow.
- What this workflow do?
This workflow is help to get all the alerts, objects, events and logs. In this workflow there are two nodes of ServicePilot app. one is for getting all the records from the ServicePilot SIEM app and another one is searching for alerts, objects, events and logs for specific entry. As a result this workflow first excecute the Get_All_Data node and after that it excecute the Get_Specific_Record node and at the last return the result.
- How the seaching happens?
For searching records from the ServicePilot app we need to write SQL query to search the data. we need to write query as a query parameter in the request url.
- Steps to create a workflow
Step 1: First we'll have to create a Shuffle workflow which will search for events, objects, alerts, and logs from ServicePilot. Go to /workflows in Shuffle and create a new worfklow. Then, inside workflow editor drag in the node for the ServicePilot.

Step 2: Click on the ServicePilot node.

Step 3: Change the name of the node as Get_All_Data.

Step 4: Write Query for searching all the datas from the ServicePilot.

Step 5: Inside workflow editor drag in the another node for the ServicePilot and connect it with the existing node.

Step 6: Change the name of the node as Get_Specific_Record.

Step 7: Write Query for searching specific record from the ServicePilot.

Finally, Click the excecution button and you should now start seeing data sent from ServicePilot into Shuffle which can be used inside workflow for further actions.
ELK/Elastic
Intergrating Elastic with Shuffle will first require you to set up a webhook in Elastic. Below are the steps you will need to follow to ensure your alerts are forwaded into Shuffle immediately.
- Create a new workflow in Shuffle, bottom left on your screen head to the triggers tab and drag in the webhook into your workflow. Click on it and ensure that the webhook is started. Copy the provided webhook URI and head over to Elastic.
-
Follow Elastic's documentation on setting up the webhook here.
- When setting up the webhook in Elastic you will have to provide a url to send the info to. Provide the Shuffle webhook URI you copied in step 1 above
- You do not need to provide authentication in Elastic while setting up, but just incase you do, remember to do the same in your webhook in Shuffle
-
To finish setting up your connector in Elastic you will be required to provide the body of the webhook connector, we will need to provide a JSON body for the connector. Copy and paste the below in the connector body
{"raw": {{context.alerts}}} -
Go ahead and test your connector and then check your workflow executions in Shuffle if you have an incoming execution.
Cortex
TBD: Responder executions